The audio mixer provides you a visual representation of each and every active sound currently available. In addition, the interface gives you the ability to control, tweak, maintain each and every sound source and groups currently active for all loaded scenes.
It is designed for sound and audio artists to be as easy to use as possible while giving maximum controls at editing time by allowing you to create presets and snapshots that can be either triggered manually or at runtime using scripts.
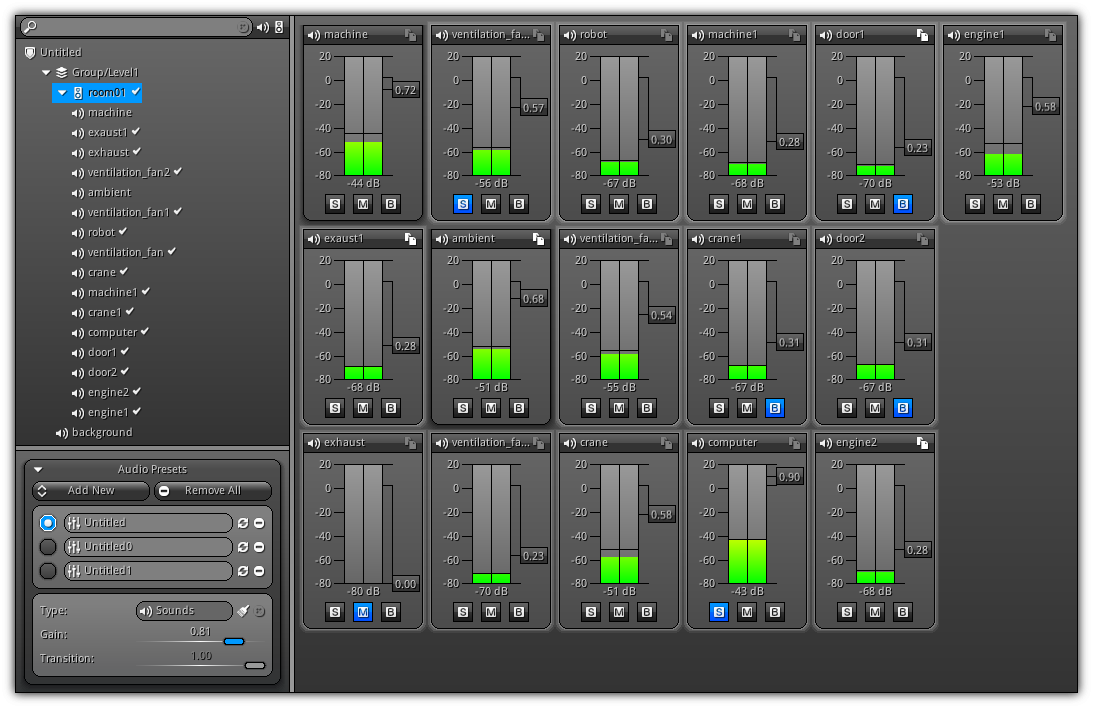
The upper left section of the audio mixer interface contains a treeview categorized by scene, sound groups and standalone sources. Each level of the tree can be activated and expanded to reveal it's the full content either locally or on the right side in the mixer area.
The lower left area of the editor is strictly reserved for audio presets. The type of preset can be specified and can affect sounds, effects or sounds and effects. Audio snapshots are created using the current sound/group selection and can either be ducked or interpolated depending on the data available.
Edit
| Item | Shortcut | Action |
|---|---|---|
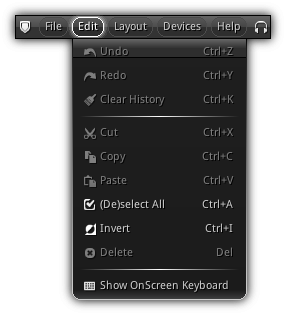
| (De)select All | Ctrl+A | If all deselected; select all audio box from the mixer area. If all selected; deselect them all. |
| Invert | Ctrl+I | Invert the audio box selection from the mixer area (does not affect the snapshot copy flag of the audiobox). |
Menu

| Item | Shortcut | Action |
|---|---|---|
| Show/Hide Sidebar | P | Toggle the left sidebar of the audio mixer On or Off. |
Action

Change the behavior of the left mouse button (single tap/drag for mobile devices) between selection mode (marquee) and pan mode.
| Icon | Mode | Shortcut | Description |
|---|---|---|---|

| Selection | Use this mode to single or multi-select audio entries from the audio mixer area defining the active audio treeview selection. For simple selection simply click on one of the audio box to mark it; for rectangular selection click on an empty area of the list then drag to create a rectangle; release to select. Use Shift to invert the current state of the active selection. 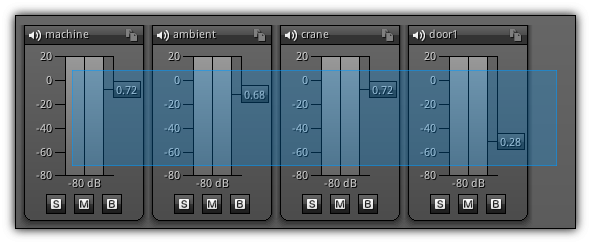 | |

| Pan | Alt+Left Button | Pan the current audio boxes list of the audio mixer area. |
Sidebar
Located on the left side of the editor the sidebar contains two distinct areas. At the top is located the Audio Treeview and at the bottom the Audio Presets.
Audio Treeview
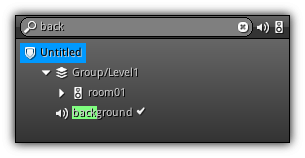
The top bar allows you to quickly search a substring to hide elements that are not relevant to the search term from the tree. The audio treeview; located below the top bar is a 2d representation of all sound sources and sound groups present in the currently active scene. Standalone sound sources and sound groups are represented as a single tree item.
Selecting/expanding an existing sound group will reveal all sources it contains. When creating audio presets you first need to select sources and/or groups; you can visualize what has been marked for snapshot identified by the ![]() icon located on the right side of the entry.
icon located on the right side of the entry.
In addition, when restoring an audio preset the snapshot selection will be restored automatically. You can keep track of the full selection by expanding the branch of the treeview looking for the check mark on the right hand of the tree item.
Search

To start searching a common term within the name of sound sources and sound groups simply start typing it in the search box. All relevant elements from the treeview will be highlighted. To clear your search term hit the ![]() icon. So as to exclude either sound sources and/or sound groups from the treeview result you can toggle the sound source (
icon. So as to exclude either sound sources and/or sound groups from the treeview result you can toggle the sound source ( ![]() ) icon or the sound group (
) icon or the sound group ( ![]() ) icon.
) icon.
Audio Presets
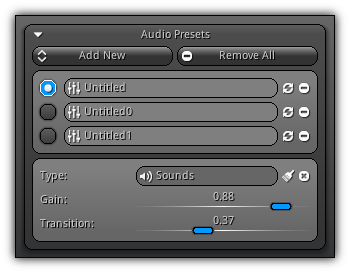
Add New: Create new audio preset using the active audio box selection (in case the type of preset you select is not exclusively for effects). To set the type of preset you want to create simply select it from the drop-down list that will appear when the button is clicked. Sounds, Effects or Sounds & Effects based range of inputs you want to snapshot.
Remove All: Clear all existing audio presets associated with the active scene.
Entry

To restore the settings recorded by an existing preset simply select it from the list of entry by tapping the radio button associated with it. You can change its unique name within the scene audio preset by editing the text box and press enter to confirm.
To remove an existing entry simply click the remove icon ( ![]() ); note that this action in undoable.
); note that this action in undoable.
Update

To update the selected preset click the ![]() icon. To add or update the edge to/of your preset; in other words another set of values to interpolate to from the base settings hold the
icon. To add or update the edge to/of your preset; in other words another set of values to interpolate to from the base settings hold the Shift button while pressing the icon.
This way you will gain access to the Transition parameter allowing setting the percentage from the base values to the edge value that you would like to transition to.
Updating an audio preset or adding an edge to it is not undoable. However, in the case of an edge; you can clear it (see section below).
- Note
- When adding an edge to your preset only audio entry marked for snapshot and tagged as duplicated (
 ) will be used for interpolating the transition.
 Effectscannot be tagged; the transition will only work if the same effect is located on both the base snapshot and its edge; same for filters (direct and auxiliary); all slots need to have the same entry to be interpolated.
Settings
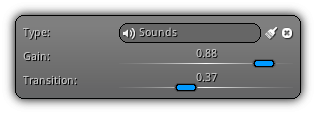
Type: The current type used by the active audio preset.
Gain: The master gain to apply on all entry contained within the audio preset. As a result the volume (gain) of each entry will be either boosted on attenuated using their original settings saved within the snapshot.
Transition: Only available when an edge has been recorded within the audio preset; the transition parameter allows you to control the level of interpolation between the base snapshot and the edge snapshot. To remove the edge contained inside an audio preset simply click the ![]() icon.
icon.
As you are building your scene adding and removing sound sources, merging sound groups etc... it is quite common that some sources (or groups) saved within an audio preset are no longer available. To keep things clean and ensure that removed entries are no longer part of your preset(s) click the ![]() icon.
icon.
Mixer Area
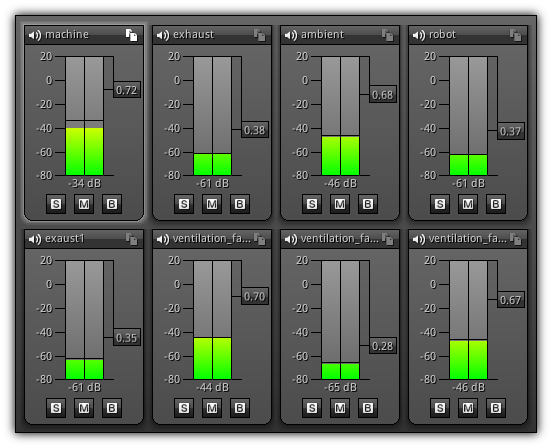
The mixer area is where you can visualize exactly what your audio output is processing. All sounds are represented as an audio box that gives you real-time feedback on the amount of decibel the sound is emitting (while playing). This area is also used as your drawing board to create audio presets and snapshots.
To select an audio box either use the marquee selection or simply click on it. Notice that at the top right corner of the box the is an icon that can be toggled. This icon determines if the full settings of the sound source will be included within the base snapshot; this will then allow you to create add an edge which can then be used for interpolation.
Dragging the gain slider allows you to increase or decrease the volume of the source; in case of a sound group, all the sources contained within this group will be affected. An additional option can also be specified on a group or source basis. Refer to the table below for more information.
| Icon | Option | Description |
|---|---|---|

| Solo | Override any gain settings applied and crank up the volume to 100%. |

| Mute | Override any gain settings applied and set the volume to 0%. |

| Bypass | Override all gain settings and use the current value assigned to the source or group. Ideal when the volume of a sound or group is dynamically set using either a script or a curve. |
Virtual Sounds
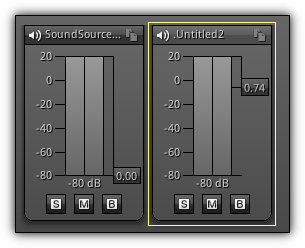
Virtual sound(s) (highlighted in yellow in the screenshot above) should not be confused with regular sound sources. They appear in the mixer area as slightly grayer than the regular audio blocks and their name always starts with by a . to indicate they are virtual. Just like an audio block, they can be selected; and their state and properties can be tweaked at runtime.
- Warning
- Virtual sound sources cannot be saved/restored by an existing audio preset.
They are created in the background by sequences (see Sequence Editor) audio strip and only stay "alive" during it's playback.
|
|
