
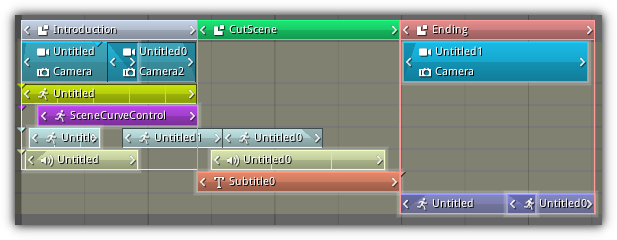
The Sequence Editor aka. Sequencer; is a non-linear action editor that allows you to create gameplay and cinematic cutscenes. Using the sequencer you can construct with ease complex animation sequences in minutes.
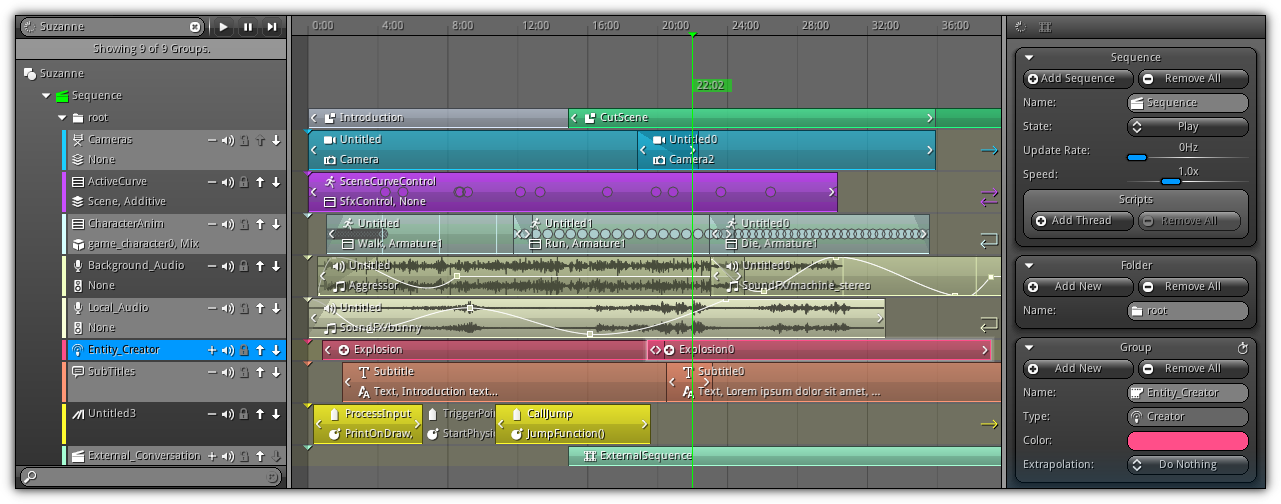
The editor is basically separated into three main sections. On the left a treeview is there to help you to organize the sequences, folders and groups of the animation currently selected. The center area is dedicated to strips manipulation and it is the section you will mostly be working with. Located on the right side you can find the various properties available for each type of structures that you will be handled within the editor.
Edit
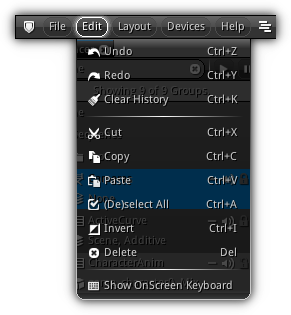
| Item | Shortcut | Action |
|---|---|---|
| Cut | Ctrl+X | Remove the active strips' selection and store the reconstruction script into the clipboard. Strips can then be pasted to other group (from the same or other sequence) with the same name and type as the original. If no strip group match is found within the active sequence a new group will be created. |
| Copy | Ctrl+C | Generate the reconstruction script for the active strip selection and store it in the clipboard. |
| Paste | Ctrl+V | Paste an existing sequencer script contained in the clipboard to the strip folder currently selected. |
| (De)select All | Ctrl+A | Select/deselect all strips from the sequence area. |
| Invert | Ctrl+I | Invert the active strip selection. |
| Delete | Del | Delete the active element(s) selected. Within the sequence area strips will be removed. If the active focus is on an element of the treeview, this selection will be removed. Take note that all deletion are undoable. |
- Note
- Selection operations are restricted to the active sequence (selected) and apply only to the strip groups that are currently available (strip folder expanded).
Menu

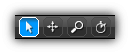
Menu: Popup the associated menu allowing you to control the view, the selection and to accelerate strips manipulations.
Action: The default action of the Left Button (or single touche). Setting the action will control if you are selecting, panning, zooming or moving the time scrubber.
Options: Optional that can modify the behaviors of the transformation action. Each options can be turned on or off independently.
Scope: Determine to either display the sequences associated with a specific object (or scene) manually or automatically (using the current object selection, or by default the scene if no object is selected).
Info: Display the current grid offset location as well as the active zoom factor on the X-axis.
View
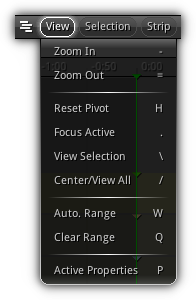
| Item | Shortcut | Action |
|---|---|---|
| Zoom In | - | Increase the zoom factor. |
| Zoom Out | = | Decrease the zoom factor. |
| Reset Pivot | H | Reset back the strip area view to zero, including the zoom factor. |
| Focus Active | . | Adjust the position and zoom factor of the strip area to focus on the active strip. |
| View Selection | \ | Calibrate the zoom factor and offset position to encapsulate all selected strips. |
| Center/View All | / | View all strips the active sequence contains that are currently visible (strip folder expanded). |
| Auto. Range | W | Adjust the Timeline Editor start and end time defining the active sequence strips time range. |
| Clear Range | Q | Reset the timeline start and end time back to zero. |
| Active Properties | P | Show/hide the right side properties panel. |
Selection
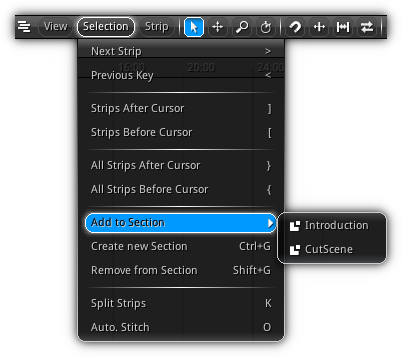
| Item | Shortcut | Action |
|---|---|---|
| Next Strip | > | Change the active selection the next chronological strip. |
| Previous | < | Move the active selection to the previous chronological strip. |
| Strip After Cursor | ] | Select all visible strips of the active strip group if their start time is greater than the scrubber position. |
| Strip Before Cursor | ] | Select all visible strips of the active strip group if their start time is lower than the scrubber position. |
| All Strip After Cursor | } | Select all visible strips of the active sequence if their start time is greater than the scrubber position. |
| All Strips Before Cursor | } | Select all visible strips of the active sequence if their start time is lower than the scrubber position. |
| Add to Section | Associate the current strip selection to an existing section. | |
| Create new Section | Ctrl+G | Use the active strip selection to create a new section. |
| Remove from Section | Shift+G | Remove the associated section to all strips currently selected. |
| Split Strips | K | Cut a strip in two at the time scrubber location. 
|
| Auto. Stitch | O | Using the active strip selection; fill the blank time space between the previous and the next strip contained in the active strip group. 
|
Strip
| Item | Shortcut | Action |
|---|---|---|
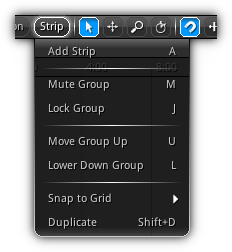
| Add Strip | A | Append a strip to the active strip group at the time scrubber location. |
| Mute Group | M | Mute the active strip group preventing it from playing. |
| Lock Group | J | Prevent any modifications to be made for the active strip group (does not affect playback). Once locked strips that belongs to the strip groups cannot be selected or transformed. |
| Move Group Up | Increase the active group priority. | |
| Lower Down Group | Decreate the active group priority. | |
| Snap to Grid | Snap the current strip selection based on a predefined method. | |
| Duplicate | Shift+D | Duplicate the active strip selection. |
Snap to Grid
| Item | Shortcut | Action |
|---|---|---|
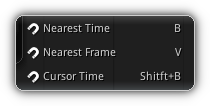
| Nearest time | B | Snap the current strip selection to the nearest time on the grid. |
| Nearest Frame | V | Snap the selection to the closest key frame value using the frame per second value set in the Timeline Editor. |
| Cursor Time | Shift+B | Snap the active selection to the current time scrubber value. |
Action
Defines the default action of the left button.
| Icon | Mode | Shortcut | Description |
|---|---|---|---|

| Selection | Use this mode to single or multi-select strips from all strip groups currently visible. Hold the Left Button and drag to create a marquee selection; release to confirm; use Shift to include or exclude strips from the selection. | |

| Pan | Shift+Alt+Left Button | When pan mode is enabled click and drag the time grid using your left button. This action will cause the strip area grid to scroll defined by your pointing device direction. |

| Zoom | Ctrl+Alt+Left Button | Zoom in on the time axis determined by the direction of your pointing device direction by dragging while holding the Left Button. |

| Scrubber | Alt | Control the time scrubber. |
- Note
- Marquee selection have an alternate mode that can also be used to control the start and end time of the timeline editor. Begin by creating a rectangular selection and hold the
Ctrlkey before releasing your pointing device.
Options
| Icon | Mode | Shortcut | Description |
|---|---|---|---|

| Snap | S | Prevent strips to overlap each other while manipulation their location or start/end time. 
|

| Extend | E | As the name imply this mode extend the boundaries of the start and end time to fit the ones of its neighbor strips. 
|

| Adjust | F | Using this mode keep the time offset between neighbor strips while moving the active strip selection. 
|

| Shift | T | Move all strips that are forward in time starting from the active selection. Since shifting is used often you, can press 
|
Scope

Choose to display the sequences associated with the active object (on), or to manually select an animation from the available resources currently loaded (off).
Treeview
Always visible on the left side of the editor is the animation sequence treeview. The treeview display the current hierarchy of all the sequences contained within the active animation.
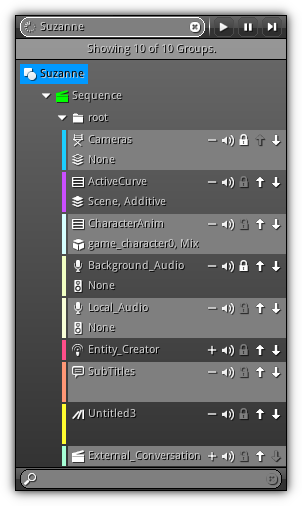
The treeview section is divided into three horizontal sections; at the top a toolbar allows you to quickly switch between existing animations available within the active scene. The center area displays the selected animation sequences architecture in a tree-like fashion where sequences, strip folders can be opened to expand the editing range of the editor (displaying more strip groups). At the bottom a quick search box allow you to restrict the editing range of the editor so you can operate on a more restraint working set using a keyword.
Toolbar

The quick box located on the left allows you to retarget the sequence editor to another existing animation. Press the ![]() icon to populate the list of all available animations contained within the active scene; press an entry to select. Alternatively, you can manually enter a name to select one. To clear the active animation selection or to select the active scene animation sequences press the
icon to populate the list of all available animations contained within the active scene; press an entry to select. Alternatively, you can manually enter a name to select one. To clear the active animation selection or to select the active scene animation sequences press the ![]() button.
button.
- Remarks
- The quick box is only enabled when the
Scopemode is set to target local animation sequences. When theScopeis set to auto., the animation sequences of the active object selection (if any) or the scene (if no object is active) will be displayed.
On the right side playback buttons controlling the Timeline Editor are there for a question of convenience to play, pause or stop the active sequence(s) playback.
Entry
The treeview hierarchy represented consists of four distinct type of element.
- The root animation currently being edited.
- The sequence(s) that the animation contains.
- For each sequence, folders are used to contain strip groups (4).
- Strip group(s); the actual container where strips are appended. In addition, strip groups have set options and functionalities that that can be toggled for each of them.
| Icon | Description |
|---|---|
| | Expand or collapse the strip group. Expanding a strip group will reveal extra information about settings and/or resource(s) that linked to it. |
| Mute the strip group; this allow you to visualize the sequence playback without a specific strip group running. | |
| Prevent the strip group to be edited; strips properties can still be manually tweak using the Properties. But all strips it contains cannot be selected or manipulated within the Strip Area. | |
| | Increase or decrease the priority of the strip group within the hierarchy. |
Within the treeview, all names can be modified straight from the tree (at the exception of the root) by pressing enter on the entry. Sequences, strip folders, and strip groups can also be swapped by using a drag and drop operation on top. When an entry is selected within the treeview, you can then press the Del key to remove it. On a side note, all removal operations are undoable.
- Note
- To invert the selected state and propagate the result to all other channel hold the
Shiftkey. To batch set the current state to all channels contained in the current action change a state holdingAlt+Shift. Alternatively, when selecting a channel hold theShiftkey to activate it and hide all other curves; subsequent selection will show the curves for the active channel.
Quick Search
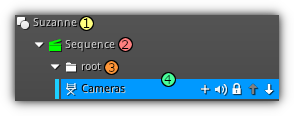
Located at the bottom of the treeview the quick search box allows you to highlight entries using a specific keyword. To restrict the available working set simply type a (sub)string. Therefore, all entries containing a match will be highlighted instead the entries will become invisible, allowing you to operate on a specific set of strip folder(s) and strip group(s).
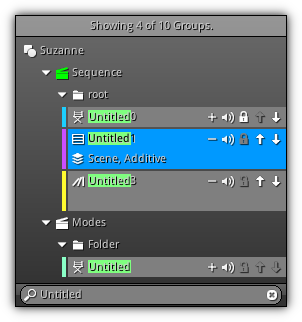
Strip Area
Located at the center of the sequence editor the Strip Area is where most of your time will be spent. It is in this section you will place all your strip which in turn will form your animation sequence. The grid represents the linear timeline of the sequence where each row is reserved to a strip group that contains strips of the same type.
Strip
Selection and manipulation controls like the one found in other editors are also available. Refer to the table below to learn how to use the default keys and button associated with these operations.
| Shortcut | Description |
|---|---|
Left Button | Select/deselect a specific strip; hold Shift to append to the active selection. Press Ctrl to shift all subsequent strips from the same strip group while performing transform operations. |
Left Button 2x | Double click to add new strip at the pointing device location. |
Ctrl+Left Button | Select all strips associated to the current strip group selected. |
Ctrl+Left Button 2x | Double click to add new strip at the pointing device location and move the scrubber at this location. |
Del | Delete the current strip selection. |
Backspace | Clear all strips for each strip group part of the active selection. |
Resize Strip
To quickly resize the timing of a strip simply click the time arrows located on the left and the right and drag them to the desired time location on the grid. Remember the start and end position of the strip can also be manually changed inside the Strip properties section.

Manual Blending
For strips of the type Director, Audio and Activity blending options are available. Blending in/out dictate how the strip will fade in and fade out and can be set inside the Strip properties; however, another mechanism is available to you within the strip area by clicking the upper left or upper right part of the strip.

Trim Audio
Trimming audio strips can also be done straight from the strip area. All you have to do is to press Ctrl while dragging the strip time arrows to either increase the start or end offset of the sound buffer stream.

Activity Scaling
Similar to audio trimming you can change the scale of an activity strip by pressing the time arrows and drag while holding Ctrl.

Properties
The right side section of the sequencer is dedicated to properties display; for a question of convenience, it is divided into two distinct tabs. The first tab ( ![]() ) display the active animation sequence properties; which consists of the sequence, strip folder, strip group, and strip section properties. The second one; associated with the
) display the active animation sequence properties; which consists of the sequence, strip folder, strip group, and strip section properties. The second one; associated with the ![]() displays the active strip properties. Depending on the active strip selection the properties displayed will be adjusted automatically.
displays the active strip properties. Depending on the active strip selection the properties displayed will be adjusted automatically.
Sequence
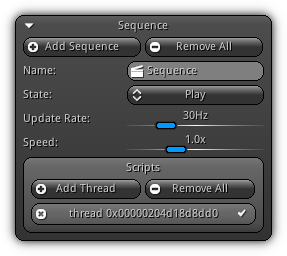
Sequences are gameplay or a cinematic cut scene that can be played once or multiple times during runtime. It consists of a series of strip folders that contains dedicated strip groups. For each strip, group strips can be inserted at specific playback time and will be executed each time the playback time is over the time range they occupy.
Add Sequence: Append a new sequence to the active animation.
Remove All: Clear all sequence(s) contained within the selected animation.
Name: The name of the active sequence.
State: The active playback state for the sequence.
Update: Represent the number of times (per second) the sequence will be updated. A value of 0hz will force the sequence to be updated every frame.
Speed: How fast the sequence should playback; the speed value will be used as the delta time multiplier.
Scripts
Manage the scripts connected to the active sequence. For more information please refer to the Scripts help section. Scripts connected to a sequence will respond to the following callbacks:
| Callback | Description |
|---|---|
OnPlay() | The sequence starts playing. |
OnPause() | The current sequence have been paused. |
OnStop() | The current sequence stop evaluating and its playback time return to 0. |
OnResume() | The action was on hold (paused) and the play function have been called again. |
OnUpdate() | The current action is done updating and processing values for each strip. |
Strip Folder
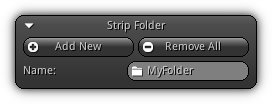
For a question of convenience and clarity the sequence system force you to place all strip groups into folders. This allows you to restrict the active strip group working set you are dealing with within the Strip Area; making it easier to work with sequences that contains a large amount of strips.
Add New: Add a new strip folder to the active sequence.
Remove All: Clear all folders the sequence contains.
Name: The name of the active folder selected within the Treeview; to change it simply input a new name and confirm it with Enter.
Strip Group

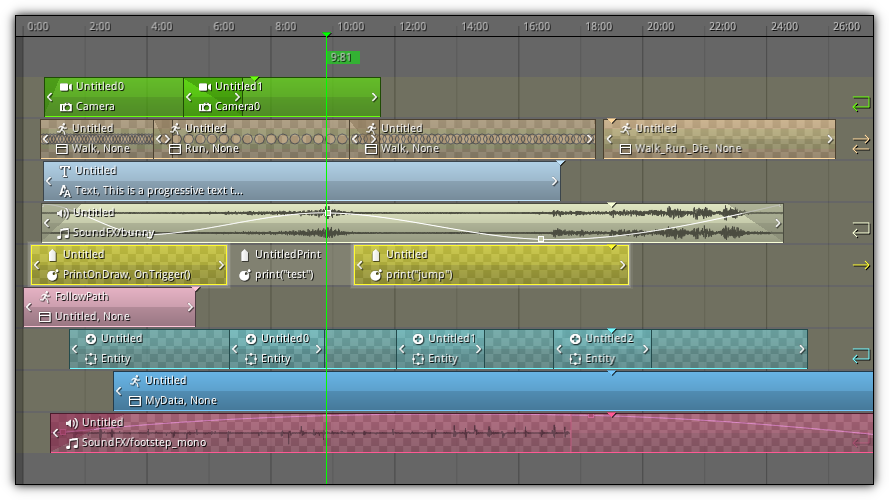
Strip Groups are where a specific type of strip is stored. The system provides you with a range a strip type that allows you to create any type of cutscenes and to control the various elements of the sequence happening during playback. Located at the top right of the slot box the ![]() icon allow you to manually sort by start time all strips contained in the active group. Note that strip sorting should be handled automatically by the system but in the case of manual user scripts, it might be necessary to manually keep the strip sorted since the sequencing mechanism is expecting them to be in order for playback purposes.
icon allow you to manually sort by start time all strips contained in the active group. Note that strip sorting should be handled automatically by the system but in the case of manual user scripts, it might be necessary to manually keep the strip sorted since the sequencing mechanism is expecting them to be in order for playback purposes.
Add New: Append a new strip group to the active strip folder. More information about each type can be found be found in the Type table below.
Name: The name of the active strip group. Change it by confirm a new name with Enter.
Type: Display the active strip group type for reference only; since the strip group type cannot be changed after creation.
Color: Allow you to set a distinctive color for the strip group and all strips it contains.
Extrapolation: Determine what to do when the strip group does not have any more strips to evaluate; in other words when the playback cursor reaches the end of the strip group. Refer to the Extrapolation table below for more details.
Type
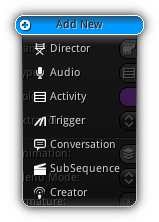
| Type | Description |
|---|---|
Director | Controls which cameras should be used during the sequence playback. |
Audio | Allows you to create virtual sound sources to play sound buffers either in 2D or 3D, control pan, volume and audio effects. |
Activity | Controls the action(s) of a specific animation. This is the type of strip group to used to animate characters, object in other words to animate existing actions. |
Trigger | Run a script, a function or custom command either at a specific point in the sequence time or continuously. |
Conversation | Provides an easy way to create subtitles or to update the string of text object(s) either statically or progressively during the sequence playback. |
SubSequence | Embed an existing sequence within the active sequence. Take note that this type of strip cannot be resized since they are strictly based on the time of the external sequence. |
Creator | Create and destroy entity assets during the sequence playback. This is the type of strip group to use if your sequence require dynamic objects created during the sequence runtime. |
Extrapolation
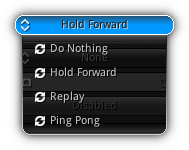
| Type | Description |
|---|---|
Do Nothing | Exactly as it imply; when the playback cursor reaches the end of the strip group simply stop evaluating and increasing delta time. |
Hold Forward | Continue to update the delta time of the strip group even when the end is reached. This is useful in the case an action cycle mode is repeating or when a trigger should be continuously evaluated. |
Replay | Reset the group playback time and restart playing it from the beginning. |
Ping Pong | Plays the strip group back and forth indefinitely. |
Director
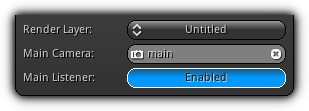
These properties are only available when the active strip group is of the type Director.
Render Layer: Specify on which render layer the virtual cameras created by the strips should be placed on. Press the combo box to show the list of all renders layers; click the entry to select.
Main Camera: Act as the default camera to use by the strip group when the time scrubber enter a non covered strip area (in other words if no strip is available).
Main Listener: Set whether the Main Camera should be used by the sound subsystem as the listener.
Audio
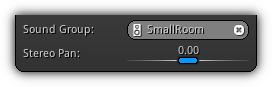
The properties set available the when strip group type is Audio.
Sound Group: Tell the system if the virtual sound source created by the strips contained in the active group should be placed on a specific sound group. Press the ![]() button to populate the existing sound group list; press an entry to select. To clear the connection hit the
button to populate the existing sound group list; press an entry to select. To clear the connection hit the ![]() . Remember that sound groups allow you to use audio presets and set audio effects.
. Remember that sound groups allow you to use audio presets and set audio effects.
Stereo Pan: Specify if the sound emitted by the virtual sound source should be redirected to the left (negative value) or to the right (positive value) speaker. A value of zero represents that the source will be heard from both left and right speaker.
- Note
- Stereo panning will only work if the sound source buffer type is mono in order to calculate the proper attenuation on a per speaker basis.
Activity
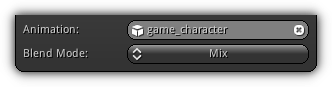
Strip groups of the type Activity provides you with the following properties.
Animation: Select which animation the activity group should be controlling. Depending on your selection subsequent strips append to this group will allow you to select an existing action contained within the animation provided. To select an animation press the ![]() to open up the list of all objects that can be animated; click an entry to select. To clear your selection press the
to open up the list of all objects that can be animated; click an entry to select. To clear your selection press the ![]() button. If no object is selected, the system will point to the active scene animation.
button. If no object is selected, the system will point to the active scene animation.
Blend Mode: Specify how actions should be blended; choose to be Mix which will interpolate values or Overwrite that will strictly use the current values evaluated by the channels contained in the active action set to a strip.
Conversation

Available when a strip group of the type Conversation is currently selected.
Text: Specify the text object that should be updated by the strips contained in the group. Select an existing text object by pressing the ![]() icon and select one from the list. Clear your selection by pressing the
icon and select one from the list. Clear your selection by pressing the ![]() button or simply by confirm an empty name and press the
button or simply by confirm an empty name and press the Enter key.
SubSequence

When a SubSequence strip group type is selected, the following option will be available in the generic settings.
Animation: Set which existing animation the strips contained in the active group should be pulling sequence from. Press the icon to populate the list and select an existing animation. If no animation is provided; the system will use by default the one of the active Scene.
Strip Sections
Strip sections give you the opportunity to consolidate multiple strips into a specific section. Once created a section will allow you to move and resize all strips it contains at once. It is ideal for tweaking and retiming your sequence as you only need to apply the modification on the section itself.
Available sections are placed on a per-folder basis and once it contains strips can be found and selected from the strip area aligned with its associated folder. Once selected a simple action allow you to modify all strips place in them, and can also be used to categorized strips and/or selected them in bulk.
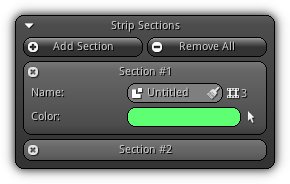
Add Section: Create a new section. To remove an existing section press the ![]() icon located at the top left of its associated slot box in the list.
icon located at the top left of its associated slot box in the list.
Remove All: Remove all existing sections the strip folder contains.
Name: The unique name to use for the selected section. The number placed near the ![]() icon is displaying how many strips are contained in the section. To clear all strips currently connected to the section press the
icon is displaying how many strips are contained in the section. To clear all strips currently connected to the section press the ![]() icon.
icon.
Color: A specific color to identify the section inside the strip area. To quickly select all strips contained in the active section press the ![]() icon.
icon.
Strip
Available under the ![]() tab of the sequencer properties; the strips are what makes a sequence alive. Based on the type of strip group the strip belongs to it will allow you to set different parameters to achieve a specific task. Whether it is to change camera, play a local or background music or playback a specific action for a character part of your cut scene; strips are the backbone behind the sequencing system.
tab of the sequencer properties; the strips are what makes a sequence alive. Based on the type of strip group the strip belongs to it will allow you to set different parameters to achieve a specific task. Whether it is to change camera, play a local or background music or playback a specific action for a character part of your cut scene; strips are the backbone behind the sequencing system.
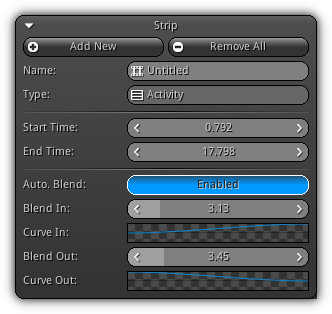
Add New: Add a new strip under the active group selected at the current scrubber location.
Remove All: Remove all strips the selected strip group contains.
Name: A unique identifier to use for the active strip.
Type: For reference only; what is the group type of the active strip.
Start Time: At which position in time (where 1.0 == 1 sec.) the strip should be evaluated.
End Time: The position in where the strip should taking part in the sequence.
Auto. Blend: Automatically set the blend in and out values as strips overlap in the Strip Area. If this option is turned off, you will have to manually specify the blend in/out time.
Blend In: Progressively fade in the strip to its full effect.
Curve In: The interpolation curve to use; the time and value range should be from 0.0 to 1.0 and specify the progression of the interpolation.
Blend Out: Progressively fade out the strip until it has no more effect on the sequence.
Curve Out: The interpolation curve used to fade out, same as the Curve In parameter the time and value range is also clamped to 0.0 to 1.0 but the value should be set the opposite way; from 1.0 (full effect) to 0.0 (no effect).
- Note
- The blend properties are only available for group type that is able to blend from one strip to another such as
Director,Activity
Director
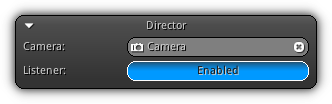
Properties that apply on for the strips contained in a Director strip group.
Camera: The camera to use during the length of the strip. Click the ![]() to populate the list of all cameras; press an entry to select. To clear the active camera selection push the
to populate the list of all cameras; press an entry to select. To clear the active camera selection push the ![]() button. Alternatively, you can set a camera by entering its object name and press
button. Alternatively, you can set a camera by entering its object name and press Enter; or clear the active one by confirming an empty camera name.
Listener: Determine whether the camera should be used as the application listener. If enabled all sound attenuation, will be evaluated based on its world position.
- Note
- For each director's group, a virtual camera will be created by the sequence system to handle cameras interpolation and transition. This virtual object will be added as a part of your scene and will be used to actually be used to draw the specified render layer. It will stay
aliveas long as the sequence is connected to theAnimationsubsystem and will be destroyed automatically when it is no longer needed. Information includingHandlerdata (Scripts) andFrameBuffer(RTT Attachments) data will be transferred automatically to the virtual camera to ensure synchronization.
Audio
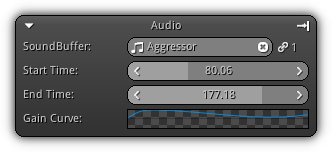
Properties available when a strip of the type Audio is selected. For convenience purposes once a sound buffer is connected to the strip you can press the ![]() button to set the start and end value to fit the exact time covered by the sound buffer asset connected.
button to set the start and end value to fit the exact time covered by the sound buffer asset connected.
Similar to the director group type; an audio strip will create a virtual object to handle the sound source emitted for each strip. These sound sources are automatically created by the underlying system and will be destroyed as soon as they are no longer needed. Virtual objects names are always starting with a . and use the name of the resources that actually create them. Worth mentioning that they will be visible during editing time inside the View3d but cannot be selected.
SoundBuffer: The sound buffer asset to use during the strip playback. Press the ![]() to open up the list of all sound buffers currently available from your library. To clear the sound buffer press the
to open up the list of all sound buffers currently available from your library. To clear the sound buffer press the ![]() . For reference, only you can find numbers of active link(s) to the selected sound buffer printed on the right side of the
. For reference, only you can find numbers of active link(s) to the selected sound buffer printed on the right side of the ![]() icon.
icon.
Start Time: Allow you to specify if the sound buffer should start with a time offset (a value of 1.0 represents 1 second).
End Time: Specify if the sound buffer should be played until the end of the stream. The value specified give you the opportunity to set the exact time (in seconds) of when to stop the sound buffer playback.
Gain Curve: Control the volume of the virtual sound source during playback. Take note the curve time should fit the actual sound buffer stream time; meaning that the time value starts at 0.0 up to the maximum extent of the strip.
Activity
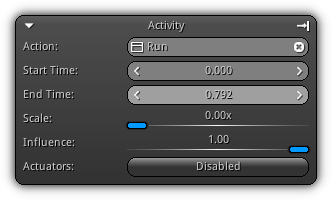
The activity properties focus mostly on the setup of the action the strip will be running during the sequence. Located at the top right of the slot box the use the ![]() button once an action is connected to set the start and end time of the strip to fit the actual action duration.
button once an action is connected to set the start and end time of the strip to fit the actual action duration.
Action: An action that belong to the animation connected to the associated group of the strip that will be used during playback. Either enter the action name manually or click the ![]() to populate the list of all actions that belong to the active animation. Press the
to populate the list of all actions that belong to the active animation. Press the ![]() button to unlink it.
button to unlink it.
Start Time: Provide a starting offset (in time) to the action.
End Time: Offset the ending time of the action.
Scale: Increase or decrease the actual action duration. If the scale is set to 0; the action will be resized to fit the time covered by the strip start and end time.
Influence: Determine the weight factor that should be applied to the values the action is controlling.
Actuators: Enable or disable the use of actuators for the current action specified above.
- Warning
- In order for the action to use the blending mode specified by the activity strip group the action have to be built to resolve memory references. Blending will not work with user variables or by evaluating variables that are calling an underlying function. For more information refer to the Actions help section.
Trigger
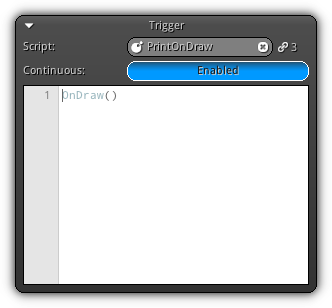
Trigger properties can set to either use the strip to execute a specific scripting command either once or continuously or by setting a script that handles the OnTrigger callback.
Script: The script to use for the active trigger strip. Press the ![]() to display the available script list; press an entry to select. To unlink the script press the
to display the available script list; press an entry to select. To unlink the script press the ![]() button. On the right side of the control near the
button. On the right side of the control near the ![]() icon display the link(s) the script current have.
icon display the link(s) the script current have.
Continuous: Determine whether the OnTrigger function callback (when a script is connected) or the custom scripting command specified should be executed every time the strip is reevaluated. The text area located at the bottom of the slot box allows you to input scripting command. It can be a single line or a full script. Take note that this area is enabled only if no script has been connected to the trigger strip. In addition, scripting command manually inputted by the user will still be saved and will be used as a fallback if the script connected is either missing or simply disconnected at playback time.
Conversation
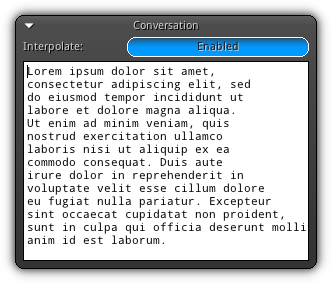
Base properties available when a conversation type strip is selected.
Interpolate: Determine if the text associated with the conversation the strip should be appended based on the length of the strip (from start time to end time).
The text area at the bottom allows you to input the text that you want to display during playback.
SubSequence
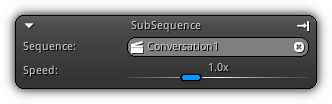
Available when a strip of the group type SubSequence is selected the following properties will guide you to quickly set up how to integrate an existing sequence in the active sequence. Once a valid sequence have been provided you can click the ![]() icon to quickly resize the start and end value of the active strip to fit its actual duration.
icon to quickly resize the start and end value of the active strip to fit its actual duration.
Sequence: An existing sequence connected to the animation previously set in the subsequence group settings.
Speed: Specify the delta time multiplier that will be used when evaluating the time of the sequence. Using this value you can either speed up or slow down the playback of the particular sequence that you have connected above.
Creator
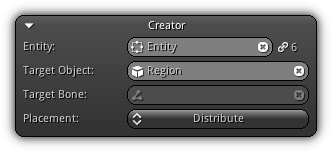
The properties available for a creator strip are listed below; they will allow you to set up the entity that should be created during the strip playback.
Entity: The entity asset that the strip should use to create a new object(s) at playback time. Press the ![]() to display the list of all available asset of this type available within your library. Select an entry to confirm your selection; to disconnect your selection press the
to display the list of all available asset of this type available within your library. Select an entry to confirm your selection; to disconnect your selection press the ![]() icon. You can also manually select one by inputting the asset name or disconnect the current one by entering a blank name. For reference only the value displayed near the
icon. You can also manually select one by inputting the asset name or disconnect the current one by entering a blank name. For reference only the value displayed near the ![]() icon represent the amount of connection(s) the asset currently have.
icon represent the amount of connection(s) the asset currently have.
Target Object: The target location to use in order to place the entity in space. Press the ![]() to pop up the list of all available objects; click an entry to select. The
to pop up the list of all available objects; click an entry to select. The ![]() button will disconnect your selection.
button will disconnect your selection.
Target Bone: If the target object is a Skeletal Mesh an optional target bone can be provided and its world position will be used for placement. To specify an existing bone type in its name or use the ![]() to display all bones available within the skeletal mesh skeleton hierarchy. To cancel the bone selection and use the target object position click the
to display all bones available within the skeletal mesh skeleton hierarchy. To cancel the bone selection and use the target object position click the ![]() button.
button.
Placement: Specify how to handle the placement of the entity; you can select between four different modes. Transform will use the actual world transformation matrix to place the entity. Pivot will only copy the location of the target transformation. Attach will connect the entity to the target object/bone creating a parent/child relationship. Finally, Distribute; only available when the target object is of the type Route or Region. If the target object type is a route, the entity will be randomly distributed along the route path. In the case of a region, the system will use its current shape parameter to randomly place within the shape bounds (volumetric) the entity.
Drag Drop
Since the editor provides you a unified development environment you can use drag and drop operations to create strips that depend strictly on a specific type of resources. For all drag and drop operations you have the choice to either drop your selection on a strip folder (which will automatically create a new strip group) or an existing strip group.
Director: A director strip can be quickly added at the scrubber location by dragging a camera from the Outliner to the director strip group you want to insert the strip.

Audio: Similar procedure as the one used for the director strips can also be used to create audio strips; however this you will be dragging a Sound Buffer asset from the Library to the audio strip group you want to create the strip.

Activity: To create an activity strip using drag and drop drag the action from the Timeline Editor to the strip group you want to append it. Ensure that the action that you select belongs to the same animation set inside the activity strip property group (in the example below game_character).

|
|