
Sensors allow you to determine the proximity of other objects based their type and an optional name filter. They are probably more useful to programmers than artists; since the volume list, the sensor update/return will have to be processed using code. Sensors can be used as triggers that will activate something in your scene, like a door, an explosion or...
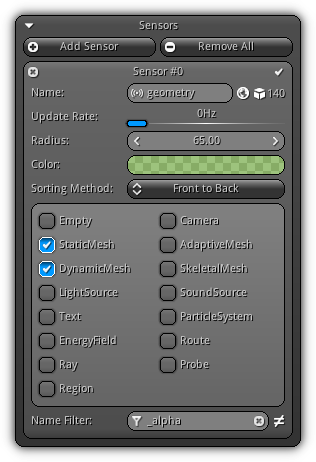
Add Sensor: Create a new sensor. Once a sensor have been created it will appear on the sensor list; press the ![]() icon to remove it. To enable or disable the sensor; either temporary or permanently use the
icon to remove it. To enable or disable the sensor; either temporary or permanently use the ![]() button to toggle its state. Toggle the
button to toggle its state. Toggle the ![]() icon to enhance the scope of the active sensor by forcing it to search for object(s) in all scenes currently loaded.
icon to enhance the scope of the active sensor by forcing it to search for object(s) in all scenes currently loaded.
Remove All: Clear up the object sensor list.
Name: A unique name to identify the sensor. The number located on the right side of the ![]() icon indicate the current amount of objects that successfully pass the sensor "volume" test.
icon indicate the current amount of objects that successfully pass the sensor "volume" test.
Update Rate: Determine the update frequency of the sensor. A value of 0hz represent that the sensor will be updated every frame.
Radius: The radius of the sensor which determines the size of the sensitive zone around the object pivot.
Color: A color to identify the sensor while debugging the scene inside the View3d edit mode.
Sorting Method: Specify the volume list sorting method returned by the sensor. Render List will simply use the objects as they appear without changing the order. Front to Back will sort from the volume list from near to far. Back to Front have the opposite effect the farthest object will appear at the top of the list and the nearest the last. Object Volume will sort the list using the biggest object first to the smallest. Object Priority will sort the list using the user-defined object priority. And the latest kGeometricData will use the internal vertex index to sort the list (ideal when using a large mesh asset library).
Inclusion Mask: The next step to make the sensor actually active is to specify the type of object the sensor will respond to. Simply click the checkbox of each object type you want the sensor to track.
Name Filter: Optionally you can provide a substring that will be used against the object name that passes the object type test to determine if they should be added to the volume list. Pressing the ![]() icon will force the filtering process to be inverted.
icon will force the filtering process to be inverted.
Events
As soon an object have a sensor created, attached script(s) can then respond to the OnProximity() event. If no sensors are available, the callback cannot be triggered.
| Callback | Description |
|---|---|
OnProximity() | Triggered every time the sensor volume list is updated. This event will occur if an object is added or removed from the list or if an existing object have moved. |
|
|