The node definition tags are very simple in nature they take an existing (or user-defined) function where predefined tags will be replaced by values and links.
NDT consists simply of tags that are going to be parsed and analyzed by the built-in Generator that will then generate a unique DNA to build a node and generate its source code. Using NDT you can create custom nodes for Lua (Script and Utility) and GLSL (Shader).
To learn how NTD is working take a look at the example below; this code used to generate a custom node for a function (for demonstration purposes only). The targetted node language is Lua (hence this node will be used by a Script or a Utility) and it is an implementation of a user function called MyFunction:
 |
|
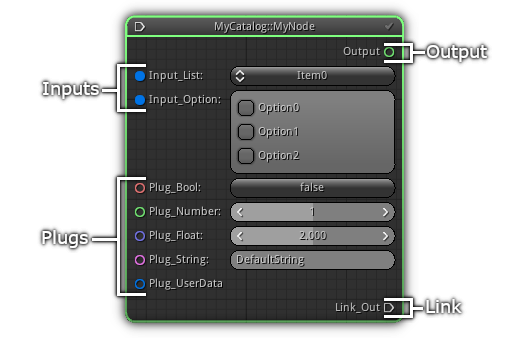
As you can see from the screenshot above there are basically four types of different tags that are implemented: Inputs, Plugs, Output and Link. Take note that all types can be mixed independently based on the type of code you are converting to a node (using all NDT types is not mandatory).
Inputs: Require the user to input a value; it can be any of the variable types listed. In the custom node above the inputs are of the type list (select an option) and mask (multiple options where each value is toggled a separate bit).
Plugs: Plugs can be also be used as an input but allow the user to feed the value from the output of another node. Just link input a default value can be defined as well as a range (numbers only).
Output: The output is basically the return value of the code (if any).
Link: Tell the system that the code call can be connected to another node inside the NodeTree to continue the execution flow.
As you might have already noticed; located on the right side the NDT code is basically replacing the part of the code with tags that will be fed by the node.
The syntax is basically the same for all at the exception of link that can simply have a name. Below is the basic syntax to implement output, inputs and plugs. Take note that the last part of the syntax &r; which is the range of the variable only apply for numeric inputs and plugs.
Before diving in with the syntax below, click on the Lua tab above to first inspect the declaration of MyFunction; then go back to the NDT tab to have a good look at the code. As you can see all declarations are a variations of the syntax below:
$<type>='<name>'@<variable_type>='<values/default_value>'&r='<minimum_range> <maximum_range>'
To understand better: $ is to specify the tag type (input, plug etc...), @ is to specify the variable and its type and finally &r is to specify the range of accepted value (if any).
In addition; you might have notice from the NDT code above that variable type @l (which stands for list) and @m (which stands for mask) can take a serie of options that have to be delimited by using the syntax below:
(<first_item_name>,<first_item_value>)(<second_item_name>,<second_item_value>) etc...
| Tag | Description |
|---|---|
$i | Create an input that require the user to specify the value to use. |
$p | Create a plug that can either receive the output of another node; or can be used as input by the user. |
$o | Create a node output. |
$l | Place a link to connect the code call to another node. |
$s | Specify additional source code that will be used by the node. The source can contain one or multiple functions/micro functions that are present in the node definition. |
| Tag | Description |
|---|---|
@b | Specify a boolean. |
@i | Specify that the value should be of the type integer. |
@f | Floating point variable. |
@p | Specify that the variable is a point (a two-dimensional vector). |
@v | Define that the variable is a tri-dimensional vector. |
@c | Specify the parser that the variable is a color (RGBA). |
@s | Define a string variable/value. |
@l | Define a list (input only). |
@m | Define a bit mask (input only). |
@u | Specify that the value/variable is a userdata. |
For the node that we use as an example above a workable connection setup can be done as described in the screenshot below:
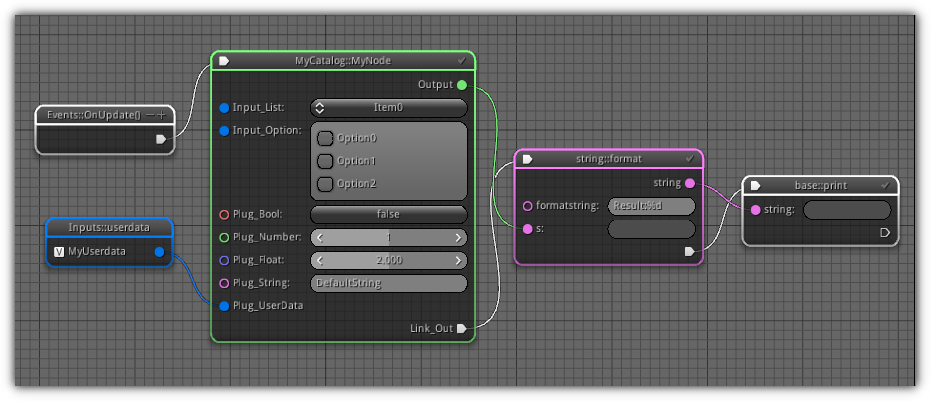
Notice that the UserData plug need to have a variable as input since there is no predefined value that can be assigned to it. All user data fields need to receive the output of another node.
|
|
