A dynamic mesh is a type of mesh that can be used for two types of deformation. Deformation using Morph Targets or using by using soft body physics (see Soft Body Settings for more information).

Dynamic meshes extend the functionalities of the two previously visited type of mesh (StaticMesh, AdaptiveMesh). It shares most of the common features of an AdaptiveMesh but it is deformable as a result they can be used as a soft body (for more information consult the Physics page ) or for morphing (morph target).
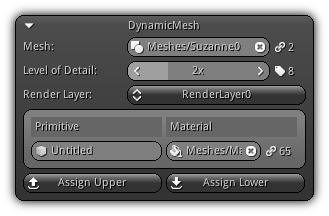
Mesh: The mesh asset to connect with the dynamic mesh; a local copy of the mesh vertex data will be created when the mesh is connected allowing deformation possible. To clear the mesh connection with the dynamic mesh click the ![]() icon. As a reference; located on the right side of the widget you can review how many connections the mesh already have by referring to the number next to the
icon. As a reference; located on the right side of the widget you can review how many connections the mesh already have by referring to the number next to the ![]() icon.
icon.
Level of Detail: Allow you to manually select a level of detail in order to be able to set its material properties on a per render layer basis. On the right the geometry icon ( ![]() ) indicates how many geometric sets (LODs) the active mesh contains (if any). Use either the left or right arrow of the spinner widget; the right button or simply type in the LOD number to select an active LOD.
) indicates how many geometric sets (LODs) the active mesh contains (if any). Use either the left or right arrow of the spinner widget; the right button or simply type in the LOD number to select an active LOD.
Render Layer: In order to edit the material properties for a specific render layer you must first use the combo box to make a selection.
Primitive: The mesh primitive name; to change it enter a new name and confirm by pressing Enter.
Material: The material to use for the primitive associated with the active render layer. Press the ![]() icon to open up the material list from your library; on the right the reference icon (
icon to open up the material list from your library; on the right the reference icon ( ![]() ) displayed the number of resources currently using the material selected.
) displayed the number of resources currently using the material selected.
Assign Upper: Use the active material(s) set for all LODs below the active index.
Assign Lower: Use the active material(s) set for all LODs above the active index.
Preview
Please refer to the Preview help page for more information.
Morph Targets

Morph targets allow you to deform the base mesh of a DynamicMesh using other meshes that share the same topology. Using weights vertices differences between two topologically identical meshes can be used to deform the original mesh. Based on this approach not only you can additively deform vertices but also use this technique to create keyframe animation by switching the weight and visibility of each morph target and more.
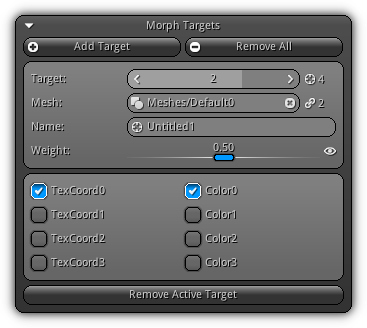
Add Target: Add a new morph target.
Remove All: Remove all existing morph target(s) attached to the dynamic mesh.
Target: Select the active morph target. The ![]() icon located on the right represents how many actual targets are available.
icon located on the right represents how many actual targets are available.
Mesh: Specify a morph target mesh that shares the same topology as the base mesh (the one defined in the DynamicMesh section ). To select a mesh type in the asset name or click the ![]() icon to populate the list of all meshes available in your library. To clear the morph target mesh slot click the
icon to populate the list of all meshes available in your library. To clear the morph target mesh slot click the ![]() icon. Located on the right of the widget the value displayed represent how many users the selected mesh currently have.
icon. Located on the right of the widget the value displayed represent how many users the selected mesh currently have.
Name: Specify the name to use for the morph target; enter the new value and press Enter to confirm.
Weight: Represent the impact the morph target will affect the base mesh; represented by a value from 0 to 1. To include or exclude the morph target into the final result you can toggle its visibility by clicking the ![]() icon.
icon.
The last section allows you to specify if the texture coordinates and/or the vertex colors should also be blended based on the weight factor of the morph target. At the bottom of the section the Remove Active Target button allow you to delete the active morph target slot.
|
|
