
SkeletalMeshes are a type of mesh that receive deformation based on a skeleton attached to it. Based on an animation sequence the skeleton bones and joints are animated and as a result, deform the vertices of the mesh attached to them.
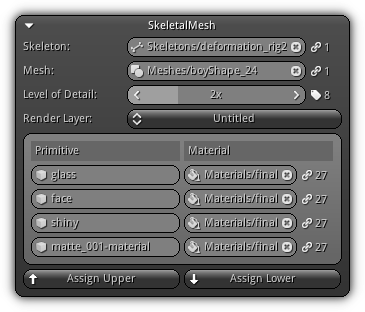
Skeleton: The skeleton to use for the active skeletalmesh. Click the ![]() icon to pop up the list of all available skeleton; select one from the list to assign it. To clear the active selection press the
icon to pop up the list of all available skeleton; select one from the list to assign it. To clear the active selection press the ![]() icon. As a reference the number next to the
icon. As a reference the number next to the ![]() icon display the number of links to the active skeleton.
icon display the number of links to the active skeleton.
Mesh: The mesh that will be deformed by the skeleton. Enter the mesh asset name manually or click on the ![]() icon to populate the list of meshes; select one by clickint it. Remove the active mesh selection by pressing
icon to populate the list of meshes; select one by clickint it. Remove the active mesh selection by pressing ![]() icon; take reference of the mesh number of user represented by the number next to
icon; take reference of the mesh number of user represented by the number next to ![]() icon.
icon.
Level of Detail: Available if the mesh contains multiple LODs; this field allow you to select the index of the active LOD to use for the material(s) setup for the active render layer.
Render Layer: The active render layer to use to set up the material(s) for each primitive of the active level of detail.
Primitive: The primitive name; to change its input a new name a press Enter.
Material: The material to use for the primitive for the active render layer and level of detail. Press the ![]() icon to show the list of all materials. To clear the active material selection press the
icon to show the list of all materials. To clear the active material selection press the ![]() icon. The number of users for the active material will be displayed near the
icon. The number of users for the active material will be displayed near the ![]() icon.
icon.
Assign Upper: Use the active material setup and assign it for all LODs below the active one.
Assign Lower: Use the active material setup and assign it for all LODs above the active one.
Transform
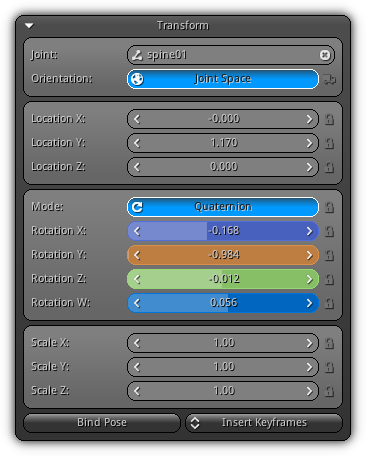
This section allows you to manipulate manually the transformation of the active bone selection. To learn more about of to select bone while being in edit mode please refer to the Editing Skeletons help section.
Joint: The active joint; to modify the selection click the ![]() icon to list all available joints contained witin the active skeleton. To clear the current selection hit the
icon to list all available joints contained witin the active skeleton. To clear the current selection hit the ![]() icon.
icon.
Orientation: Change the active orientation mode of the transformation. In Pose Space the transformation data will be relative to the parent bone the joint is connected to. In World Space the transformation will be relative to the world axes. To automatically select the orientation mode based on the joint relationship toggle the ![]() option.
option.
Location XYZ: The location of the joint in either pose or joint space. Use the lock options to restrict the manual and manipulator movements to be only available for a set of axes of your choice,
Rotation Mode: Select the rotation mode to use for the joint. By default the system is using quaternions as they are more suited for bone animation; however, you can also switch to Euler Angles which are more intuitive to manipulate. You can also lock the rotation mode from subsequent changes by clicking the ![]() option.
option.
Rotation XYZ(W): The rotational values of the joints. Same as location, you can use the locks to restrict the movement on specific axes.
Scale XYZ: The scale value to use for the active joint. Use the lock options as you see fit to restrict further scaling changes.
Bind Pose: Restore all the joints transformation back to their original bind positions.
Insert Keyframes: Insert keyframes for the active joint from a specific set of channels to the active action (see /ref timeline). Select between Location, Rotation, Scale or Available (Loc and Rot only).
Skeleton
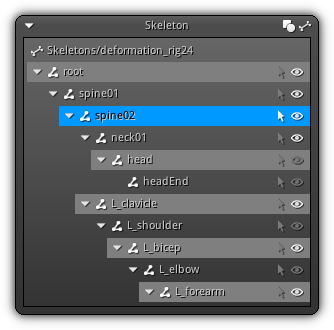
Using the skeleton section you can specify a working set of bone/joints to work with. The tree view displays the architecture of the skeleton connected to the active skeletal mesh. To activate a specific entry simply press it using the Left Button, to append to the active selection hold the Shift key.
To toggle manually the selection of a specific entry press the ![]() icon. To toggle its visibility press the
icon. To toggle its visibility press the ![]() icon.
icon.
Located on the top right corner of the box; ![]() icon allows you to toggle on or off the visibility of the mesh connected to the active object when drawing wireframes; to facilitate joints/bones selection. Similarly; the
icon allows you to toggle on or off the visibility of the mesh connected to the active object when drawing wireframes; to facilitate joints/bones selection. Similarly; the ![]() icon give you the opportunity to visualize the skeleton without having to select the object.
icon give you the opportunity to visualize the skeleton without having to select the object.
You can toggle a specific state (either visible or selected) for a whole chain by pressing the Ctrl key while toggling an option on or off. Similarly; to invert the active state and propagate it along the whole skeleton press the Shift key. To apply the active state of a specific entry to the whole skeleton hold Alt+Shift while enabling or disabling a specific state.
Preview
Please refer to the Preview help page for more information.
Joint Physics
Each joint of the skeleton can also physic; at the time of writing joints can either be static or a rigid; which is ideal for ragdoll physics and locomotion system. If you require part of the mesh to use soft body physics it is recommended to use a separate object; and use the Miscellaneous Constraint Generator to automatically attach the soft body to the existing collider used for the skeletal mesh object or its joints collider.
For more information about the physic properties that can be applied on the joint please refer to the Physics help page.
Bone Collider
To facilitate the creation of ragdolls or other type chain base physics the collider tool allows you to automatically generate colliders between an active joint and another.
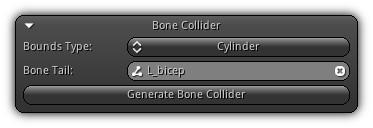
Bounds Type: The type of bounds you want the new collider to use. Select one of the following collision bounds: Box, Cylinder (default), Sphere, Capsule or Cone.
Bone Tail: Which joint position should be used as the tail of the collider (using the active joint as head). Click the ![]() icon to open the list of all available joint the active skeleton contains. To clear the active selection press the
icon to open the list of all available joint the active skeleton contains. To clear the active selection press the ![]() button.
button.
To create the bone starting from the active joint location to the selected tail location click the Generate Bone Collider button. As a result, a new collider will be added creating a bone collider between the active joint (the head) and the joint specified as the tail.
- Remarks
- Once the bone collider created you might want to adjust the size of the bounds to fit the topology of your actual mesh to ensure that the proper dimension is applied.
|
|