
The controller editor is the front end interface used to create complex machine state hierarchies to transition between any type of existing actions. It is ideal to create complex skeletal animation and facial animations that are either controlled by scripts, plugins, AI or by user input (touch, keyboard or gamepad).
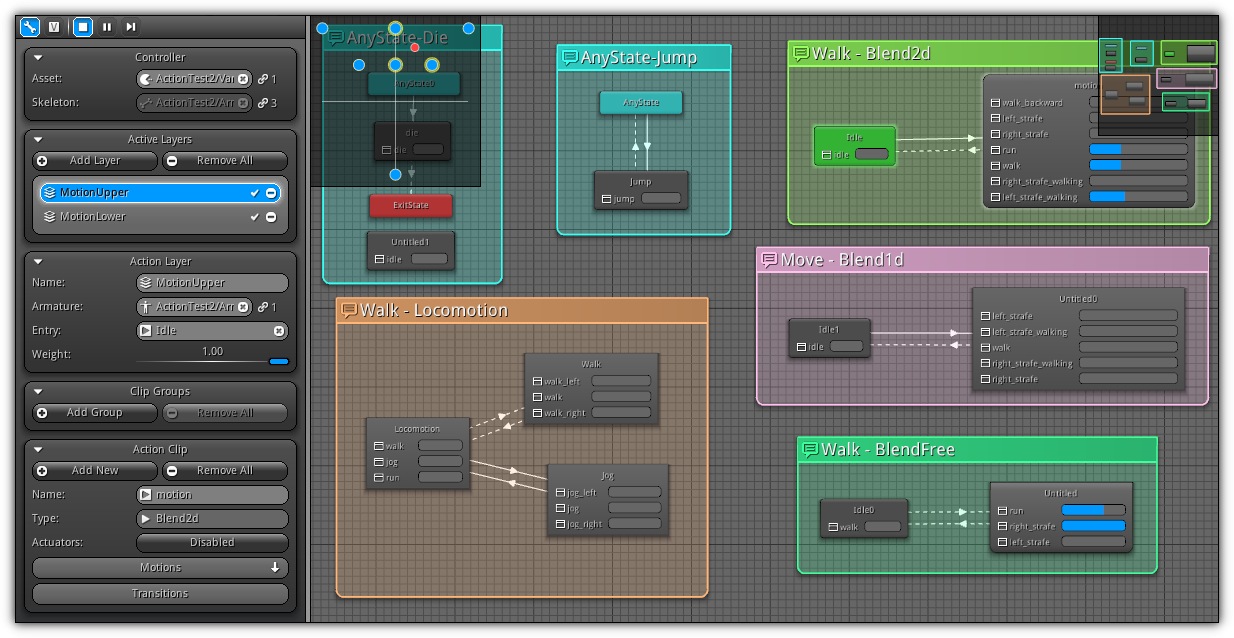
On the left side of the editor; the property panel allows you to create and manage the different components used by your state machine. It is divided in two sections; the settings section; available under the ![]() button. Next is the variables section (
button. Next is the variables section ( ![]() ); under it you can define variables and have access to transition properties. To facilitate testing and debugging, the standard play, pause and stop buttons are available at the top left of the tool to control the application time (without actually starting your app).
); under it you can define variables and have access to transition properties. To facilitate testing and debugging, the standard play, pause and stop buttons are available at the top left of the tool to control the application time (without actually starting your app).
The right side of the editor is entirely dedicated to action clips and transition manipulations. Depending on your selection; the top left corner can also display real-time visual information about the active action clip or transition during the controller execution (for live debugging). On the top right corner; the navigator allows you to fly from the only location of your machine state to another in a simple click.
Edit
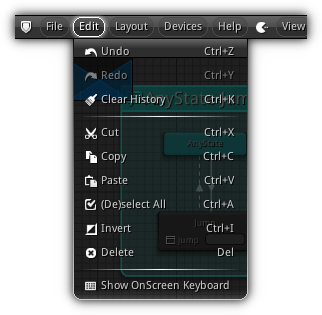
| Item | Shortcut | Action |
|---|---|---|
| Cut | Ctrl+X | Delete the current action clip(s) selection and store the necessary script to reconstruct them into the clipboard. Once done you can paste them to the active or another controller editor. |
| Copy | Ctrl+C | Auto. Generate the script to reconstruct the active selection and store it in the clipboard. |
| Paste | Ctrl+V | This item is only available when the clipboard actually contains a script generated from a controller editor. When executed the script contained in it will be executed taking in consideration the active controller asset action layer selected. |
| (De)select All | Ctrl+A | Select/deselect all action clips and transitions of the active action layer. |
| Invert | Ctrl+I | Invert the active action layer selection. |
| Delete | Del | Delete all selected action clips and/or transitions. |
Menu

Menu: The view menu control the display options of the controller editor. Selection controls the relation between action clips and clip groups. The final entry the ActionClip item; contain common utilities that apply on the action clips manipulation.
Action: The default action of the Left Button (or single touche) when manipulating action clips within the controller editor.
Info.: Display the active location and zoom information on both XY Cartesian axis.
View
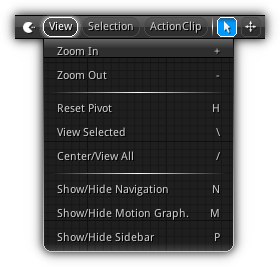
| Item | Shortcut | Action |
|---|---|---|
| Zoom In | + | Increase the X and Y axis zoom. |
| Zoom Out | - | Decrease the X and Y axis zoom. |
| Reset Pivot | H | Reset back to view to 0,0 and the zoom to 1:1. |
| View Selection | \ | Calibrate the zoom and pivot position to encapsulate all selected action clips. |
| Center/View All | / | Adjust zoom and position to obtain an overall view of the active action layer. |
| Show/Hide Navigation | N | Toggle on or off the top right navigation graph. |
| Show/Hide Navigation | M | Enable or disable motion graph (action clips) and transition graph. |
| Show/Hide Sidebar | P | Open or close the left side bar maximizing the grid area. |
Selection
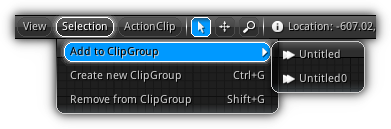
| Item | Shortcut | Action |
|---|---|---|
| Add to ClipGroup | Append the active action clip selection to an existing clip group. | |
| Create new ClipGroup | Ctrl+G | Create a new clip group using the active action clip selection. If an action clip selected is already part of another clip group it will be automatically transferred to the new one. |
| Remove from ClipGroup | Shift+G | Remove all selected action clip(s) from their respective clip group (if any). |
Action Clip

| Item | Shortcut | Action |
|---|---|---|
| Create Transition | Spacebar | Create a transition(s) using the active selection as the "from" target, to the active action clip (the "to" target). To invert the direction of the transition use
|
| Snap to Grid | Snap the current action clip selection to the grid. | |
| Duplicate | Shift+D | Duplicate the action clip selection; optionally you can hold Alt to keep the new action clip(s) connected. |
| Remove Unused | Shift+R | Remove all action clips that are not connected to anything from the machine state graph of the active layer. |
Actions
Theses options control the default behavior of the Left Button while operating the machine state graph.
| Icon | Mode | Shortcut | Description |
|---|---|---|---|

| Selection | Use this mode to single or multi-select action clips (marquee selection) placed on the machine state graph. Hold the Left Button and drag to create a marquee selection; release to confirm; use Shift to include or exclude action clips and/or transitions from the single or marquee selection. | |

| Pan | Shift+Alt+Left Button | Pan the machine state grid. Alternatively to jump directly to a specific location on the grid all you have to do is to double tap it. Panning can also be done by first pressing the Middle Button and by moving the pointing device. |

| Zoom | Ctrl+Alt+Left Button | Zoom in/out the machine state grid scaling the current action clips. You can also zoom in or out using the mouse scroll. |
Toolbar

Located at the top left of the controller editor the toolbar allows you to select which property page will be displayed on the left side of the editor. In addition, for convenience standard playback controls have been added for testing and debugging your state machine tree without having to start/stop the application itself.
| Icon | Mode | Description |
|---|---|---|
| Controller | Display the controller property page. | |
| Variables & Transitions | Show the variables and transitions property page | |
| Start increasing the application playback time; press again to stop and reset it back to 0. | ||
| Pause the playback. | ||
| Increase the time step of one frame (see Playback Controls to setup a specific or relative frame time). |
Properties
This page allows you to manage and control all the building blocks that your machine state tree will be using.
Controller
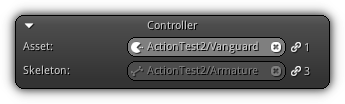
Asset: Select the controller asset to operate. Press the ![]() to populate the list; press one to select or simply type in the asset name and press
to populate the list; press one to select or simply type in the asset name and press Enter to confirm. To clear the active selection press the ![]() icon.
icon.
Skeleton: Specify that the controller will be connected to a skeletal mesh; setting the skeleton will also allow you to use masking by connecting an optional Armature asset to any action layer the controller contain. To specify a skeleton type a name or press the ![]() to open up the skeleton asset list; press an entry to select. To remove the connection between the skeleton and the controller press the
to open up the skeleton asset list; press an entry to select. To remove the connection between the skeleton and the controller press the ![]() button.
button.
- Warning
- The skeleton asset cannot be changed or removed if the controller asset is connected to an action controller; as it might cause incompatibility issues with the target resource.
Active Layers
Manage the action layer of your machine state tree; each layer will be blended with the next, allowing you to create new animations by mixing multiple actions (each of them controlled by weight). Optionally; as mentioned earlier an armature for skeletal animation can be connected; this will allow you to mask bones restricting the influence of the resulting state of actions to a specific working set on a per layer basis.
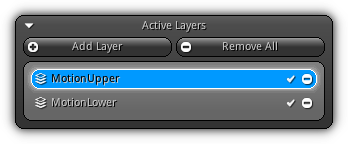
Each action layer contains its own set of action clips, and maintain a unique state that dictates transitions and resulting actions blending.
For example, one layer can control the upper body of a character and another the lower part. Or it can be as complex as each layer take the charge of a specific part of the body such arm left, arm right, torso, legs etc... allowing an almost infinite amount of poses and combinations.
Add Layer: Create a new action layer; once created the layer will appear in the layer list. To select a layer simply click the entry; to remove an existing layer press the ![]() icon; to toggle the layer influence on the rest of the machine state on or off press the
icon; to toggle the layer influence on the rest of the machine state on or off press the ![]() icon.
icon.
Remove All: Clear all action layers from the active controller.
- Remarks
- Layer order can be changed by using drag and drop operation. Simply select an entry and drag it over another; drop it to confirm its new location in the list.
Action Layer
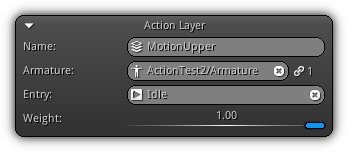
Name: A unique name to identify the active action layer; to edit simply input a new name and press Enter.
Armature: Available only when a Skeleton have been connected to the controller (see Controller). Press the ![]() icon to display the armature list; select an entry by pressing it or by typing in the armature asset name, then press
icon to display the armature list; select an entry by pressing it or by typing in the armature asset name, then press Enter.
Entry: The entry point of the action layer (an existing action clip); press the ![]() icon to open up the list of all action clips currently available within the active layer. Select an item to confirm the entry point.
icon to open up the list of all action clips currently available within the active layer. Select an item to confirm the entry point.
Weight: Determine how much influence the action layer have when mixing it with the other layers. Take note action layer will always take into consideration the base value that was originally set (ie. the pose the skeletal mesh was into before entering the machine state).
- Note
- If you are looking at targeting (ensure that at the end of the machine state tree the skeleton end up at one specific position) you can either use
Inverse Kinematicconstraint(s) along withGetPose,SetPoseAPIs andPoseGetMatrix,PoseSetMatrixas well asPoseBlend; see the IK constraints and the coding API for more information.
Action Clip
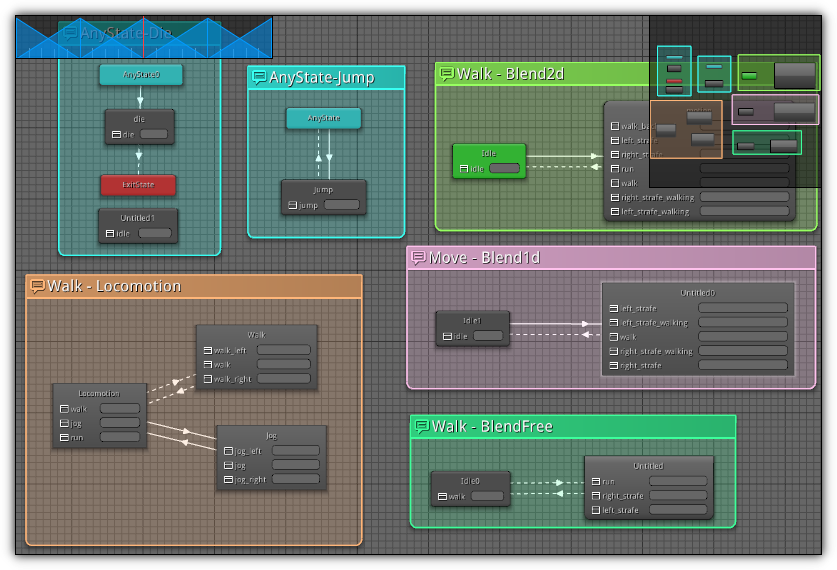
Once an action layer has been created you can now start adding action clips. Action clips come in six different flavors which can be Single, Blend1d, Blend2d, BlendFree, AnyState or ExitState; refer to the table below to learn more about each of them.

Add New: Create a new action clip and place it at the center of the current action layer view. Select an action clip type by pressing the drop-down entry
| Type | Description |
Single | Provide a way to connect a single action. |
Blend1d | Can contain multiple actions that will be linearly blended based on the value of an existing controller variable. |
Blend2d | Multiple actions blended in two dimension; it is ideal for user or AI controls. Actions are first defined and placed on the X and Y axis. For blending the actions in 2d two variables (one for each axis) have to be specified to influence the cursor location. |
| BlendFree | Ideal for facial expression or to simulated wounded body parts; this type of action clip allow you to set up multiple actions and specify how much influence each of them will have on the final mix. |
AnyState | This type do not allow you to set up any action; it is acting as a branch that will be evaluated by the system regardless of the current state the tree is currently in.
|
ExitState | Specify the termination of the action layer; different termination strategies can be set based on your requirements, for more information please refer to the Exit Options section.
|
Remove All: Remove all action clips the action layer contains.
Name: A unique name to identify the action clip within the active action layer.
Type: For reference only display the type of the active action clip (read-only).
Actuators: Determine whether or not actuators contained in the different action(s) connected to the clip should be evaluated.
- Warning
- If an action clip enter into an error state it will be highlighted in red inside the Action Clip Area. A state error can occur if an action set by the clip cannot be located inside the connected action controller resource animation. An action clip error will stall the machine state tree as it cannot continue since the necessary information (in this case an action) is missing.
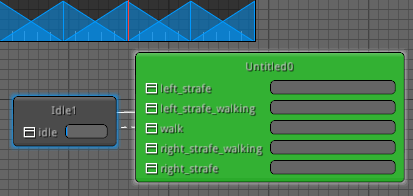
Motions
Depending on the action clip you have selected the section will auto-adjust itself and display the properties relevant for its type. Located at the top right of the slot box the sort icon ( ![]() ) will be enabled if the action clip can contain multiple action; it is important (and good practice) to always keep your actions sorted.
) will be enabled if the action clip can contain multiple action; it is important (and good practice) to always keep your actions sorted.
In addition, all actions specified are internally stored as a string and does not point to any action unique id. The reason for this is re-usability; by specifying an action names as a string the same controller can be assigned to multiple resources as long as the action names match the entries specified and will always be valid. It is also, good practice to plan first and keep action names consistent to avoid duplication controllers asset that are essentially doing the same thing.
The scale parameter (which is present for most action clip types) allow you to increase or decrease the playback speed to synchronize actions. However, when the scale is used with a 1d or 2d blend type the effect will be inverted; a lower value will speed up the action, and a a higher value will slow it down. The reason for this is that for these types (1d and 2d) action time is always normalized to ensure synchronization; as a result, the scale will be multiplied to the relative playback time of the actions.
- Note
- If you shift or modify keyframe locations the action have to be rebuilt in order to update its internal duration. To rebuild a previously built action refer to the Timeline Actions help section.
- Warning
- To ensure that actions are blended properly in 1d and 2d your actions have to be synchronized (in normalized time ranging from 0.0 to 1.0). For example, if at 0% the left foot is on the ground then at 50% the right foot has been the one on the ground. Consequently, at 100% (the end of the action) the left foot should be back to its original position (the same on as it was at 0%). In addition, to ensure synchronization you should ensure (using Timeline Editor) that the first frame of each action actually start a 0.0; instead noticeable "clicks" between action cycles will occur.
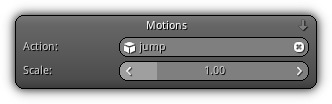
Single
Single Motion Clip.
| 
|
Action: Specify a single action to use for the active action clip. Press the ![]() ,
, ![]() or simply the
or simply the ![]() icon (which will vary depending on the active View3d selection, either: object, scene or none) to populate the list of actions for the selected resource. Press an entry to confirm the desired action name; or type it in and hit the
icon (which will vary depending on the active View3d selection, either: object, scene or none) to populate the list of actions for the selected resource. Press an entry to confirm the desired action name; or type it in and hit the Enter key. To clear the action press the ![]() button.
button.
Scale: Increase or decrease the playback time by setting a scale factor.
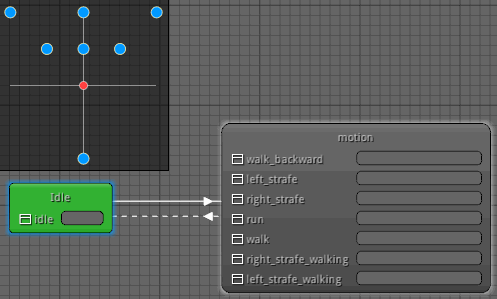
Blend 1d
Linear Motion Interpolation.
| 
|
Variable: The variable to use in order to control the linear interpolation of the action clip. Press the ![]() icon to open the list of all variables currently defined in your controller (see Variables & Transitions for more info.) press an entry to select. You can clear the variable referent by pressing the
icon to open the list of all variables currently defined in your controller (see Variables & Transitions for more info.) press an entry to select. You can clear the variable referent by pressing the ![]() icon.
icon.
To add a new entry press the ![]() button. Once the entry added, you can set up the
button. Once the entry added, you can set up the Position, Scale and the Action to evaluate. Each entry can be removed using the ![]() button located on its right side in the motion list.
button located on its right side in the motion list.
If the action clip is selected within the Action Clip Area (and motion graph drawing is on) you will be able to visualize each entry on graph and monitor in real-time, the blending weight(s) specified at the variable location (as displayed in the right screenshot above).
- Note
- All positions range are from -1.0 (left) to 1.0 (right) to insure proper results clamp you variable within that range and always sort motions using the (
 ) button.
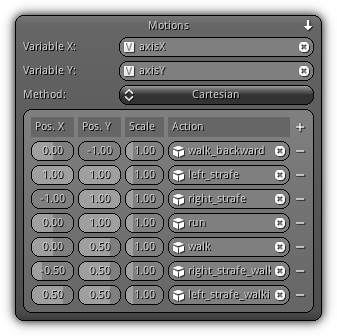
Blend 2d
Two Dimensional Motion Interpolation.
| 
|
Variable XY: Variable to control the position on the X and Y-axis of the action clip (same as in blend1d ranging from -1 to 1). Push the ![]() to populate the list of all variables setup in the controller; press or type an entry to select. To clear the variable press the
to populate the list of all variables setup in the controller; press or type an entry to select. To clear the variable press the ![]() button. Once your variables are set up press the
button. Once your variables are set up press the ![]() icon to start adding motions. For
icon to start adding motions. For Blend2d motions location have to be specified on the X and the Y axis. Same as its 1d counterpart motion(s) can be remove by pressing the ![]() button.
button.
Action & Scale: Work also the same way as the other type of action clips describe above.
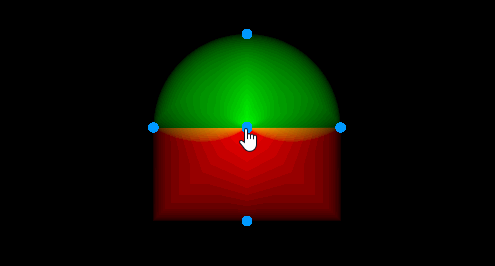
Method: The interpolation method to use while blending motions in 2d; choose between Cartesian or Radial. Radial gives usually smoother results but require you to have a motion located as 0,0 (such as idle) to perform adequately. A visual representation of the two methods is available below where red represents the Cartesian method and green the Radial method.
Blend Free
Free Form Motion Interpolation.
| 
|
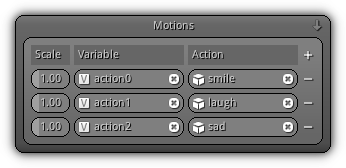
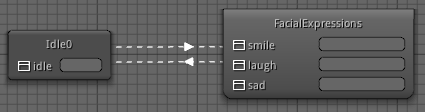
Variable: For this type of action clip each motion are controlled independently by a variable that should range from 0 to 1 (where 0 represent the action have no influence). A value of 0.5 will evaluate the action at 50% of influence and at 1.0 100% of influence. All motions are then blended to produce the final action output. This type of action clip is ideal to simulate a facial expression or different states of injuries on a character etc...
To add a new motion press the ![]() button; to remove it hit the
button; to remove it hit the ![]() icon. Worth mentioning that no position is needed for this type of clip since all motions are controlled independently by a variable (no sorting required as well).
icon. Worth mentioning that no position is needed for this type of clip since all motions are controlled independently by a variable (no sorting required as well).
Exit Options
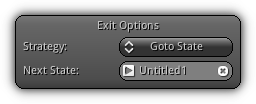
Available only when an action clip of the type ExistState is currently active (selected).
Strategy: The exit strategy to adopt, select between Back to Entry, Restart, Terminate or Goto State.
Next State: Available in the case Goto State is selected; this field allow you to select the action clip to jump to when the exit state is processed.
Transitions
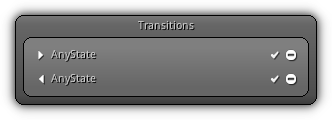
Populated when an action clip become active; all transitions that are either pointing to the active clip or coming from it listed in this section. To select a specific transition manually press an entry and it will then be selected in the Action Clip Area. To enable/disable a specific transition hit the ![]() located on the right side of the entry in the transition list. Transitions can also be removed from this section by pressing the
located on the right side of the entry in the transition list. Transitions can also be removed from this section by pressing the ![]() button for the associated transition entry.
button for the associated transition entry.
Clip Groups
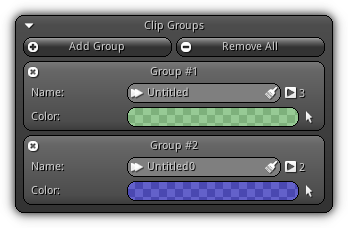
Clip groups allow you to conveniently pack action clips in a bunch. Once associated with a group you can select them all at once from the machine state graph using Ctrl+Left Button while selecting an action clip within the Action Clip Area.
Add Group: Create a new clip group. To remove a specific group press the ![]() icon located on the left side of its entry in the list.
icon located on the left side of its entry in the list.
Remove All: Clear all existing clip group associated with the active action layer.
Name: A unique name to identify the clip group. To clear the action clips contained in a group press the ![]() icon. The number near the
icon. The number near the ![]() icon represent how many action clips are currently contained inside the group.
icon represent how many action clips are currently contained inside the group.
Color: A unique color to highlight and identity all action clips the group contains. To conveniently select or deselect all action clips associated to the group at once using the interface press the ![]() button.
button.
Variables & Transitions
Activated by the ![]() icon from the toolbar; as the name imply this page is dedicated to variables and transition. Using the different sections presented below you will be able to add variables to your controller and set up a transition to respond to logical expressions using variables your machine state contains.
icon from the toolbar; as the name imply this page is dedicated to variables and transition. Using the different sections presented below you will be able to add variables to your controller and set up a transition to respond to logical expressions using variables your machine state contains.
Variables

This section allows you to define the variables that your controller will be using. These variables will automatically be propagated to any ActionController that is connected to the controller asset. The variables created in this section represent the definition and base value to use for each of them.
Contrarily to Member Variables (found in Scene or Object) they can only represent a single data; consequently, the types to select from are: Boolean, Integer and Float. To manage and manipulate variable settings please refer to the Object Member Variables help section.
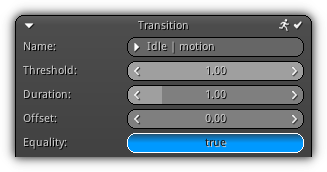
Transition
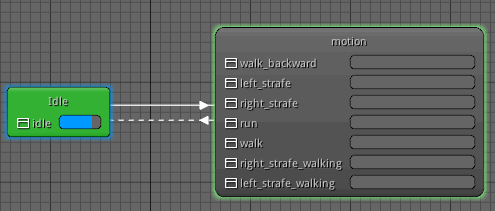
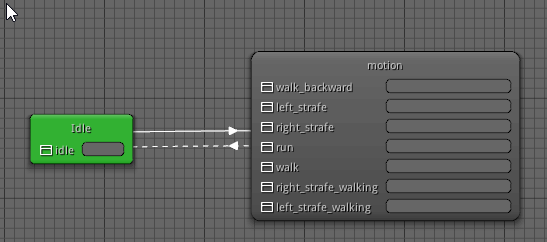
Transitions are used to tell your machine state to jump from one state to another depending on the result of a logical expression. A transition can be immediate or not; meaning that if it is immediate as soon the condition is true the state will automatically change. A non-immediate transition will wait until the duration of the action (minus threshold and duration time setup); in other words, delay the jump to the next machine state. To visually identify these two types inside the Action Clip Area, immediate transitions are drawn using a straight line and non-immediate transitions using a dashed line.
To toggle on/off the immediate mode of the transition press the ![]() icon; if you wish to disable a transition disable the
icon; if you wish to disable a transition disable the ![]() button.
button.
| 
|
Name: For reference only the name and direction of the active transition selected in the Clip Area.
Threshold: Relative value (ranging from 0 to 1, representing the beginning and the end of the action) to offset the end time of the action to perform a state jump.
Duration: How long the transition should take; were 1.0 equals to 1 second. This value will tell the system for how long it needs to continue blending the two states involved in the transitions before completely moving on the next.
Offset: Relative value to set an offset, telling the next action where to start. This is ideal to ie. synchronize transitions from a jump to a swept kick where the feet only need to be transitioned at a certain point in time.
Equality: The default conditional value of the transition that will be used as a base for the logical expression. The default value can either true or false.
- Warning
- If a transition enter into an error state it will be highlighted in red inside the
Clip Area. This situation can happen if the transition has been created using a user utility script or via plugins and the transition is deemed to be illegal (ie. a transition cannot come from an exit state) as it will never be executed.
Conditions
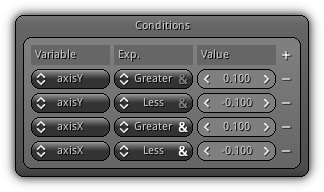
In this section, you can form any type of logical expressions that will in turn result as a boolean result. Base on this result the controller will decide whether or not it should jump to another state.
Start off by clicking the ![]() button to create a new condition line. To remove an existing line press simply press the
button to create a new condition line. To remove an existing line press simply press the ![]() icon.
icon.
Variable: The variable to test against the logical expression.
Expression: The logical expression to test the variable against. By clicking the & button you can force the condition to be evaluated as a AND instead of a OR.
Value: The value to evaluate the condition line with.
- Remarks
- All condition lines will be internally tested in sequence like this:
result=resultAND/OR(variable.valueexpressionvalue)
- Note
- The logical expression
Neveris evaluated asNOTas inif !(var.value); in the case ofAlwaysit will be evaluated asif (var.value).
Action Clip Area
The action clip area displays the content (all action clips and transitions) of an action layer. Action clips can be selected and dragged around to change their location using the Left Button. Using the Shift key will either append or exclude a specific component from the selection. Marquee selection is also available within this area but is restricted to action clip only. To controll the view (pan and zoom) refer to the Actions help section.
To enable real-time visualization feedbacks of the controller you first need to select a resource within the View3d that have an existing Action Controller that utilize the active controller the editor is displaying. Progress bars for action clip of the type Blend1d, Blend2d and BlendFree will then display the weight for each action. For Single the progress bar will display the action playback time. When selecting a transition or a blend1d/2d action clip a motion graph will be displayed on the top left. The red dot or line will display in real-time the value of the variable or duration time on the graph.
Comments
To create a Comment (basically a container for multiple actions) right off the machine state grid start by pressing creating a marquee selection using the Left Button. Hold Ctrl before releasing the button.
Once created simply press an unoccupied area to select all action clips it contains then drag it around to move all them all at once.
To modify the size of the comment press and drag the left, right and bottom border.
If you wish to move a comment without its content press the Ctrl key before selecting it then drag it around.
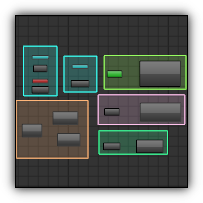
Color Coding
During development you will encounter a different type of color coding used to highlight action clips and transitions; refer to the table below to learn about their meaning. Take note all colors are assumed to be the default colors (does not consider user customization).
| Color | Description |
|---|---|
| White | Default action clip selection color. |
| Red | Error; an action was not found in the active action controller animation. |
| Yellow | The machine state controlling the action layer is terminated (usually triggered by scripts or an ExitState). |
| Green | The previous state the machine state tree was into. |
| Blue | The active state of the machine state tree. |
Navigation
Located on the top right of the Clip Area the navigation give you a visual overall view of the active action layer. As your state the machine becomes more and more complex it will also become more large and sparse (in term of on screen size); you can then use this control to easily jump from one side to another of the tree by simply clicking a location on the navigation graph.
Drag Drop
Single action clip can also be created automatically using drag and drop operation. The controller editor work in sync. with an active Timeline Editor editor; to create a single clip simply drags the action name to an active Action Layer them drop it on top of the controller editor the action clip is located.
|
|