
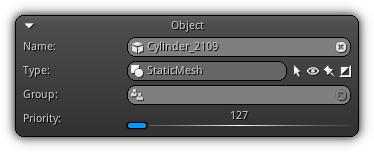
Name: The unique name of the object within the scene. To change the name of the active object enter a new one and confirm with Enter. To de-activate the current object click the ![]() icon.
icon.
Type: The object data type (read only). On right side the ![]() control the object selection state; next to it the
control the object selection state; next to it the ![]() icon control the visibility of the object and the
icon control the visibility of the object and the ![]() icon determine if the object is static (preventing the object to receive any manual transformation). Available if the active object have a mesh attached to its data the
icon determine if the object is static (preventing the object to receive any manual transformation). Available if the active object have a mesh attached to its data the ![]() determine if the geometry is mirrored or not.
determine if the geometry is mirrored or not.
Group: The Object Groups that the object belong to (if any). To manually add or change the group of the active object click ![]() to display the list of all available object groups; select one from the list by tapping on it. To remove the active object from the object group press the
to display the list of all available object groups; select one from the list by tapping on it. To remove the active object from the object group press the ![]() icon.
icon.
Priority: Set the priority of the object, this property can be used in code internally to (ie) mark a specific set of objects; but by default, it is used internally by the render layer Priority Sorting Methods.
- Note
- Setting the
priorityto 0xFFFF will force the object to draw regardless if it was occluded. Useful in the scenario where occluders and skybox are used.
Scripts
The Scripts section allow you to create threads and connect a script asset to each of them. Using this mechanism you can easily implement your game logic based on the event the object respond to. The table below list all the events that a base Object can trigger:
| Callback | Description |
|---|---|
OnCreate() | Triggered once when the object is created. |
OnDestroy() | Triggered when the object is about to be destroyed. |
OnUpdate() | Called everytime the object is updated (once per frame on scene update). |
OnDraw() | Triggered every time an object is calling a draw function (only apply for drawable object types). |
OnDisplay() | Triggered right after the object draw calls have been sent (only apply for drawable object types). |
Drawable Object Types
Camera, Probe, StaticMesh, AdaptiveMesh, DynamicMesh, SkeletalMesh, FracturedMesh, Occluder, Text and
ParticleSystem (Particles).
Action Controllers
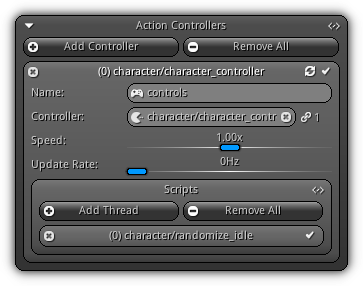
Action Controllers allows you to connect an existing Controller asset to the active resource. Once created the action controller can be controlled by manipulating the variables previously defined by the controller on a per resource basis. The action controller will act as a bridge between the states defined in the asset; allowing you to implement manual or artificial controls to a game characters, NPCs etc.
Located at the top right of the section the ![]() allows you to resolve the name of the controller asset(s) currently in used; or to simply display a sequential list.
allows you to resolve the name of the controller asset(s) currently in used; or to simply display a sequential list.
Add Controller: Create a new action controller slot. To remove an existing slot; press the ![]() icon on the left side of the entry. Located on right side of the slotbox header; pressing the
icon on the left side of the entry. Located on right side of the slotbox header; pressing the ![]() button will force to sync. the variables defined inside the controller asset with the active resource. The
button will force to sync. the variables defined inside the controller asset with the active resource. The ![]() icon allow you to enable or disable the action controller.
icon allow you to enable or disable the action controller.
- Note
- If you haven't force variable synchronization they will be automatically created as soon as the action controller is evaluated for the first time.
Remove All: Remove all existing action controller slots.
Name: A unique name to represent the action controller.
Controller: The controller asset to connect and sync. with the active action controller. Press the ![]() icon to display the list of all existing controllers. To disconnect a previously set controller; push the
icon to display the list of all existing controllers. To disconnect a previously set controller; push the ![]() button. Diplayed on the right near the
button. Diplayed on the right near the ![]() is the number of times the controller is referenced.
is the number of times the controller is referenced.
Speed: Control the speed of the playback time for the active action controller.
Update Rate: Control how many times per second the action controller should be updated. A value of 0Hz represent that the action controller will be re-evaluated every frame.
Scripts
The Scripts section allow you to create threads and connect scripts to an action controller. The table below list all the events that a script connect to an ActionController can respond to:
| Callback | Description |
|---|---|
OnUpdate() | Occurs every time the action controller is updated. This is the best location to sync. your action controller variables with an external input device such as keyboard or gamepad. |
OnEnter() | This callback is triggered when everytime the action controller enter a new machine state. |
OnLeave() | Called everytime the mahine state is about to change to another. |
OnState() | Triggered every time the active machine state is updated. |
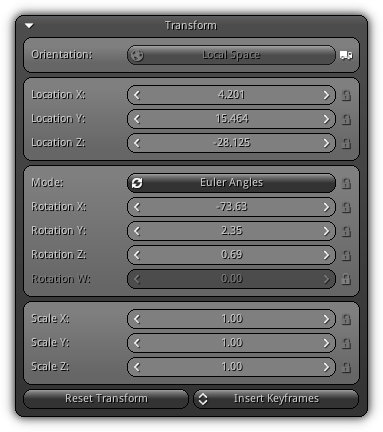
Transform
The transformation properties is a very versatile section. Multiple options are available to facilitate the manipulation of objects transformation in either world space or local space (when the object have a parent-child relationship); it offers two rotational modes, optional axis locks for positions, rotations and scale and more.
| 
|
Orientation: Select the transformation space of the object; either world space or local space (if parented) or simply toggle the ![]() option to automatically select the appropriate orientation based on the root status of the object.
option to automatically select the appropriate orientation based on the root status of the object.
Location XYZ: Control the XYZ location of the object in either local space or world space. Optional locks ( ![]() ) are available allowing you to restrict the movement of the object on a specific world/local axis.
) are available allowing you to restrict the movement of the object on a specific world/local axis.
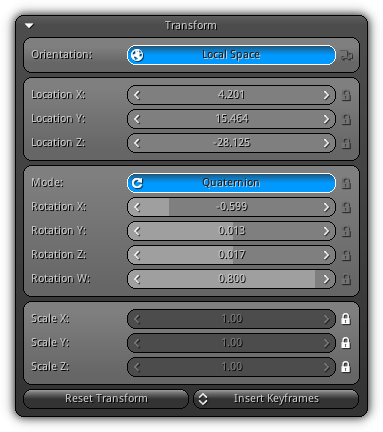
Rotation Mode: Select the rotation type that you want to use; switch between Euler Angles or Quaternion. An optional lock is also available to prevent the rotation mode to be changed.
Rotation XYZ(W): The rotation angles or quaternion value; either in local or world space. Same as for the location, locks are available to restrict rotational movements on each axis.
Scale XYZ: Control the XYZ scale of the object. Lock any axis (or all) to prevent scaling on the specified axes.
Reset Transform: Reset the object transformation back to the identity matrix.
Insert Keyframes: Insert keyframes from a specific set of channels to the active action (see /ref timeline). Select between Location, Rotation, Scale or Transform (Loc/Rot/Scl).
Bounds
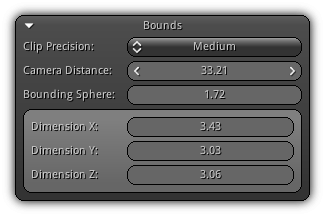
Clip Precision: Determine the precision of the bounding volume that will be tested against the camera frustum. A low precision will use a bounding sphere, a medium precision will use an axis aligned bounding box and high precision will use a world bounding box. The lower the precision the faster it is to test the object for visibility, the higher the slower.
Camera Distance: The distance between the camera and the object center.
Bounding Sphere: The bounding sphere radius of the object.
Dimension XYZ: The size of the axis-aligned bounding box of the object on all world axes.
Attachments
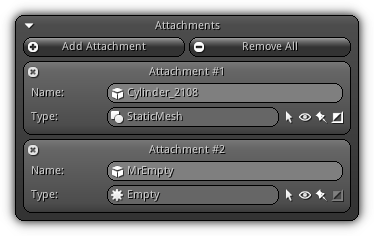
Add Attachment: Add a new attachment (child object) to the active object. To detach the child object press the ![]() icon located on the left side of the entry in the child list. To remove the attachment from the scene hold the
icon located on the left side of the entry in the child list. To remove the attachment from the scene hold the Shift key while pressing the clear icon.
Remove All: Remove all attachments and delete the child object(s) from the scene. To simply cut off the link between the child object(s) and the active object hold the Shift key while pressing the button.
Name: The name of the child object, to change its edit and press Enter to confirm.
Type: The data class of the child object (read only). Located on right side the ![]() control the child selection state. Next, the
control the child selection state. Next, the ![]() icon control the visibility of the child and the
icon control the visibility of the child and the ![]() icon determine if the child object is static or not. Enabled only if the object is a drawable type, the
icon determine if the child object is static or not. Enabled only if the object is a drawable type, the ![]() determine if the geometry should be mirrored or not.
determine if the geometry should be mirrored or not.
Relations
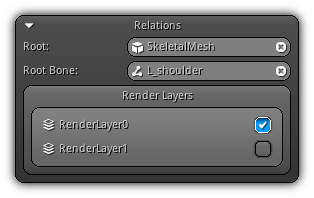
Root: The root object the active object is currently parented to; if the object does not have a relationship to another object the root is defaulted to be the scene. Press the ![]() to disconnect the relation.
to disconnect the relation.
Root Bone: If the parent is of the type SkeletalMesh and its connection to a specific bone; this field will list which bone the active object is actually linked to. Use the ![]() to break the relationship.
to break the relationship.
Render Layers: Define on which active render layer(s) the active object is placed on. Use the checkbox located on the right side of each entry to select the render layer you wish the object to co-exists.
Member Variables
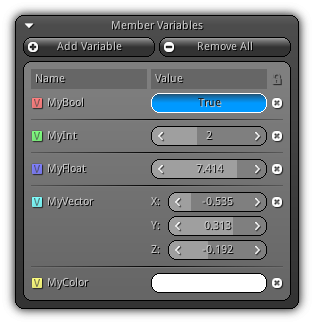
Add Variable: Add a new member variable. Member variables are specifically associated with the object and can be accessed by scripts, plugins, and shaders. To remove an existing variable press the ![]() icon located on the right side of the variable listed below.
icon located on the right side of the variable listed below.
Remove All: Remove all member variables associated with the active object. As a precaution measure, all variables can be prevented from being edited by toggling the ![]() icon. To lock variable(s) independently you can use the Variable Settings dialog. To change the value of the member variable use the associated widget(s) control associated with its entry in the list.
icon. To lock variable(s) independently you can use the Variable Settings dialog. To change the value of the member variable use the associated widget(s) control associated with its entry in the list.
Variable Settings
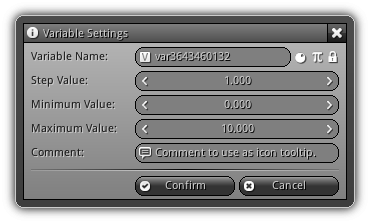
By clicking ![]() icon located on the left side of the variable you will have access to the variable settings dialog. This dialog allows you to customize the settings and behavior of the variable.
icon located on the left side of the variable you will have access to the variable settings dialog. This dialog allows you to customize the settings and behavior of the variable.
Variable Name: Change the name of the variable by inputting a new name and press Enter to confirm. On the right side, three additional options are available.
To tell the system that the variable is, in fact, a uniform and the variable value that should be pass to the shader(s) associated with the object (if the object is illegible to have Material(s) connected to it) toggle the ![]() icon. If you want to specify that a uniform variable should be applied on a specific material associated to a primitive append the index at the end of the variable name. In example
icon. If you want to specify that a uniform variable should be applied on a specific material associated to a primitive append the index at the end of the variable name. In example baseColor.1 will specify that the baseColor variable should be converted to a uniform only for the primitive index 1.
To specify that the variable is a constant (initialized once) value that does not need to be updated each and every frame toggle the ![]() icon.
icon.
In order to prevent modifying the default value that have been set click the ![]() icon.
icon.
Step Value: Specify the step value to use when the user is pressing the spinner left and right arrows.
Minimum Value: The minimum value for each field of the variable.
Maximum Value: The maximum value for each field of the variable.
Comment: A user friendly comment that will be use as icon tooltip when the pointing device hover the ![]() icon.
icon.
To confirm the variable settings press the Confirm the changes; press the Cancel or close the dialog to revert the changes.
Object Data
These type of properties are available depending on the type of object that is currently active in a View3d. The following set of settings will be automatically activated when the respective object type is selected. The list below describes which icon is toggling which properties page.
| Icon | Description |
|---|---|

| Access the properties of the active StaticMesh. |

| Control the settings of the current Adaptive Mesh selected. |

| Display the active DynamicMesh settings. |

| Show the SkeletalMesh settings for the active object. |

| List the active FracturedMesh properties. |

| Access the active Occluder properties and settings. |

| Display the active Text object settings. |

| Control the current Route settings. |

| Display the active Camera properties. |

| Toggle the properties of the active SoundSource. |

| List the setting of the current LightSource. |

| Access the selected ParticleSystem properties. |

| Display the properties of the active EnergyField. |

| Show the active settings of the current Probe. |

| Toggle the properties of the selected Ray. |

| Access the current Region settings and properties. |
|
|