
As an alternative to the COLLADA content pipeline, NRG supports the glTF v2.0 standards. Both embedded JSON (.gltf) and binary (.glb) file formats are supported natively and can be used to import either an entire scene with cameras and lights or a single model. The full scope described in the glTF v2.0 Specifications have been and tested against the output of all major 3d modeling software that is following this standard.
![]()
At import time an optional minimal PBR + IBL shader can be generated to give you direct visual feedback for quick prototyping. The material model used is the Metallic-Roughness as described in the specifications; the shader supports out-of-the-box base color map, tangent space normal map, emissive map as well as ambient occlusion. For metalness and roughness values, properties are packed as a single texture following the metallicRoughnessTexture model; where the G component contains the roughness value and the metalness is stored in B. For a more complete material/shader setup refer to the standard glTF Viewer code from the Khronos group. Aditional test models can be found here to test specific functionalities of the format.
To import the content of an existing glTF simply select the Library and from the top menu use Asset > Import... to open up the importer interface, and use the NRGeditor built-in File Explorer to locate and select the file. Alternatively, you can use the default file explorer for your current platform to drag and drop the glTF file on top of an existing Library editor (Desktop version of the editor only).
Importer Header

Asset Group: The location (relative to your project root folder) to place all the assets that are about to be imported. Use the app. (![]() ) icon to open the file explorer to manually select an existing group or manually input one.
) icon to open the file explorer to manually select an existing group or manually input one.
glTF File: Specify the glTF file you wish to import; it can be either a JSON .gltf or a binary .glb file. If your textures are not embedded within the glTF file insure that the path or associated .bin file is inside the same folder where the glTF file is located. To manually change the current file selection click the folder icon (![]() ) which will open the File Explorer.
) which will open the File Explorer.
Mesh Import
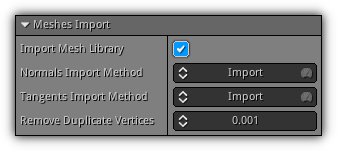
Import Mesh Library: Specify whether or not to import all mesh(es) contained in the specified glTF file.
Normals Import Method: Select between None, Import, or Calculate. The method None will bypass the normal import process (even if they are included in the file). Import will first check if the normals are present and import them; if not the importer will fall back to the Calculate method since you've requested them. Finally, the Calculate method will ignore the normals contained in the file (if any) and force a full re-calculation. When calculating the normals you can choose between two methods; either fast or accurate. Press the ![]() icon to switch between the fast (on) method or accurate (off).
icon to switch between the fast (on) method or accurate (off).
- Note
- Based on the triangle density of your geometry the accurate
Calculatemethod might take several minutes as each vertex are tested against the other to find its connectivity.
Tangent Import Method: Similar to the normals, three methods are available to handle the tangents: None, Import, and Calculate. Based on your selection the tangents will either be ignored, imported, or forced to be re-calculated. Take note that to re-calculate tangents both normals and texture coordinates have to be present. Alternate between approximated (fast) or accurate (slow) tangent calculations by toggling on/off the icon.
Remove Duplicate Vertices: Merge vertices that are below the minimum distance threshold of 0.001m; removing the potential discontinuity of the mesh.
Textures Import

Import Texture Library: Choose to either include or exclude all elements of the texture library contained in the glTF file.
Convert Textures to 16 bits: Force to convert all textures to 16 bits; this is recommended if you are targeting lower hardware classes such as early mobile devices. RGB (24bits) textures files will be converted to RGB565 and RGBA (32 bits) will be converted to RGBA4444.
- Note
- If the textures connected to the glTF file are not embedded inside the initial container insure that each texture file or associated
.binfile is inside the same directory as the.gltfor.glbimported.
Materials Import

Import Material Library: Import or simply ignore all material entries contained in the material library of the glTF file.
Generate Base Shader: Create a default PBR + IBL shader for quick visualization; the default shading model implemented is base on the Metallic-Roughness standard contained in the glTF specifications. Take note that this shader is not production ready; and should simply be used as reference for quick prototyping.
Material Presets
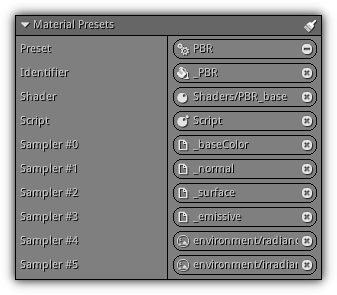
To give more flexibility to the import process the glTF importer provides the material presets section. In this section you can predefine material linkage based on string pattern(s) found in material names that are about to be imported. It is ideal when implementing your rendering pipeline since you will end up having shaders, scripts and other resources that have been created to handle specific phase of the rendering process.
At import time when a new material entry is encountered, it will be tested against the list of of existing presets (in the same sequence they appear on the list) to find a corresponding match with the active material name.
To create or select a existing profile click the ![]() icon to open the active preset list. Presets are saved along with your projects and will be used each time you are importing new resources. If you wish to remove an existing preset select it from the list and click the remove icon (
icon to open the active preset list. Presets are saved along with your projects and will be used each time you are importing new resources. If you wish to remove an existing preset select it from the list and click the remove icon (![]() ) button. If you wish to clear the material presets list press the
) button. If you wish to clear the material presets list press the ![]() button located at the top right of the section.
button located at the top right of the section.
Preset: The name of the active preset.
Identifier: The identifier representing a substring to look for in a material name to trigger the active preset. In the example above all material names that contain the _PBR identifier will trigger the PBR preset.
Shader: An existing shader to connect to the active material that matches the active identifier.
Script: An existing script to attach to the material if the preset is triggered.
Sampler #0~?: In a similar fashion as the identifier the importer will check for the first texture filename applied to the material (by default the diffuse or baseColor texture), and will use the matching substring specified in this section to search the glTF texture library for existing matches. For example, if the first texture applied to the material is called rock_baseColor.png, the preset will analyze that the texture base name is rock. It will then search the directory for rock_normal.png, rock_surface.png and rock_emissive (concatenating the string specified above) following the slot number sequence. If you want to connect a specific sampler slot with an existing texture or cubemap asset (like in the example above an existing radiance and irradiance cubemap) hold the Shift key while pressing the left side icon. This action will allow you to cycle through ![]() (texture),
(texture), ![]() (cubemap) to select an existing asset or to get back to
(cubemap) to select an existing asset or to get back to ![]() (the default file pattern).
(the default file pattern).
RenderLayer Presets
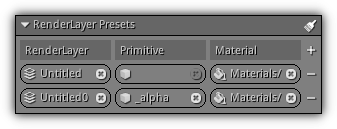
To make the integration even easier by and to avoid effectuating manual repetitive tasks; you can also specify rules to apply on a per object primitive basis. With the renderlayer presets you can set an identifier that have to be present in the primitive name. Once detected the material specified will be applied to each primitive that matches the identifier. To add a new preset press the ![]() icon, this action will create a new entry slot.
icon, this action will create a new entry slot.
To remove all existing preset press the ![]() icon; if you only wish to only remove a single preset entry click the
icon; if you only wish to only remove a single preset entry click the ![]() button.
button.
RenderLayer: Specify an existing renderlayer to apply the preset.
Primitive: A substring that have to be present in the primitive name to trigger the preset.
Material: An existing material that will be connection on the primitive(s) that matches the substring specified in the field primitive.
- Remarks
- An empty
primitiveidentifier will force the preset to be applied on all primitives that are connected to the renderlayer specified.
Skeletons Import
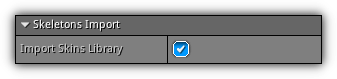
Import Skins Library: Choose to either import or ignore the entry of the skins library contained in the active glTF file.
Animations Import
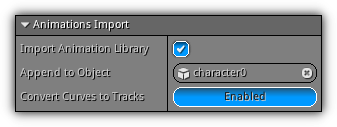
Import Animation Library: Import the animation library contained in the active glTF file.
Append to Object: Specify an existing object to either append to it new action(s) or to update existing ones. To select an existing object press the ![]() icon to open up the active objects list; to cancel the active selection press
icon to open up the active objects list; to cancel the active selection press ![]() .
.
Convert Curves to Tracks: Convert all animation local curves into track assets; this is ideal if you are planning to re-use or duplicate a certain object. Toggle this option if you are importing animations for resources that have multiple instances at runtime (for example an NPC or an animated object instanced multiple times in a scene). This will allow you to minimize storage as the tracks will be shared by all instances.
- Note
- To insure that skeletal mesh animations are imported properly please refer to the Skeleton Import section of the COLLADA content pipeline.
Curves Optimization
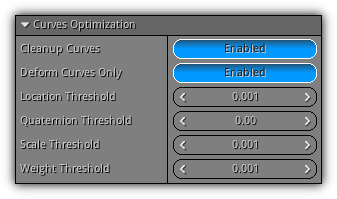
Cleanup Curves: Remove redundant keyframes based on the thresholds values specified (location, quaternion, scale, and weight).
Deform Curves Only: Import only curves that are actually having an impact on the animation, object, or bone transformation. Take note that the thresholds will also impact the curve(s) removal since the importer will first remove duplicated keyframes and then analyze if the resulting curve has an impact on the animation.
Location Threshold: The minimum value to determine if a location keyframe should be discarded or not.
Quaternion Threshold: The minimum value to determine if a quaternion keyframe should be discarded or not.
Scale Threshold: The minimum value to determine if a scale keyframe should be discarded or not.
Weight Threshold: Used when animating morph targets; this value determines the minimum threshold value to discard a keyframe or not.
Scene Integration
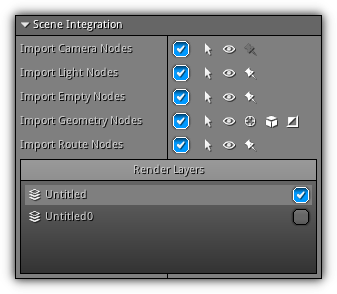
This section of the importer deal with the scenes and the nodes libraries contained inside the active glTF file. Based on the type of import you are planning you can skip specific types or sub-type of nodes and change their default states.
Import Camera Nodes: Import all cameras nodes inside the nodes library. Two types of cameras are supported: Perspective and Orthographic + Zoom.
Import Light Nodes: Import all lights nodes, defined by the format specifications only punctual lights are supported: directional (Sun), point (Lamp), spot (Spot).
Import Empty Nodes: Import all empty nodes; an empty node is an entry that is not associated with any type of data structure.
Import Geometry Nodes: Import all the nodes that have mesh data attached to them; this includes by default StaticMesh (with or without manual LODs), DynamicMesh (with morph target), AdaptiveMesh and SkeletalMesh (mesh + skin data attached to the node).
Import Route Nodes: Route nodes are used to import nodes with mesh data that consists strictly of lines (aka Path asset).
In addition, next to each type of node extra controls are available to change the state of the newly created object. You can also enable or disable extra functionalities such as LOD lookups and control if morph targets should be imported. The table below lists the icon types and effects on the object state(s).
Node Integration
| Icon | State | Description |
|---|---|---|
| Selected | Determine whether or not the object should be selected by default. | |
| Visible | Controls the default visibility of the object. | |
| Sticky | Force the object to be static preventing it to be moved. | |
Allow importing morph targets associated with a specific mesh node. Take note that enabling this option will change the type of the active node to DynamicMesh. | ||
Automatically search for associated LODs that have been linked manually. To manually connect LOD created using an external 3d software used to export the glTF file, a name-based mechanism is also available. During the scene integration phase any object that contains the token _LOD can be manually connected as a level of detail to an existing static mesh object. For example, assuming an object called Sphere which will be used as base; to automatically specify the lower level of details for that particular object all you have to do is call the subsequent object(s) like this: Sphere_LOD0 for the first level, Sphere_LOD1 the second, Sphere_LOD2 third, etc... The importer will keep looking for the next object name in the sequence until the sequence break. | ||
| Mirrored | Check if the active node transformation contains a negative scale marking it as a mirrored object. This mark can then be used by shaders to analyze if ie. normals and tangents should be inverted. |
Render Layers
Render Layers: Manually select on which render layer(s) the newly created object should be placed on.
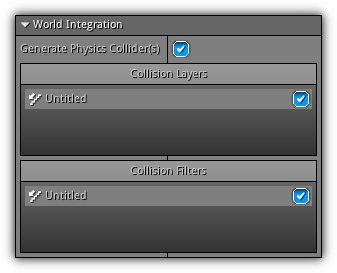
World Integration
Generate Physics Collider(s): The imported provides a name based mechanism to automatically generate physics colliders for each individual object types. Refer to the Physic Colliders subsection below for a list of all supported tokens.
Collision Layers: Select on which collision layer the physic object(s) should be placed on.
Collision Filters: Choose the collision layer(s) the physic object(s) should collide with.
Physic Colliders
To automatically create a physic collider for an incoming node simply ensure that one of the following token is present in the node name. For example the name Sphere_SPH will create a sphere collider for the object named Sphere. All colliders will take in consideration the dimension and radius of the object at the time of import to encapsulate its boundary based on the collider type provided. Take note that all colliders (at the exception of triangle mesh and convex hull) are using the Z as up axis by default.
| Token | Description |
|---|---|
_BOX | Create a box collider using the dimension of the node. |
_SPH | Create a sphere collider using the node radius. |
_CYL | Create a cylinder collider using the dominant dimension as the height and the radius for the base. |
_CAP | Create a capsule collider using the dominant dimension as the height and its current radius for both caps. |
_CON | Create a cone collider using the dominant dimension as the height and its current radius as base. |
_HUL | Create a convex hull collider using the active geometry associated to it. |
_TRI | Create a triangle mesh collider for the active node using its associated mesh geometry. |
- Remarks
- All shapes at the exception of convex hull and triangle mesh require the pivot point of the object to be located at the center of the geometry in order to work properly. To properly set the center of mass in Blender (with some objects selected) access the
Object > Set Origin > Origin to Geometrymenu to properly place the pivot at the center.
Library Integration
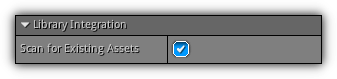
Scan for Existing Assets: Force the glTF importer to scan the current Library for existing assets of the same name and type. Toggle this optional step ON will cause the importer to first check if an asset already exists before creating it. It is ideal when assembling level(s) using modular assets or using existing asset library.
First, import your library of assets; then import your level (the objects that actually use these assets), all subsequent imports will automatically connect active resources directly without duplicating them (for more information please check the MicroKart and MicroLand video tutorials).
Importer Footer
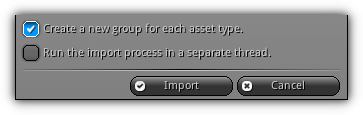
Create a new group for each asset type.: Force the importer to categorize the type of assets imported by directory. A dedicated asset directory will be created at the base of the group (if any) or to the project root specified in the Importer Header. For example, let us assume that the main asset group specified is Level1 all textures imported will be placed under the directory Level1/Textures, materials under Level1/Materials and so on.
Run the import process in a separate thread.: Running the import process in the main thread will be faster since the process bypasses the synchronization mechanism. However, on mobile devices it is recommended to run the import process in a separate thread as the underlying operating system might think the NRGeditor is not responding and in turn kill it automatically.
Import: Start the import process using the active settings.
Cancel: Cancel the import process; take note that all settings will remain the same next time you reopen the glTF importer (only valid for the current session).
|
|