
The default digital asset format supported by the editor is COLLADA. The importer is based and supports the COLLADA Specifications v1.5 (using a different version might result in some incompatibilities) supported by all major 3d modeling software at the time of writing. If you are using an Autodesk's product we recommend you to use OpenCOLLADA if you are using Blender the default COLLADA importer is fully supported.
Whether you want to import a single animated character, a single static mesh or even a complete scene; the importer is designed to allow you to quickly and easily import all your existing work to NRG.
The built-in COLLADA importer at the core of the editor fully supports importing the following assets and resources: Cameras, Lights, Static Meshes (with or without LODs), Skeletal Meshes, Dynamic Meshes (morph targets), Animations, Materials, Textures, Physics and allow you to optimize your geometries and automatically generate Adaptive Meshes import time. To import a COLLADA (.dae) to your Library select Asset > Import... menu item and then select a .dae file using the File Explorer; or simply drag and drop an existing COLLADA file on top of a visible Library editor (Desktop version of the editor only); the importer will pop up.
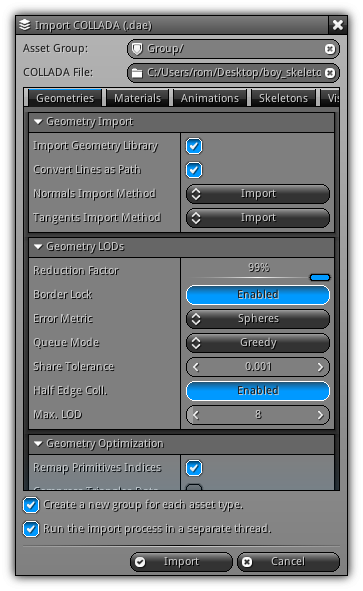
The importer consists of multiple tabs that allow you to control each and every aspect of the import process. Choose between the Geometry, Materials, Animations, Skeletons and Visual Scenes to configure how to import each library type.
Before getting deeper into the settings lets start with the header area where you can specify in which group to place the data as well as the COLLADA file to use. For each type of assets (Meshes, Materials, Textures etc...) a dedicated subgroup will be created from the root group (aka Asset Group).
It is good practice to keep all assets of a specific type grouped this way by you are of course free to rename and rearrange them as you see fit. To turn this option off simply click the Create a new group for each asset type checkbox (located at the bottom of the importer) off.
To receive visual feedback during the import process toggle the Run the import process in a separate thread. checkbox.
- Note
- On a mobile device it is recommended to run the import process as a separate thread. If not; the editor might be tagged as
not respondingby the operating system and might be terminated automatically.
Importer Header
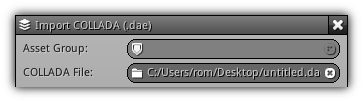
Asset Group: The location (within your project root folder) to place all the assets that are about to be imported. To create a new group automatically at creation time simply type the new path; you can also use the app. (![]() ) icon to open the file explorer to manually select an existing group within your project path.
) icon to open the file explorer to manually select an existing group within your project path.
COLLADA File: The current COLLADA file you wish to import. To change the current file selection click the folder icon (![]() ) which will open the File Explorer.
) which will open the File Explorer.
- Note
- In addition, note that by default the importer settings are configured to process all libraries contained in a COLLADA file. Depending on your requirements you might want to tweak what you want to import specifically based on the content of your COLLADA file.
Geometry Import
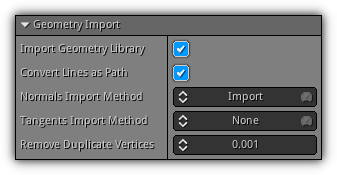
Import Geometry Library: Import all entries contained in the DAE geometry library.
Convert Lines as Path: When geometry is made out of lines; convert it to a Path asset that can be assigned to a Route object.
Normals Import Method: Determine the method to use when importing vertex normals. Choose to either import the one contained in the COLLADA file; recalculate them (using the current geometry info.) or simply ignore them (recommended when you are importing two dimensional elements for HUD or other types of GUI). Toggle the ![]() icon for fast normals calculations; off for accurate normals.
icon for fast normals calculations; off for accurate normals.
Tangents Import Method: Determine the method to use when importing vertex tangents. You can either use the one specified inside the DAE data; recalculate them for each UV channel (recommended) or simply ignore them (which you generally do when importing HUD or other GUI data type). Toggle the ![]() icon for fast tangent calculations; off for accurate tangents.
icon for fast tangent calculations; off for accurate tangents.
- Note
- For both
NormalsandTangentsif the data is not contained in the COLLADA file while theImportoption is selected they will be recalculated automatically; since you specify you require them.
Remove Duplicate Vertices: Merge vertices that are below the minimum distance threshold of 0.001m.
Material Import
This section of the importer located under the Material tab allows you to control how to import the different material and textures links located inside the active COLLADA file.

Import Material Library: Select to import or simply ignore all entries contained in the material library of the DEA file.
Convert Textures to 16 bits: Automatically convert all textures linked in the image library of the file to 16 bits. RGB (24bits) files will be converted to RGB565; RGBA (32 bits) will be converted to RGBA4444.
Generate Base Shader: Automatically generate a base shader for each material found that does not correspond to any presets (see Material Presets). This shader code will handle simple UV mapping of the base texture (slot #0).
- Warning
- When importing texture if no full path provided the importer will assume that the entry is located in the same directory as the COLLADA file. If you are using either relative or absolute path make sure that the importer can find these textures on disk; every texture not found will have to be manually imported and linked.
Material Presets
To facilitate material import process the importer provides the presets section. It works by analyzing the material name from the DAE library and assign the proper shader and textures defined by a string pattern. To create or select a profile click the ![]() icon to open the preset list. Presets are saved and updated automatically, and belong to your project; to remove an existing preset select it from the list then click the remove icon (
icon to open the preset list. Presets are saved and updated automatically, and belong to your project; to remove an existing preset select it from the list then click the remove icon (![]() ). At import time when a new material entry is encountered, it will be tested against the list of ALL your presets (in the same sequence they appear on the list) to find a match. To avoid any possible conflict revise your presets before importing. To remove all existing material presets press the
). At import time when a new material entry is encountered, it will be tested against the list of ALL your presets (in the same sequence they appear on the list) to find a match. To avoid any possible conflict revise your presets before importing. To remove all existing material presets press the ![]() button located at the top right of the section.
button located at the top right of the section.
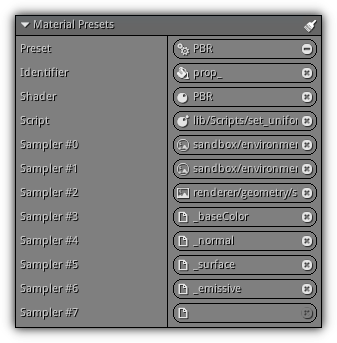
To understand how presets works let's take an example the settings from the screenshot above.
Preset: The name of the preset currently in edit mode.
Identifier: The identifier representing a substring that has to be present in the material name in order to apply the preset. In the example above all material names that contain prop_ will trigger the PBR preset.
Shader: The shader to use for the material that matches the predefined identifier; in the case above the shader named PBR.
Script: An existing script to attach to each new material.
Sampler #0~?: In a similar fashion as the identifier the importer will check for the first texture filename applied to the material (by default the diffuse or baseColor texture), and will use the substring set here to search the directory where the texture is located for files that matches the entry. For example, if the first texture applied to the material is called rock_baseColor.png, the preset will analyze that the texture base name is rock. It will then search the directory for rock_normal.png, rock_surface.png and rock_emissive (as it is set above). Each time appending the identifier for each slot and assigned it to the corresponding sampler slot number. In addition you can also preset some existing asset by cycling through ![]() (texture),
(texture), ![]() (cubemap) or
(cubemap) or ![]() (default file pattern) by holding the
(default file pattern) by holding the Shift key while pressing the left side icon.
RenderLayer Presets
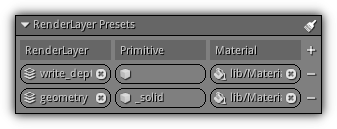
For the sake of making integration easier by and to avoid applying manual repetitive tasks; you can also specify rules to apply on a per Object primitive basis. With the renderlayer presets you can set an identifier that have to be present in the primitive name. Once detected a material specified will be applied to each primitive that matches the identifier. To add a new preset press the ![]() icon, this action will create a new entry slot.
icon, this action will create a new entry slot.
RenderLayer: Specify on which renderlayer to apply the preset.
Primitive: A substring that have to be present in the primitive name to activate the preset.
Material: An existing material asset to apply on all primitive(s) that matches the substring specified above.
To remove all existing preset press the ![]() icon; if you only wish to only remove a single preset entry click the
icon; if you only wish to only remove a single preset entry click the ![]() button.
button.
- Remarks
- An empty
primitiveidentifier will force the preset to be applied on all primitives that are connected to the renderlayer specified.
Animation Import
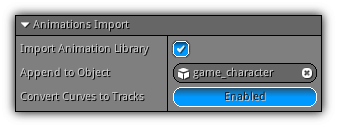
In this section of the importer, you can control whether to import the animation library. If you decide to do so all animation(s) will be imported as a New Track asset and will be connected to object(s) or bone(s) that have been extracted throughout the import process and linked to theses animation curves.
Import Animation Library: Choose to either import or discard the content of the animation library.
Append to Object: Ideal to add new action(s) or update existing one(s) of an existing object. This field provides you with a way to specify that all tracks imported from the animation library should create new action(s) for the selected object.
Convert Curves to Tracks: Allow you to specify if you want curves to be local or to be converted as a track (a global asset). Toggle this option if you are importing animations for a resource that have multiple instances at runtime. As a result, this will allow you to minimize storage as the tracks are shared by all instances.
- Warning
- When appending actions to an existing object; ensure that only the resources that you need are imported to avoid creating duplicates. For example; when adding a new action(s) to an existing skeletal mesh you do not need to re-import skeleton as well as the mesh data; only the animation data. Visit each importer tabs and turn everything that would duplicate resources; only keeping the animation data import.
Curves Optimization
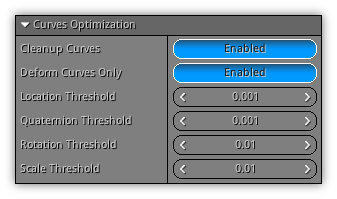
Cleanup Curves: Remove redundant keyframes using by the thresholds below.
Deform Curves Only: Force the importer to analyze which tracks actually have an impact on the object transformation including its joints/bones; in case of a skeletal mesh. As a result, all tracks that are not actually deforming the object or bone transformation will be removed. Note that thresholds values will also be used to determine if a track has an impact or not on the matrix.
Location Threshold: The minimum value to determine if a location keyframe value should be discarded or not.
Quaternion Threshold: The minimum value to determine if a quaternion keyframe value should be discarded or not.
Rotation Threshold: The minimum value to determine if a Euler rotation keyframe value (in degree) should be discarded or not.
Scale Threshold: The minimum value to determine if a scale keyframe value should be discarded or not.
Action Clips
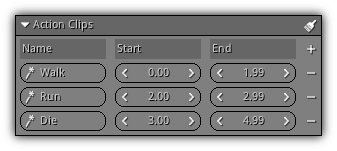
This section allows you to split animation tracks into multiple actions. To get started click the ![]() icon; this will create a new action slot.
icon; this will create a new action slot.
In this new slot fill in the following information:
Name: The name of the action to create/append to the new or selected object.
Start: The start time of the action within the animation track.
End: The end time of the action within the animation track.
- Note
- The Start and End time are specified in seconds where 1.0 = 1 sec. Take special attention when effectuating calculation to coordinate theses value with the corresponding keyframe time was used by your content creation software (assuming your software is using a specific amount of frames per second to create animations).
To remove an existing slot simply press the ![]() icon. If you want to restart fresh and delete all slots press the
icon. If you want to restart fresh and delete all slots press the ![]() icon located at the top right of the Action Clips section.
icon located at the top right of the Action Clips section.
- Remarks
- Action clips settings will remain active for the current session; if you are about to perform multiple import operations; verify that the clip data is still valid for your current operation before pressing the
Importbutton.
Skeleton Import
Import Skeleton Library: Toggle this option to import all skeletons and their relatives' joints contained in the COLLADA files. Note that this will only import the armature itself and have nothing to do with the skin (the mesh associated with a skeleton). However, if both the skin and the armature are selected for import a full SkeletalMesh will create and link to the skeleton; and if the bones of the armature have animation curve and the animation library is also set to import you will have a fully animated skeleton.
To ensure that your skeletal mesh animation will be imported properly revise the checklist below:
- Clean up your skeleton or armature by removing useless bones that are not connected to any vertices, or that does not have any impact within your animations.
- If some bones of your skeleton rely on inverse kinematics (IK) to solve bone transformation make sure that you have baked the resulting keyframe(s) within the animation curve(s). Do not rely upon IK to solve the transformation as it will not be exported to COLLADA.
- Ensure that all bones (heads and tails) are properly connected to each other. Loose bones cannot be used when applying transformation modifiers such as inverse or forward kinematics as the bone chain is broken, and the result will be incorrect.
- Converge all meshes into one objects attached to a skeleton; instead, the COLLADA export process will duplicate the full skeleton for each mesh.
- Clear the parent/child relationship between the mesh object and the skeleton/armature. COLLADA does not use controllers and will simply ignore the relationship. In content creation software including Blender use the
Armature Modifierto apply skeletal deformation to your mesh. - Apply transformation (reset Xform) on both the object and its attached armature.
- Remove any keyframe vertex animation (aka shape key) applied on the mesh as they will interfere with the skeleton deformation.
- Start the animation frame at 0; some content creation software starts by default their animation at frame 1.
Scene Integration
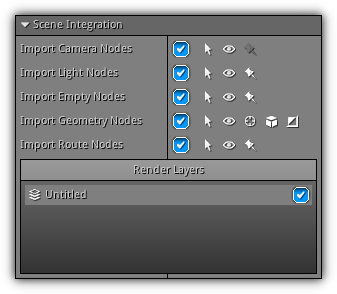
Located under the Visual Scenes tab this section control what type of object you want to import/create and append them to the currently active scene (if any). This area also allows you to manage the relationship of the newly created objects with the existing render layers of your scene.
Import Camera Nodes: Import all cameras contained in the visual scene library. The supported camera types are: Perspective and Orthographic with Zoom.
Import Light Nodes: Import all existing lights contained in the visual scene. Available lamp types are: World (aka Ambient), Direction (aka Sun), Lamp (aka Point) and Spot.
Import Empty Nodes: Import all empty nodes (a single node not associated with any type of data structure). Even if they don't sound like doing much they are often used as helpers, place markers, triggers (since they can also be associated with a physic object) etc...
Import Geometry Nodes: Import all the nodes that have geometrical data attached to them; this include StaticMesh (with or without manual LODs), DynamicMesh (with morph target), AdaptiveMesh (StaticMesh with automatic LODs) and SkeletalMesh).
Import Route Nodes: Import all nodes that have geometrical data made out of lines and create a Route object that will be connected to the Path (if enabled) associated with it.
In addition, next to each type of node you can control the state of the newly created object(s) and gain access to extra import functionalities defined by the type of node you are dealing with. Refer to the table below to learn what functionalities are available when enabling each icon button.
Node Integration
| Icon | State | Description |
|---|---|---|
| Selected | Determine whether or not the object is selected by default. | |
| Visible | Enable or disable the visibility of the object on all render layer the object is associated to. | |
| Sticky | Toggle if this type of objects are static and does not move. | |
Allow the creation of morph targets. If a "morph target" sequence is attached to a node the importer will create a DynamicMesh for it and reconstruct its morph targets using the exact same sequence found in the COLLADA file. | ||
Search for manually linked LODs (objects tagged with the _LOD token). To manually connect LOD created using an external 3d software used to export the COLLADA file, a name-based mechanism is also available. During the scene integration phase any object that contains the token _LOD can be manually connected as a level of detail to an existing static mesh object. For example, assuming an object called Sphere which will be used as the base; to automatically specify the lower level of details for that particular object all you have to do is call the subsequent object(s) like this: Sphere_LOD0 for the first level, Sphere_LOD1 the second, Sphere_LOD2 third, etc... The importer will keep looking for the next object name in the sequence until the sequence break. | ||
| Mirrored | Automatically find and mark mirrored mesh (drawable objects that uses a negative scale to mirror geometry). |
Render Layers: Specify on which render layer(s) the new objects will be placed.
World Integration
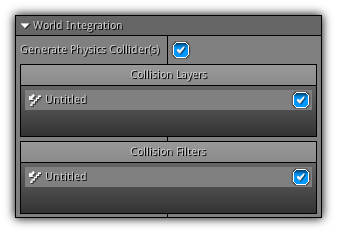
The final section of the Visual Scenes tab is dedicated to physics. If the active project contains a World this section will be enabled. The creation of a physics object is similar to the process used to manually specify LODs; it uses tokens to determine what type of physic collider should be generated for an object.
Generate Physic Collider(s): Automatically generate physic colliders for each node tagged with one of the valid token listed in the table below (Physic Colliders).
Collision Layers: Select on which collision layer the physic object will be placed on.
Collision Filters: Choose with which collision layer the physic object will collide with.
Physic Colliders
To dynamically generate physic collider for any type of node at import time all you have to do is to append one of the following tokens at the end of the node name.
| Token | Description |
|---|---|
_BOX | Create a box collider using the dimension of the node. |
_SPH | Create a sphere collider using the node radius. |
_CYL | Create a cylinder collider using the dominant dimension as the height and its current radius for the base. |
_CAP | Create a capsule collider using the dominant dimension as the height and its current radius for both caps. |
_CON | Create a cone collider using the dominant dimension as the height and its current radius as base. |
_HUL | Create a convex hull collider using the active geometry associated with the node (if any). |
_TRI | Create a triangle mesh collider using the active geometry associated with the node (if any). |
- Note
- By default, all physic objects created are non-static rigid bodies at the exception of triangle meshes assumed to be used for collision maps. Once imported feel free to tweak and set the appropriate physics properties to make the physic object behave the way you want.
Library Integration
Scan the current Library for existing mesh(es) and material(s). Toggling this option ON will force asset(s) of the same name and type to be re-used instead of creating new ones. It is ideal when assembling Scene(s) that uses modular pieces; simply import your geometry library along with its materials first then, all subsequent imports will automatically be linked to the existing library assets.
Mixamo Integration
Over the years Mixamo has become a platform of choice from indie to AAA game developers. To properly import your creations using Mixamo and COLLADA into NRG follow the quick steps below:
- Use a default skeletal mesh from Mixamo or upload your own; then setup.
- Download as FBX (T-Pose) with skin.
- Import into Blender (suggested, since the COLLADA exporter fully compliant).
- Select all meshes press Ctrl+J to merge them into one.
- Enter edit mode (Tab) remove doubles using 0.001f.
- In Properties -> Data, clean up all extra UV Maps (keep only 1; all others are duplicates).
- In Properties -> Material, remove all duplicated materials (if any).
- In UV editing, select all (A) faces and assign them to the diffuse texture.
- In Animation view select Animation Editor; Key menu > Clean Channels (with all channels selected).
- Select the mesh and armature then export as COLLADA (ensure that `Selection Only` is checked).
- Drag Drop the COLLADA file on an active Library editor and import it.
To append other actions to the base skeletal mesh you've imported in the steps above:
- Setup your action on Mixamo.
- Download as FBX, this time without skin (only the skeleton).
- Import in Blender.
- Select the armature object and export as COLLADA (ensure that `Selection Only` is checked).
- Inside the editor; ensure that the initial skeletal mesh object is selected (and activated).
like this the COLLADA imported will detect that you are trying to append a new action to the active skeletal mesh selected.
- Drag Drop the COLLADA file on a selected Library editor and import.
- Delete the duplicated armature imported (or uncheck import skeleton before import).
It is also important to keep the skeleton's joints name consistent to maximize the re-usability of the actions within your project. It happens sometimes that the joints name have a header that makes actions retargeting problematic. To clean up names before importing actions use the FixRig utility script before importing additional actions to your character(s).
If you are planning on retargeting actions it is suggested that you use them Convert Curves to Tracks option to ensure no keyframe duplicates in memory as the tracks generated will be shared by all actions regardless of the owner of action (see Animation Import for more details).
- Remarks
- If the action is actually moving the character (and you do not want to use root motion); in Blender open a new
Dope Sheeteditor and remove theHips Location Zchannel (select and hitDelkey).
- Note
- Actions imported from a Mixamo character can be retargeted to other characters that share the same skeleton hierarchy; visit the View3d Selection Menu Miscellaneous section for more information; or use directly in C/C++ or Lua the
SkeletalMeshRetargetActionAPI.
|
|