
Scripts
A common control that you can find all over the editor is the scripts box. It allows you to connect one or multiple scripts to many types of resources, other assets, and subsystems (ie: the application itself). Each type of the resources responds to a specific range of events documented in this manual and inside the scripting API.
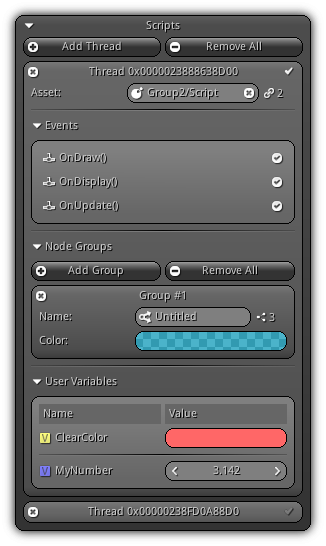
Add Thread: Create a new environment to run a specific script.
Remove All: Remove all existing threads attached to the resource handle.
To remove a specific entry from the thread list (which include detaching its associated script, if any) simply click the ![]() icon located on the left side of the slot box header.
icon located on the left side of the slot box header.
If you wish to disable the execution of the script, toggle off the ![]() icon. This will cause the script to stop responding to any event callbacks it contains but the thread will still remain active.
icon. This will cause the script to stop responding to any event callbacks it contains but the thread will still remain active.
Asset: Change the internal name of the script asset by typing in the new name; press Enter to confirm. To change the current script in use press the ![]() icon to pop up the list of all scripts available in your Library. To clear the reference of the script attached to the thread tap the
icon to pop up the list of all scripts available in your Library. To clear the reference of the script attached to the thread tap the ![]() icon. On the right side of the asset text box, you can find the number of references the script used by the thread actually contains. The number following the
icon. On the right side of the asset text box, you can find the number of references the script used by the thread actually contains. The number following the ![]() icon represents how many users that are currently linked to that specific script.
icon represents how many users that are currently linked to that specific script.
Events
When a script is compiled, the callbacks it contains are automatically extracted from the code to create an independent mask. In this section, you can visualize what are the callbacks that the script can handle.
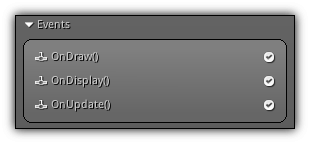
On the right side of each event, an icon is present representing the state of the callback. The ![]() icon show that the function is responding normally. In the case that a function encounters an error the icon will be updated giving you a hint about the error type. However, since all functions are masked; only the callback that creates the error will stop responding; all other functions will continue to run normally as expected.
icon show that the function is responding normally. In the case that a function encounters an error the icon will be updated giving you a hint about the error type. However, since all functions are masked; only the callback that creates the error will stop responding; all other functions will continue to run normally as expected.
- Note
- When an execution error is encountered the full information will be displayed in the Console. In addition, if you are testing your app full screen it will automatically switch back to the editor and the Code Editor will be focused. If the Lua debugger is attached (
Ldb), the code editor will break at the line that causes issue and the full call stack will be available.
- Warning
- By default (while running any script or utility in edit mode) the maximum time of execution allowed per script is set to 5 sec. If the script hasn't responded during that period the editor will automatically stop its execution and generate a
timeouterror. To override this limit (in case your script/utility need more processing time) you can simply add the following comment anywhere in your code:--IGNORE_NOT_RESPONDING. This will lift the maximum time limit your script have to respond.
Node Groups
Only available when the script is using nodes; the next section gives you a quick access to manage the existing node groups.
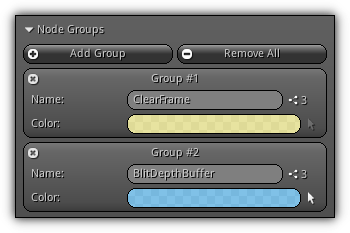
Add Group: Create a fresh node group ready to be used.
Remove All: Delete all existing node groups. To remove a single node group click/tap the ![]() icon located on the left side of the slot box header available for each entry.
icon located on the left side of the slot box header available for each entry.
Name: Quickly change the name of a specific node group; press Enter to confirm the changes. Next, on the right of the text box is the node count ( ![]() ) which represent the number of nodes a specific group currently contains.
) which represent the number of nodes a specific group currently contains.
Color: A color to present the node group. This color will be used as the highlight color when a node that belongs to the group is selected. The ![]() icon control/display the selection state of all nodes contained in the group. To invert the group selection hold the
icon control/display the selection state of all nodes contained in the group. To invert the group selection hold the Shift while pressing the icon, to synchronize the selection state hold Alt+Shift.
- Remarks
- To select all node within a group hold
Ctrlwhile selecting a node while the Code Editor is in Node View.
User Variables
Each script connected to a resource run inside its own specific environment; within this environment global variables can be placed to allow the script to be tweaked by other users. To do this, programmers can optionally use global variables within their Lua code that will be exposed in the IDE. These variables are then analyzed at compilation time and visually displayed in this section of the scripting properties.
User variables can also be generated from shaders when the uniform keyword is found within their declaration.
- Note
- To hide a
uniformvariable from a shader simply add a_as the first character of the variable name. As a result, they won't be exposed in the user variables settings. For Lua code simply add thelocalkeyword to a global scope variable.
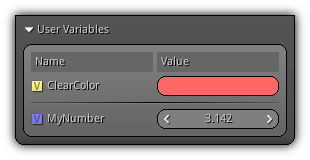
Control that is automatically generated using the user variables contained in their script or shader act the same as any others found in the editor. To modify a value, simply manually input the new data and press Enter to confirm. You can also use the Right Button+Drag to change the value as you would do on a slider.
Additional widgets, such as the Color Picker, might also be available in the case the programmer wants you to change color; or a simple toggle button, that you can (in case of a Boolean value) to enable or disable a specific option.
In addition, usage comments might also have been placed by the programmer to give you instruction about how to use the value(s); to gain access to these comments simply place your cursor over the ![]() and a tooltip will popup.
and a tooltip will popup.
Color Picker
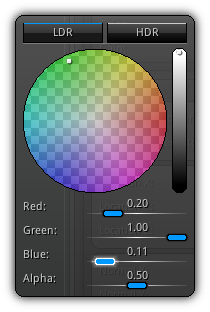
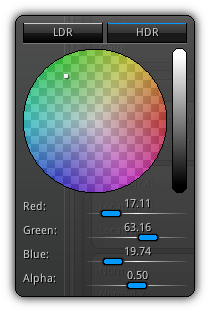
The color picker allows you to select a specific RGB or RGBA color and comes in two flavors giving you the opportunity to select between LDR and HDR. It is based on the cylindrical-coordinate representation HSV (hue, saturation, value) represented as a double hexcone which is converted back to RGB (red, green, blue) color space (represented as floating point values).
The upper part of the color picker is the "color wheel" area. To select a color click or drag the cursor around to pinpoint a specific tint of your choice. On the right side, you can increase or decrease the luminance of the active color.
Below this section, you can tweak, set and adjust each color component by either dragging the slider or by editing the value of a specific component manually.
| 
|
Red, Green, Blue, Alpha: To change the RGB and A component you can either drag the scroll or select the text box where the value is display and edit it. Please remember that the value range of each color space component will be clamped to 0.0 to 1.0 in LDR and 0.0 to 100.0 in HDR; alpha is always in the range of 0.0 to 1.0, and luminance is off in HDR.
On a side note, in the case that the RGB(A) component is attached to an asset, object or another type of resource that can handle animations the color component label will become clickable. Clicking on the label will bring the popup menu that will allow you to create an animation curve for the specific component which can then be animated in real-time.
- Note
- Every Time the color picker is presented on screen it is attached to a color bar control. To copy color and paste it to another color bar control (or inside a text control)all you have to do is to focus the color bar control press
Ctrl+Cthen focus the other color bar control where you want to assign the color and paste it (Ctrl+V). In addition, the value that will be placed in the clipboard will be a hexadecimal value represented as RGB or RGBA.
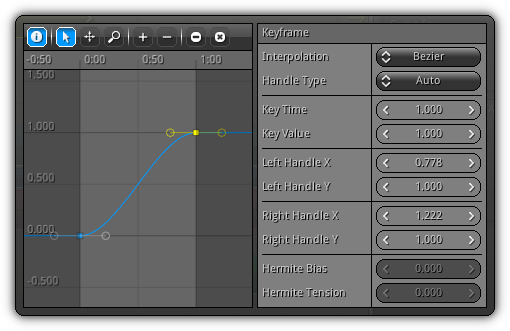
Curve Picker
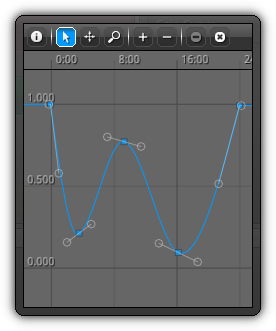
Available when ie. a Track or a Color Vector texture is active and is frequently used in the Sequence Editor to manipulate various curves. The curve picker provides you a quick way to edit and manipulate keyframes. It works the same way as the Curves Area of the Timeline and contains much of its features as well, and is available on demand when tapping on a curve bar control.
| 
|
The curve picker is divided into three distinct part; the upper toolbar gives you quick access to common functionalities; the center part is where you can edit and manipulate keyframes. The right side panel is available on demand when a keyframe is selected. Once available you can then set and tweak manually the properties of the active keyframe.
- Note
- In some cases when the time range of a curve is restricted left and right side grayed area will be displayed showing you the available the time range currently covered by the curve (as displayed in the left side screenshot above).
Toolbar
Control the default left button action and provide quick access to common operations.
| Icon | Action | Shortcut | Description |
|---|---|---|---|

| Info. | Show hide the active key frame property panel. | |

| Selection | Allow you to single select key frames from the current curve (hold Shift to append to selection). | |

| Pan | Shift+Alt+LB or MB | Pan the grid using your pointing device drag direction; this action will cause the grid to pan to that direction (or at all time the Middle Button). |

| Zoom | Ctrl+Alt+LB | Zoom in on a specific axis using your pointing device (either X, Y or both) by dragging it while holding the Left Button. |
| Zoom In | Zoom in the grid on both X and Y axis. | ||
| Zoom Out | Zoom out the grid on both X and Y axis. | ||

| Remove | Del | Remove the active key frame selection. |

| Clear | Backspace | Clear all the key frames from the active curve. |
Keyframe
Refer to the table below to learn how to add, insert, select or delete keyframes using the shortcuts listed below. To translate the active keyframe(s) selection simply move it with your pointing device. During any of the operation listed above, you can hold X or Y on your keyboard to constraint the axis plane to operate on. In addition, while dragging holding Shift will smooth the movement to increase precision.
| Shortcut | Description |
|---|---|
Ctrl+I | Invert the current key frame selection. |
Left Button | Select/deselect a key frame; hold Shift to append to the active selection. |
Ctrl+Left Button or Ctrl+A | Select/deselect all keyframes. |
Left Button 2x | Double tap to add new keyframe. |
Shift+Left Button 2x | Double tap while holding Shift to insert a new keyframe. |
- Remarks
- If the active keyframe interpolation type is set to
Hermiteit is possible to modify itsTensionandBiasby respectively holding thetorbkey. To reset these values simply use their uppercase counterparts (TandB). In addition, if the active keyframe interpolation type include the use of handles, you can re-equalize them by pressingE.
View
You can control the active view of the curve picker by using the shortcuts listed below when the curve area is selected.
| Item | Shortcut | Action |
|---|---|---|
| ZoomX In | - | Increase the X axis zoom. |
| ZoomX Out | = | Decrease the X axis zoom. |
| ZoomY In | + | Increase the Y axis zoom. |
| ZoomY Out | _ | Decrease the Y axis zoom. |
| Reset Pivot | H | Reset back to view to 0,0 and the zoom to 1:1. |
| Focus Active | . | Adjust the view position and scale to focus the current active keyframe. |
| View Selection | \ | Calibrate the zoom and center position to encapsulate all selected keyframes. |
| Center/View All | / | View all active key frames currently visible. |
|
|