
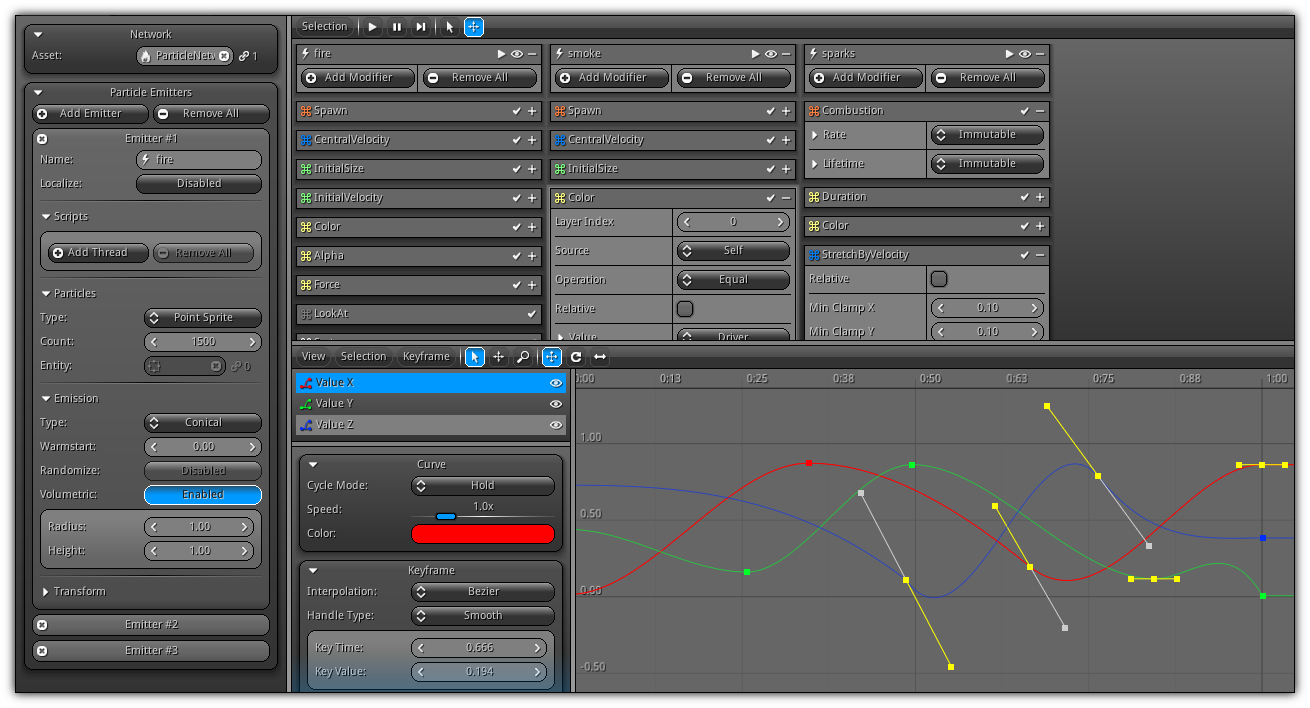
To create a wide range and variety of particle effects you have access to the Molecules Editor. Built-in on top of the NRG particles network system the editor allow you to visually create and control the behavior of millions of particles. With a modular approach, the molecules editor will give you real-time feedback allowing you to create extremely fast complex effects. The editor is divided into three specific sections; spanning all the way up on the left side you have a dedicated section for selecting a particle network and set emitters properties.
The center area is split in two; the upper section is the modular representation of your particle emitter(s) where you will be adding blocks defining emitters and particles behaviors; in other words the Modifiers Editor. The center down section is the Curve Editor similar to the Timeline Editor Curves Area; where you can create/edit custom curves for each component of a specific particle property or behavior using its distribution value (either uniform or driver).
A few more words to make you understand how particles networks are working. At the base of an effect, you always have Particle Network asset. To this network, you will then add emitter(s). Basically, an emitter is a shape (ie. cube, sphere, cylinder etc...) attached to a particle network that creates particles. On top of defining a specific shape in space where the particles have spawned the emitter you also need to specify the type of particles it will create; such as points, quads, lines or matter (aka. objects).
Once an emitter created, you will then add Particle Modifiers that will allow you to define the behavior of the particles an emitter launch in space. This modular approach drastically simplifies the way you create particle systems allowing you to create stunning effects in no time.
While creating your particle networks make sure that a View3d is currently assigned to a section of the editor (either in edit mode or application mode) to visualize in realtime the effects of your modifiers settings on the particles. To control the playback timeline; you can use the control located in the modifier editor toolbar, or simply use the Timeline Editor Playback Controls.
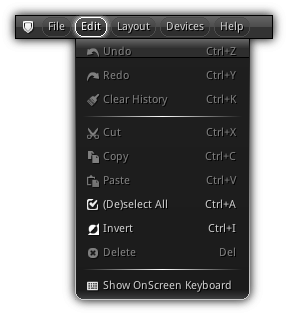
Edit
| Modifiers | Emitters |
|---|---|
| 
|

| 
|
| Item | Shortcut | Action |
|---|---|---|
| Cut | Ctrl+X | Delete the current modifiers selection and store the necessary script to reconstruct them into the clipboard. |
| Copy | Ctrl+C | Generate the scripting command to reproduce the current modifiers selection. |
| Paste | Ctrl+V | Append all the modifiers generated by the script held in the clipboard to the active particle emitter. |
| (De)select All | Ctrl+A | Select vertically all entries contained in the active emitter; if everything is already selected this action will deselect them all. |
| Invert | Ctrl+I | Invert the current emitter/modifier selection. |
| Delete | Del | Delete the active modifier selection. |
- Note
- Take note you can copy/cut particle modifier(s) but not an emitter itself. However to paste (or append in this case) the particle modifiers script held in the clipboard you need to select an emitter first. Hence, all modifiers created by the script in your clipboard will be appended to the selected emitter.
Properties
In order to start editing a particle network you first need to select an existing one from your library (from the Particle Network area).
Once selected the Particle Emitters section will become enabled listing all existing particle emitter(s) previously created (if any) and attached to the active particle network.
Particle Network
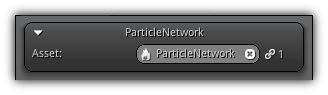
Asset: Either type in the name of an existing particle network or use the ![]() icon to pop up the list of all existing networks available in your library. Select one to get started.
icon to pop up the list of all existing networks available in your library. Select one to get started.
Particle Emitters
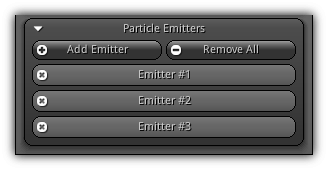
Add Emitter: Add a new emitter to the active particle network.
Remove All: Remove all existing particle emitters currently attached to the active particle network.
To remove a specific emitter from the list click the ![]() icon located on the left side of the header its associated slot box.
icon located on the left side of the header its associated slot box.
- Note
- To change the rendering order of the emitter simply select a slot box header and drag it to another. Consequently, the two emitter index will swap. Take note that the rendering of the particles will always draw based on the emitter sequence in the list.
Settings
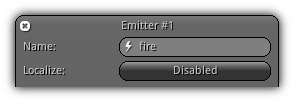
Name: A unique name for the active emitter within the particle network.
Localize: By default particles are calculated in world space; enabling this option will force all particles associated with the current emitter creates to be calculated in local space (relative to the emitter position).
Scripts
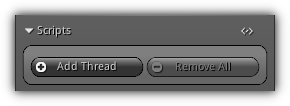
Each emitter can be linked to its own set of scripts. To setup scripts to the emitter refer to Scripts help for more information. Scripts that are connected to an emitter will respond to the following callbacks:
| Callback | Description |
|---|---|
OnPlay() | The emitter start playing and emitting particles. |
OnPause() | The emitter is stop generating particles and all existing ones are not affected by the application playback time. |
OnResume() | The emitter state was set to pause and the play function have been triggered again. |
OnStop() | The emitter is stop function have been triggered all particles are removed. |
OnCreate() | New particles have been created. |
OnDestroy() | One or more particles have been destroyed and finish their cycle. |
OnContact() | Available when physics is applied on the particles created by an emitter. If one or more particles are in contact with the physics world (in other world they collide with another entity) this function will be called. Extended information about the collision will then be available within the function callback. |
OnUpdate() | Triggered every time a particle emitter update particles. |
Located on the upper right side of this section; the ![]() allows you to resolve the asset name of the script(s) used by the emitter.
allows you to resolve the asset name of the script(s) used by the emitter.
Particles
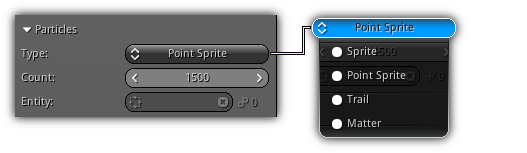
Type: Specify the type of particles to emit. Take reference on the table below to learn and understand their differences.
Count: The maximum amount of particles this emitter can produce. This amount will be cached (in other words the memory will be assigned) in order to speed up the particle creation process. Keep this number as close as possible to numbers of alive particles you wish to maintain.
Entity: Available when the Matter particle type is selected. This field allows you to manually enter an existing entity asset. By clicking the ![]() icon you can pop up the list of all available entity in your project library.
icon you can pop up the list of all available entity in your project library.
| Type | Description |
|---|---|
| Sprite | Quads; their sizes are not implementation limited and rotation can be applied. They are constructed using two triangles and takes 4 vectors per particle in memory. |
| Point Sprite | Points; they are the fastest type to render and takes little memory (1 vector per particles). However their size is restricted by the maximum point size of the graphic implementation (which may vary from platform to platform). In addition they can only have the same size on the X and Y axis and cannot be rotated. |
| Trail | Stitched quads; very similar as Sprite the trail allow you to created lines since all particles emitted will connect to the next using a triangle strip. They are ideal to create effects such as lighting, electricity or motion trails. |
| Matter | This type allow you to connect an existing entity. An entity is basically a predefined branch (including leaves if any) of the scene graph that have been saved as a script. Every time a particle will be emitted the script will run creating a new object or series of objects and reconstruct their properties (physics included). |
Emission
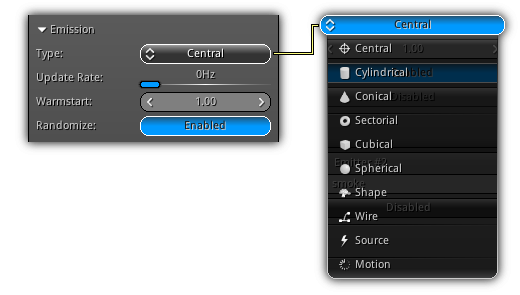
Type: Select the type of emission for the current emitter; refer to the Types table for more information about each type.
Update Rate: Specify the particles update frequency (in Hz); if no update frequency is specified the particles are going to process a full update cycle every frame.
Warmstart: Define a time offset to warm start the emitter. By assigning a value of ie. 1.0 or 1.5 the emitter will go ahead in time and start emitting particles in the background. This is ideal when you want to have an emitter that already has particles generated when it starts playing (ie. for a fire).
Randomize: Available when using a warm start value, this option tells the system to generate a random time between greater than 0.0 and warm start. An example using this option you can have multiple fires particle system starting at a different random time increasing the level of realism even if they are all derived from the same particle network.
Volumetric: Only enabled when a tri-dimensional shape is specified as the emission type including cube, sphere, cone etc... This option will force the particles to be emitted over the volume in space the emission shape occupy. If turned off, the particles will be generated at the edges of the shape specified.
|
|
Types
The table below describes each emission type.
| Type | Description |
|---|---|
| Central | Particles are emitted from a single point in space. |
| Cylindrical | Creates particle contained within a cylinder. |
| Conical | Emits particles from a cone. |
| Sectorial | Particles are emitted within a sector shape (a non closed cylinder). |
| Cubical | Creates particles within a cube. |
| Spherical | Creates particles around the radius of a sphere; or optionally an hemisphere. |
| Shape | Use the vertex information of a specific geometry to generate particles (non volumetric). |
| Wire | Create particles along a path in space. A curve for each axis can be created independently using the Curve Editor or can be set using an existing track from your library. |
| Source | Use another existing emitter particle information within the same network to generate particles. |
| Motion | Use an object as target to generate particles. At emission time the current position of the object (or bone(s)) will be used to generate the particles starting position. |
Central
Particles are emitted from the pivot point of the emitter.
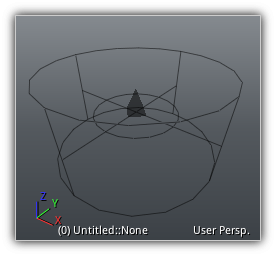
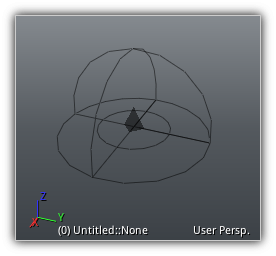
Cylindrical
| 
|
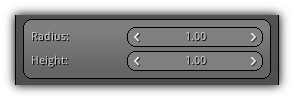
Radius: The cylinder base radius.
Height: The height of the cylinder.
Centered: Controls whether the pivot point of the cylinder is located at the center of the shape or at the base.
Step: If a value greater than 0 is specified this value will be used to increment the step every time a particle is generated forcing them to be generated in a circular fashion around the cylinder base radius.
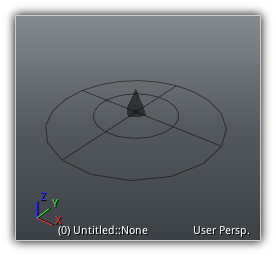
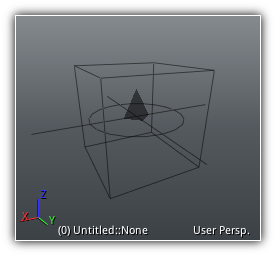
Conical
| 
|
Radius: The base radius of the cone.
Height: The height of the cone.
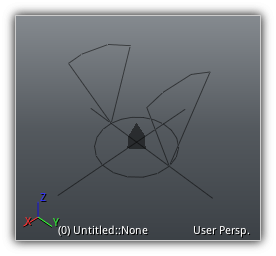
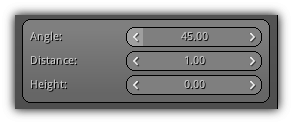
Sectorial
| 
|
Angle: The maximum angle of the sector.
Distance: The radius of the sector.
Height: The maximum spanning an area of the sector.
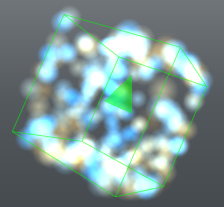
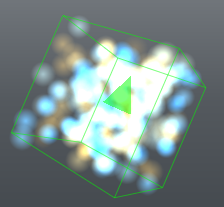
Cubical
| 
|
Size XYZ: Determine the size of the cube on each axis.
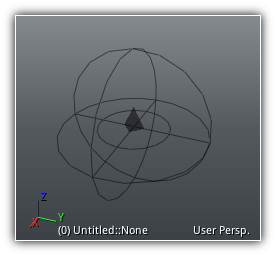
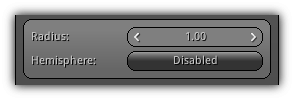
Spherical
| 
| 
|
Radius: The radius of the sphere where the particles should be spawned.
Hemisphere: Use a hemisphere instead of a full sphere to generate particles starting positions.
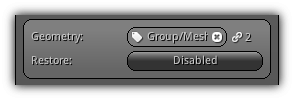
Shape
| 
|
Geometry: Select an existing geometry from the library. You can either type in the name of the asset or click the ![]() icon to populate the list of all existing geometry assets available within your library.
icon to populate the list of all existing geometry assets available within your library.
Restore: Force the geometry to be restored back to its original vertex position. Enable this option if you do not want to use the deformation on the vertex that other resources might have changed including resources using morph targets, skeletons or soft body physics.
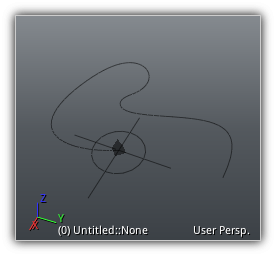
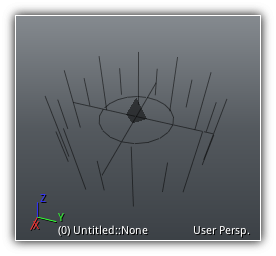
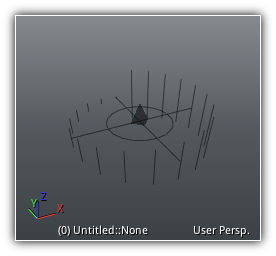
Wire
| 
|
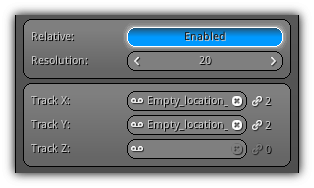
Relative: When enabled use the resolution value to compute the playback time of the curves. Instead, the emitter curves will sync themselves with the application time and evaluate the curves values using their individual playback time.
Resolution: The number of samples each curve should produce. The higher the value the more smooth the control points generated along the curves will be.
Track XYZ: Specify an existing track from the library to be used for each axis. Type the name manually or use the ![]() icon to pop up the existing list of all tracks available in the library of your project.
icon to pop up the existing list of all tracks available in the library of your project.
- Note
- If a track is not specified for an axis (or all axis) you can manually create a curve for each of them using the Molecules Curve Editor. To start editing the curves simply select the emitter from the Modifiers Editor to activate the curve editor.
Source
| 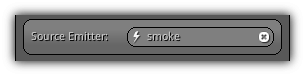
|
Source Emitter: The emitter to used to generate particles. Either type in the name of an existing emitter within the active particle network or click the ![]() icon to show to existing emitter list.
icon to show to existing emitter list.
Motion
| 
|
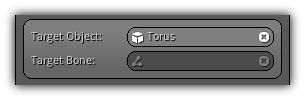
Target Object: The object to track to generate new particles positions. Type in a valid object name or click on the ![]() to show the list of the available object for the currently active scene.
to show the list of the available object for the currently active scene.
Target Bone: If the Target Object selected is a skeletal mesh you can also choose an optional bone of its skeleton to track. Enter a valid bone name; or simply click the ![]() to select one from the skeleton associated with the skeletal mesh.
to select one from the skeleton associated with the skeletal mesh.
Transform
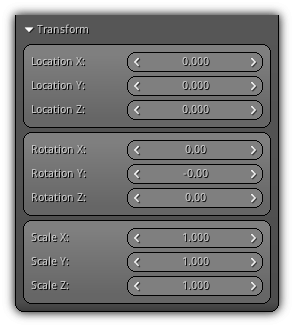
This section gives you additional control over the local transformation of the emitter. You can optionally add an offset to the particle emitter allowing you to create more complex effect surrounding the pivot point of the particle system.
Modifiers Editor
This section is used to visualize the content of your particle network presented into a table. To top of a column always represent an emitter followed by the list of modifiers where each of them filling an additional row.
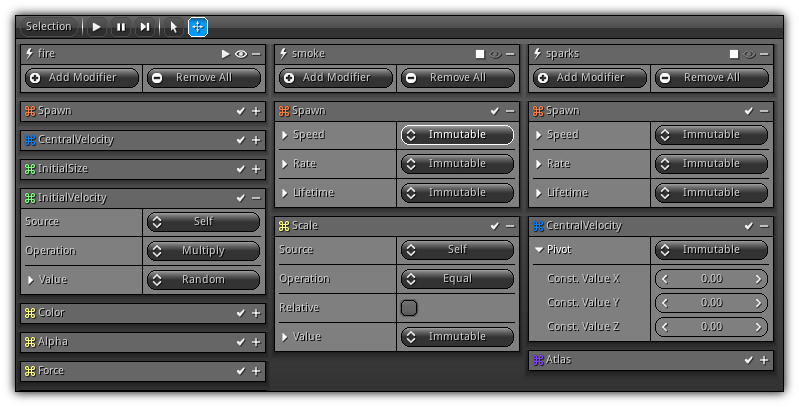
To reorganize the emitter list and reordering the drawing sequence of the emitters, you can simply select the emitter header at the top of the column and drag it to another row header to swap them. Same apply for modifiers; their sequence in the table have a direct impact on their execution. You can also manually change their sequence using the drag and drop operation described above within modifiers that resided inside the same emitter (in other words the same column of the table).
Menu & Toolbar
The menu for this section of the editor can be found in the toolbar at the top of the emitters and modifiers area. It is not located in the usual main menu bar like the other editors since the curve editor also has a dedicated menu.
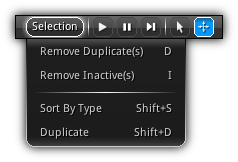
Remove Duplicate(s): Available when at least one emitter is selected from the grid. This action will analyze the current modifiers of all selected emitters looking for duplicates and remove them from the grid if necessary.
Remove Inactive(s): Also available when an emitter cell is selected this action will look for incompatible modifiers that are currently contained in your emitter table.
Sort By Type: Sort all the modifiers contained within the current emitter selection.
- Warning
- As the complexity of your emitter increase, it is recommended to sort and maintain the modifiers order manually since the system cannot predict all possibilities of drawing sequence.
Duplicate: Duplicate the current modifier selection and append it to their respective emitter.
The next section of the menu is dedicated to playback. The buttons located in this section allow you to quickly play, pause, step or stop the playback of your particle systems.
| Icon | Description |
|---|---|
| | Start increasing the application playback time and run a full sequential update; press again to stop, reset back the timeline to 0 and kill all existing particles (physics transformation will also reset). |
| Pause the playback. | |
| Increase the time step of one frame. This is the ideal method to use in order to debug the progress of your particles in space. |
The last section of the menu allows you to change the default behavior of the left mouse button (single click on mobile). Choose between pan mode or multi-selection mode.
| Icon | Mode | Description |
|---|---|---|

| Selection | The fastest way to select (or deselect) multiple columns and rows simultaneously in one action using a rectangular selection. Start by clicking where you want the rectangle to begin then drag the cursor where you want the rectangle to end; then release to multi-select. To append or deselect a cell hold the Shift key. |

| Pan | Click and drag on an empty space inside the cell list area then drag; as a result the table will be panned in the point device movement direction. |
Emitter Cell

Emitter cells are always located at the top of the network table as the first element of a column. The first element of the header is always the name of the emitter followed by a series of icons that controls either its behavior of the state of the cell itself. To change the emitters order drag and drop the cell header to the one of another emitter and release; therefore both emitter will swap.
| Icon | Description |
|---|---|
| | Controls the current/default state of the particle emitter. |
| | Controls whether or not the particles for the emitters are visible. Take note this option does not affect the playback of the emitter; only the visibility of its particles. |
| | Show/hide the active emitter box action buttons. |
Add Modifier: Pop up the list of all available modifiers for this emitter; to add a new modifier simply click an entry from the list. It will automatically be added to the active emitter. For more information about the behavior and properties of each particle modifiers please refer to the Particles Modifiers page.
Remove All: Clear out all modifiers for the emitter.
Modifier Cell

Each modifier will be added as a row to the emitter column where it belongs. Similar to the emitter cell the modifier cell header contains the name of the modifier and on the right icons allowing you to first control the state of the modifier (enabled/disabled) and the next one to reveal the properties available for the modifier. To remove a modifier from the table select it first by either clicking its header or by using multi-selection mode (available from the Menu & Toolbar); then press the Del key.
| Icon | Description |
|---|---|
| | Enable or disable the state of the modifier. When disabled the modifier will not affect the particle output. |
| | Open/close the active modifier box hiding or revealing its properties. |
- Note
- By default, a name will automatically be assigned when creating a new modifier; this name can be changed by selecting the modifier box within the list and press the
Enterkey. This action will allow you to customize the name of the modifier.
Number Distribution
Aside from the common visual controls used to represent a property like checkbox or spinners you will encounter a new type used to deal with variables and vectors that needs to be dynamically represented. This type requires you to select the number distribution you want to use to interact with the variable or vector. Refer to the table below to learn more about their usage:
| Distribution | Layout | Description |
|---|---|---|
| Immutable | 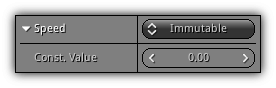
| A constant value that will affect the property. |
| Random | 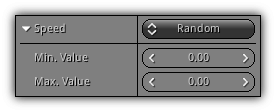
| A random value that will be generated using the min. and max. value specified. |
| Uniform | 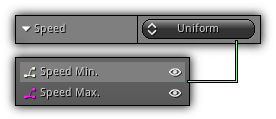
| A random value that will be generated using a min. curve and a max. curve. The random number to use will be evaluated after the values extracted from the two curves over time (emitter playback time). |
| Interpolate | 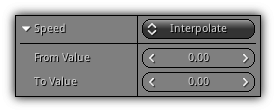
| Linearly interpolate between the From and To Value. |
| Driver | 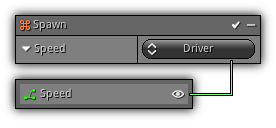
| A single curve to control the value over time (emitter playback time). |
- Remarks
- For the distribution type
Interpolationif aSpan Modifieris available and no relative for the modifier is provided the lerp function will use the ratio between the span time and the emitter playback time. If noSpan Modifieris available emitter playback time will be used as thetinterpolation factor.
Relative Distribution
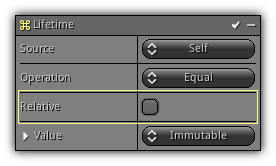
Another common option for number distribution usually available when the modifier process data during the update phase of the particle is the Relative parameter; which affect the time value that will be sent to curve(s) and interpolation.
When the relative options are toggled, the time that will be used by the distribution solver will be the particle lifetime ratio. The ratio is a value from 0 to 1 calculated by dividing the particle duration divided by its maximum lifetime. Using the relative option you can progressively interpolate values using the lifespan of the particles.
If the relative option is available but turned off; the particle emitter playback time will be used to evaluate the parameters.
Proportional Distribution
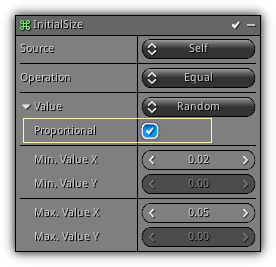
This option commonly found along with the various type of distributions give you the opportunity to affect the value to all components. As example in the screenshot above the above since the Proportional option is toggled the particle size will be affected on both the X and Y component instead on independently randomizing the size between the threshold specified.
Source & Operation
In addition to Number Distribution another important concept to grasp while dealing with the molecules editor is the data source and operation concept. All particles have an available data set created using the type of modifier you add to your emitter.
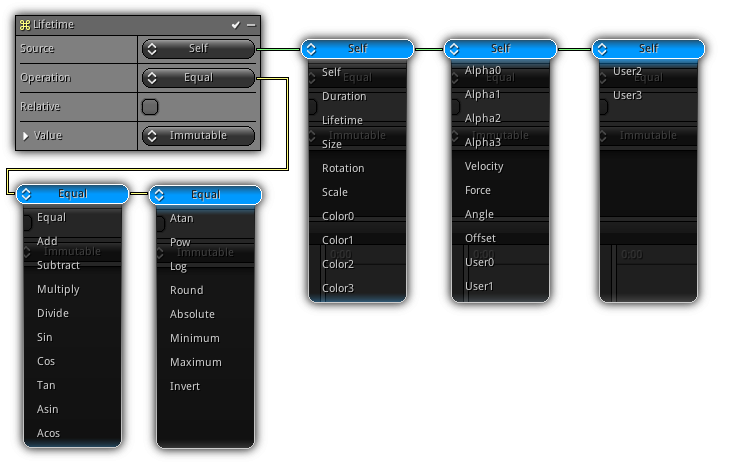
In example when any modifier that controls the Lifetime of the particle (either its initial value or update time) its creation will force the lifetime data to be created. This data can be reused by another modifier to affect other properties; ie. the velocity modifier (which will create the velocity data) can be controlled using the (ie) lifetime data available as a multiplier by selecting the Multiply operation.
- Note
- By default, every particle starts with basic data like
Lifetime,DurationandBasis Matrix. The reference toLifetimein the paragraph above is used as a hypothetical reference for the example sake only.
Logical Operators
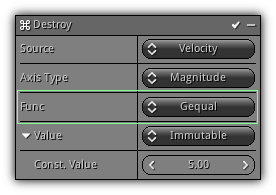
Logic operators are also available in some cases allowing you to make decision dynamically using a specific data. Just like in the screenshot above; this modifier (here the Destroy modifier) implement the following behavior: If the velocity of the particle is >= than 5.0 then kill the particle. Of course, more advanced and complex scenarios can be created (including more complex logic using scripts or plugins to directly access the particle data) giving you even more control over each and every particle and the way they behave in space.
Curve Editor

Located at the bottom of the center section of the molecules editor the curve editor allow you to create and edit curves based the type of number distribution you've selected for the active modifier. At the top of the curve editor, you can find the menu bar and toolbar to quickly access common functionalities of the editor.
On the right side; you can find the curve area where you can manipulate curves; on the top left is the active curve section that displays the current curve working set for your current modifier/emitter selection. Below, located at the bottom left, you can get access to the properties of the active curve(s) and keyframe(s).
The curve editor is designed to be consistent with the Curves Area of the timeline editor and share many of its functionalities; refer to its help learn how to manipulate this section.
To operate a specific set of curves simply select the modifier that has a distribution type set to either Uniform or Driver; once selected the related curves will automatically appear in on the top left section of the curve editor.
- Remarks
- In addition; if the emission type of particle emitter is set to Wire selecting the emitter itself from the table will allow you to manually edit the XYZ curve that will be used by the emitter.
View Menu
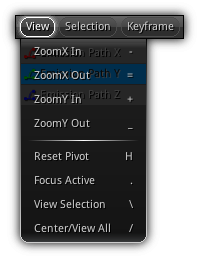
| Item | Shortcut | Action |
|---|---|---|
| ZoomX In | - | Increase the X axis zoom. |
| ZoomX Out | = | Decrease the X axis zoom. |
| ZoomY In | + | Increase the Y axis zoom. |
| ZoomY Out | _ | Decrease the Y axis zoom. |
| Reset Pivot | H | Reset back to view to 0,0 and the zoom to 1:1. |
| Focus Active | . | Adjust the view position and scale to focus the current active keyframe. |
| View Selection | \ | Calibrate the zoom and center position to encapsulate all selected keyframes. |
| Center/View All | / | View all active keyframes currently visible. |
Selection Menu
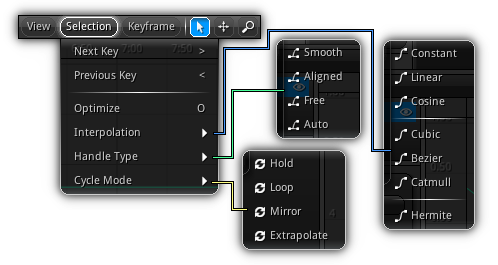
| Item | Shortcut | Action |
|---|---|---|
| Next Key | > | Activate the next keyframe. |
| Previous Key | < | Set the previous key as active. |
| Optimize | O | Optimize the current curve. The optimization process will automatically remove all keys that are duplicated over the curve and will eliminate redundancies. Consequently, the curve will only contains the keyframes that have a direct impact on its output value. |
| Interpolation | Set the interpolation method of all selected keyframes. | |
| Handle Type | Specify the type of handle for all selected keyframes. | |
| Cycle Mode | Set the interpolation method of the active curve. |
- Note
- For more information concerning Interpolation, Handle Types and Cycle Modes please refer to the Timeline Editor associated help sections.
Keyframe Menu
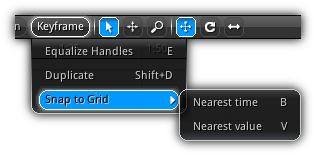
| Item | Shortcut | Action |
|---|---|---|
| Equalize Handles | E | Equalize the handles of all selected keyframes only if the Interpolation is greater or equal than Cubic. |
| Show Key(s) | F | Show/hide keyframes. |
| Snap to Grid | Snap the current keyframe selection based on a predefined method selected from the pop up menu either time or value. | |
| Duplicate | Shift+D | Duplicate the current keyframe selection. |
Toolbar
Controls the left button behavior and the type of manipulation that will be applied when dragging selected keyframes.
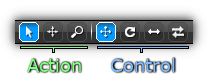
Action
Defines the default action of the left button.
| Icon | Mode | Shortcut | Description |
|---|---|---|---|
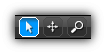
|
| Selection | Use this mode to single or multi-select keyframes from the current channels that are visible. Hold the left button and drag to create a marquee selection; release to confirm. | |
|
| Pan | Shift+Alt+Left Button | When pan mode is selected click and drag using your left mouse button. This action will cause the curves area grid to scroll using the active pointing device direction. |

| Zoom | Ctrl+Alt+Left Button | Zoom in on a specific axis determined by your pointing device direction (either X, Y or both) by dragging it while holding the Left Button. |
Control

Determine the type of control operations will be used when dragging selected keyframes within the Curves Area.
| Icon | Mode | Shortcut | Description |
|---|---|---|---|

| Translate | T | Toggle the translation mode when dragging selected keyframes. |

| Rotate | R | Toggle the rotation control to use when manipulating selected keyframes. |

| Scale | S | Toggle the scale mode to operate the selected keyframes. |

| Shift | M | Optionally shift the keyframe(s) past the active selection during transformation; or hold Ctrl while dragging the active selection. |
- Note
- During any of the operation listed above you can hold
XorYon your keyboard to constraint the axis plane to operate on. In addition, while dragging holdingShiftwill smooth the movement to increase precision.
Active Curves
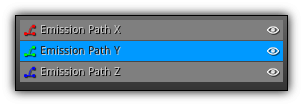
To activate a curve to work on simply select it by tapping on it, if it is invisible it will automatically appear. To change the visibility of a curve click the ![]() icon.
icon.
To change the visibility state of all available curves in batch, hold Shift while activating/deactivating the icon to set all available curves state to be the same as the selected curve. To invert the visibility state of all curves hold Ctrl+Shift while pressing the ![]() icon.
icon.
Properties
Controls the basic properties of the curves and selected keyframes.
Curve
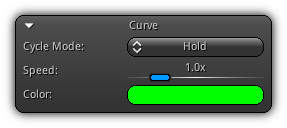
Cycle Mode: Defines how to cycle the curve when the last keyframe is reached (refer to Cycle Modes for more information.)
Speed: Controls the playback speed of the curve.
Color: A unique color to identify the curve on the graph.
Keyframe
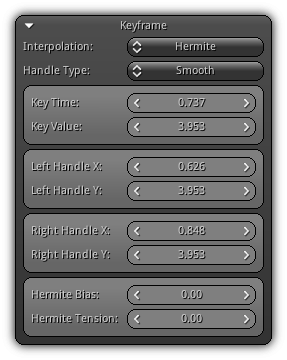
Interpolation: Select the type of Interpolation to use for the active keyframe.
Handle Type: Specify the type of handle to use. For more information refer to the Handle Types section.
Key Time: The playback time of the keyframe.
Key Value: The value for the active keyframe.
Left Handle XY: The position of the left handle on the X and Y axis of the curve area grid.
Right Handle XY: The position of the right handle on the X and Y axis of the curve area grid.
Hermite Bias: Available only when the interpolation type is set to Hermite this extra value allow you to add an arbitrary bias on the keyframe.
Hermite Tension: For Hermite interpolation type only this value adds tension on the keyframe giving you extra flexibility on the smooth factor of the keyframe.
Curves Area
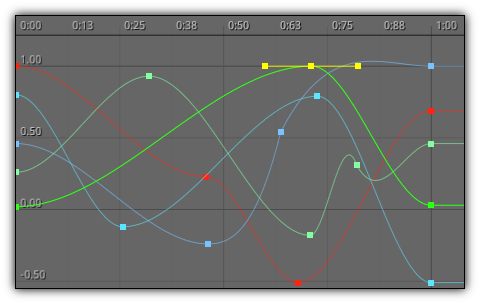
The curve editor allows you to manually create and edit the curves available within your modifiers and emitter. To control keyframes once available on the grid; simply select then drag and drop; based on the control type selected in the toolbar the proper transformation will be applied.
| Shortcut | Description |
|---|---|
Ctrl+Left Button | Select/deselect all keyframes from a curve. |
Left Button 2x | Add a new keyframe to the active curve. |
Shift+Left Button 2x | Double tap to insert a new keyframe at the pointing device location. |
Del | Delete the current keyframe selection. |
Backspace | Remove all keyframes contained in the active curve. |
|
|