
When you first start the NRGeditor you should see a screen similar to the one in the screenshot below (might slightly change depending on the version and platform you are using).
The first window that you might have noticed is the Project Manager. The Project Manager gives you quick access to your current project(s) and allow you to create new ones. In addition, once you are done developing a project you can publish them using the extended deployment options for the platforms(s) that you are targeting.
Command Arguments
On a desktop PC, you can start the NRGeditor from the command line or the shell by passing any combinations of the following parameters to control various visual/display options of the OpenGLES context will use.
Usage: NRGeditor [OPTION] [PARAM] ...
| Option | Description |
|---|---|
-red | Specify the desired bit for the red component of the default backbuffer(default:8). |
-green | Specify the desired bit for the green component of the default backbuffer(default:8). |
-blue | Specify the desired bit for the blue component of the default backbuffer(default:8). |
-alpha | Specify the desired bit for the alpha component of the default backbuffer(default:8). |
-depth | Specify the desired bit for the depth component of the default backbuffer(default:24). |
-stencil | Specify the desired bit for the stencil component of the default backbuffer(default:8). |
-samples | Set the amount of samples to use for anti-alias (MSAA) (default:4). |
-vsync | Enable/Disable vertical synchronization (default:0). |
-fullscreen | Create a full screen window (default:0). |
-border | Determine if the window should have a border or not (default:0). |
-help | Display this help. |
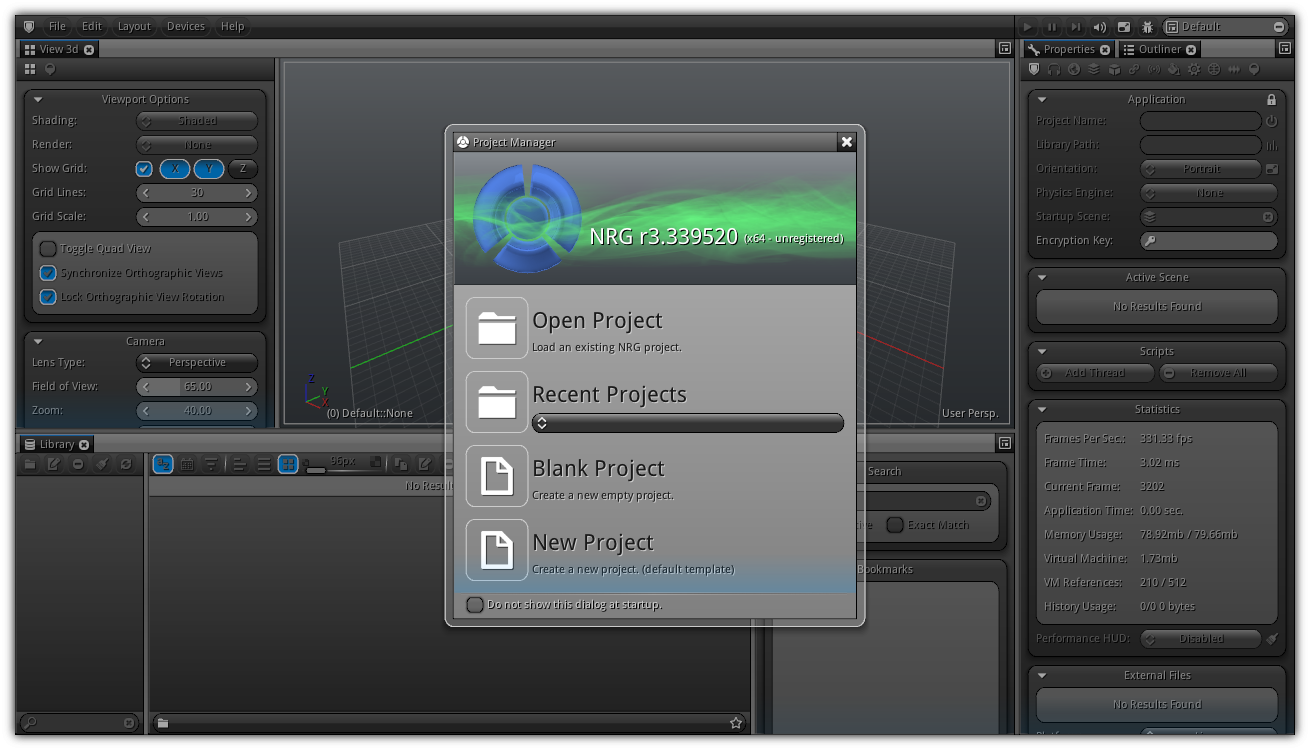
Please take note the Project Manager is always displayed as a topmost window to prevent any changes to the current project while publishing or while manipulating an existing project. To close simply click the X button and the current workspace will be focused.
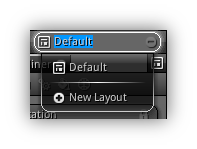
In NRGeditor every delimitation of the layout can be "cut" into separate areas that can hold multiple editors. In addition, you can also create multiple workspaces that are optimized for the type of work that you are doing switch between them easily using the interface or your keyboard. By default, two types of predefined layout are bundled with the editor. A minimal layout optimized for mobile tablets and the default layouts more suitable while working on a desktop PC. They both can be toggled at will from the Layout menu always available from the Main Menu.
Creating Workspaces
| Always accessible at the top right of the editor
is the workspace layout box. This box allows you to create, delete a workspace or
manually select an existing one.
|
 |
Cycle Layouts
Once you have multiple workspaces you switch between them by either selecting an entry from the workspace box list, or you can cycle through them using the keyboard shortcuts listed below:
| Shortcut | Action |
|---|---|
Alt+Left Key | Jump to the previous workspace on the list (if any). |
Alt+Right Key | Jump to the next workspace on the list (if any). |
To delete a layout (at the exception of the first layout which cannot be deleted) simply select or cycle to it and press the remove button ( ![]() ) located on the right side of the workspace layout box.
) located on the right side of the workspace layout box.
Adjusting Workspaces
For each workspace area located at the
top right you can find the editors button ( ).
Click on it to reveal the layout menu to set the type of editor you want to display in the current area. Basically, the layout menu contains two
sections, an editor section
and an action section.
As quickly mentioned earlier each section can contain as many editors as you want.
To add/append a new editor for the current area simply select it from the list by clicking on it. For each editor that you are adding a new tab, it will be created. ).
Click on it to reveal the layout menu to set the type of editor you want to display in the current area. Basically, the layout menu contains two
sections, an editor section
and an action section.
As quickly mentioned earlier each section can contain as many editors as you want.
To add/append a new editor for the current area simply select it from the list by clicking on it. For each editor that you are adding a new tab, it will be created.
To select a specific editor from the tab list simply clicks on it. If your area tab bar becomes too crowded with editors you can scroll it by selecting an empty area with your touch or your left mouse button and drag it either left or right to hide/reveal tabs, double click or tap will restore the scroll back to its default position (just like on any other panels). To get you started and to learn the NRGeditor more quickly find below a list of all editors available along with a short description for each of them. |
| Editor | Description |
|---|---|
| | Reserved for advanced users or programmers the console allows you to monitor all the scripting commands either sent or received by to the server. In addition, the console allows you to run live unprotected scripting commands and monitor the state of each running thread(s) and their resource reference. |
| | The view 3d is acting as a level editor that allows you to control and manipulate the different aspects of your scene in real time; it is basically the core editing tool in NRGeditor. |
| | The properties editor is where all the different settings of your application resources and assets can be accessed from. From materials to physics each categories gives you access to all the real time properties that can be controlled from within the editor. |
| | The Outliner list all the objects currently available and loaded in your scene as well as their different types and states. It contains search functionalities that allows you to quickly locate or sort a specific object or object type. |
| | The library editor is acting like a file explorer and allows you to manipulate the assets that are part of your project. In it you can organize assets and folders, list and preview all the resources and folder that your project contains/currently loaded. |
| | The code editor is where you can code Scripts, Utilities as well as GLSL shaders. It contains a built-in Lua debugger allowing debugging locally or remotely your code. And an optimizer to improve the performance of your shader(s). It is not only ideal for programmers but for artists as well since it contains a visual node editor that work in conjunction with a code generator that allows you to build shader(s), utilities (graphical or console based) and scripts without touching a single line of code. |
| | Allows you to deal with linear animations and create and edit actions, channels, curves and tracks in real time. You can also use the timeline editor to record key frames, physics data as well as camera path and other various type of curves that are using scripting properties and values. |
| | Creates cinematics movie like sequences using the objects of your scene to build non linear actions that can be played in realtime. It is ideal for creating in-game cut scenes and short animated film. |
| | This editor will allow you to create particle system procedurally and gives artists and programmers and easy way to create high-end visual effects like smoke, rain, snow, fire, lightning, explosions and a lot more. The Molecules editor control the behavior of particle networks by a modular approach to create extremely complex effects without a single line of code. |
| | The audio mixer allows you to visualize in real time what your audio hardware is processing. As the complexity of your project grow, so does the number of explosions, gun shots and other different sounds that are all playing simultaneously by your mixer. |
| | Allow you to create complex machine state hierarchies to mix any type of existing actions. It is ideal to create complex skeletal animation etc... either controlled by AI or user input. |
To add a new editor to the area that contains the area button simply click on one of them. You can add as many editors as you want per area, and toggle them using their related tabs.
Adjusting Areas
To split the current area you can choose between "Split Vertical" or "Split Horizontal". This action will split the current cell in half using the cut direction that you have specified. To cut and area in two you can also use your pointing device and keyboard by first selecting an area grip located on at least one of the edge of the area; then use the following shortcuts:
| Shortcut | Action |
|---|---|
| Alt+Left Button+Drag | Split the current area in the same direction as the grip is oriented. |
| Ctrl+Left Button+Drag | Merge the current area with the one aligned with the current grip selection. |
Main Menu
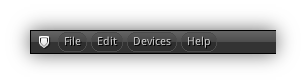
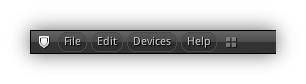
Since the editor can run on all platforms from desktop to mobile tablets, the way menus are implemented is a bit different from conventional software. At the exception of the main menu ( ![]() ) which remain static at all time (since the operations it contains are re-used by most of the editors). All other editors have a specific menu that can be accessed when the editor as soon as the editor receives the focus (in other words any of the widget contains within the editor is selected). In addition, at anytime you can collapse active menus by clicking their icon to maximize the menu bar spacing.
) which remain static at all time (since the operations it contains are re-used by most of the editors). All other editors have a specific menu that can be accessed when the editor as soon as the editor receives the focus (in other words any of the widget contains within the editor is selected). In addition, at anytime you can collapse active menus by clicking their icon to maximize the menu bar spacing.
Main Menu Open (no editor selected)
Main Menu Open + View 3d Menu Closed

Main Menu Closed + View 3d Menu Open

Main Menu Open + View 3d Menu Open
- Note
- On lower screen resolution it might gets harder to select the underlying scrollable widget of a menu, panel, text area or tab bar. To make things easier, regardless of where your touche or cursor is located on the interface you can always have access the underlying scrollable base by pressing the
Altkey on your keyboard and then drag/scroll. To reset the scroll of a scrollable widget, simply double click or tap on it.
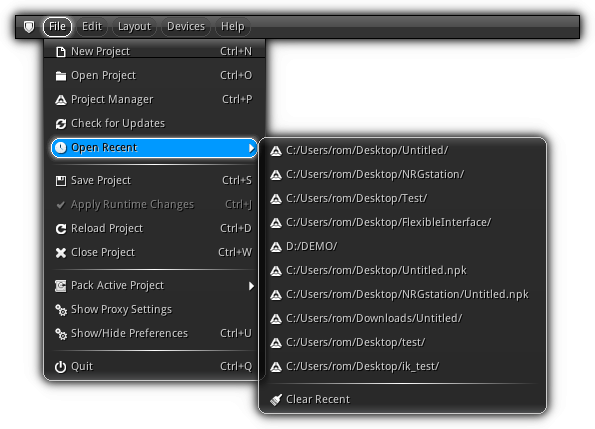
File Menu
| Menu Item | Action |
|---|---|
| New Project | Create a new NRG project. For more information concerning the New Project dialog please refer to the Project Manager help page. |
| Open Project | Open the File Explorer in folder selection mode allowing you to select and load an existing NRG project from your local machine or from a remote network drive.
|
| Project Manager | Open the Project Manager. |
| Check for updates | Only available on the desktop version of the editor. This item allows you to manually check for software updates (Internet connection required). |
| Open Recent | Pop-up the list of the latest projects successfully loaded inside the NRGeditor. To clear the list, simply click or tap the Clear Recent button. To increase amounts of items contained inside the recent list consult the Preferences. |
| Save Project | If a project is currently open by the editor clicking this item will save your project and its latests changes. |
| Reload Project | Reload the current project; if the project haven't been saved all latest modifications will be lost. |
| Close Project | Close the current project (if any), if you have unsaved changes make sure you save before closing. |
| Apply Runtime Changes | Allows you to run all the scripting commands emitted during runtime and apply them to the project. This is a useful feature that allows you to transfer to the active scene all changes and tweaks that you have made while running your app. inside the NRGeditor. |
| Pack Active Project | Allows you to quickly compress the current project to an NRG package ( Based on your selection, the To generate a self publishing settings file that will automatically launch and run the |
| Show Proxy Settings | Open the Proxy Settings dialog to setup an HTTP proxy server to authenticate your certificate and access software updates. |
| Show/Hide Preferences | Open the Preferences dialog allowing you to customize the look and feel of the interface as well as the various editors and their behaviors. |
| Quit | Exit the NRGeditor (desktop platforms only). |
Proxy Settings
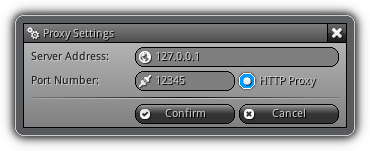
Proxy Settings can be used as an alternate method to access the software updates and certifcate authentication process. It allows you to setup a proxy server address and a port number to contact using a tunnel the nrgcore.com web server.
This feature is experimentatal; at the moment only HTTP tunnels are supported; future version might also include SOCKS support if requested.
Server Address: The IP address of the proxy server.
Port Number: The port number to use when contacting the proxy server.
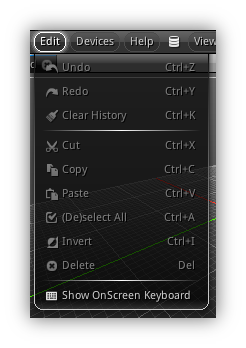
Edit Menu
| Menu Item | Action |
|---|---|
| Undo | Send to the command server the necessary scripting instructions to undo your last steps (if any). |
| Redo | Send to the command server the necessary scripting instructions to redo your last steps (if any). |
| Clear History | Clear the undo/redo instructions list. The undo/redo history size in memory can be monitored from Properties > App > Stats panel. By default the history rely on the system memory size, clearing history when saving your project is good practice. |
| Cut | Cut the currently selected text, color, asset, object, node blocks etc... and store the generated scripting commands in the clipboard |
| Copy | Copy the selected text, color or scripting commands and keep it in the clipboard. |
| Paste | Paste the current content of the clipboard on the currently active or focused widget. |
| (De)select All | If nothing is deselected it will select everything and if everything is selected it will deselected them. This is effective for text, objects, assets, nodes etc... |
| Invert | Invert the current selection. On a side note this also apply to as the previous menu items of the type and is also effective for text, objects, assets, node blocks etc... |
| Delete | Delete the current selection( also eligible for text, objects, assets, nodes etc...) |
| Show/Hide OnScreen Keyboard | Basically only useful when using the NRGeditor on a mobile tablet, this on screen keyboard (aka Coder Keyboard) is a replacement of the default keyboard that mobile operating systems provide.
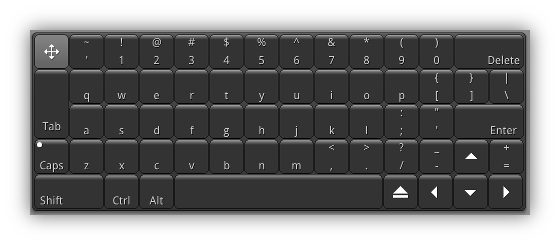 All these "mobile keyboards" are basically optimized for the web or for typing simple text but when it comes to coding keys generally used in programming languages including Lua and GLSL area hard to get access to frequently used keys. The OnScreen Keyboard operate like a generic desktop keyboard you can move around anywhere on the screen by dragging the four-sided arrow button (top left); and hide it using the eject button (between the space bar and left arrow). On a tablet's touch screen you can show or hide the keyboard at any time by tapping the screen once with five fingers. |
Layout Menu
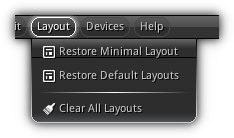
Restore Minimal Layout: Clear all layouts and reset the workspace to compact all in one view.
Restore Default Layouts: Clear all layouts and reset the workspace to multiple layouts was each of them is optimized for a specific task.
Clear All Layouts: Remove all existing layouts.
Devices Menu
One of the most useful features of the NRG ecosystem is the ability to connect and synchronize other devices with the project loaded in the editor. You can sync your whole project and remote debug a running instance of your app. on another device or use an existing mobile device as an input device to emulate touch screen, accelerometer, and gyroscope on a desktop PC and more.
All you have to do is to first download and install the Viewer (download links for each platform is available to you from your developer control panel). Here's a quick rundown of the steps that you have to do to scan and connect a device to the editor:
- Download, install and run the Viewer on the device(s) that you want to sync or use an input device.
- Start or open an existing project inside the NRGeditor.
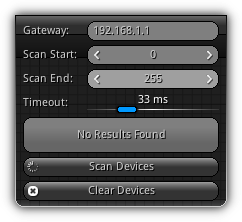
- Open the Devices Menu and enter the
Gatewaywhich represent the base IP address to start scanning. - Next specify the range of the IP to scan (stard and end), this action will determine how many IP addresses have to be scanned.
- Press the
Start Scanningbutton. Devices that have been detected will be kept "alive" within the list; to restart fresh and forget all device(s) detected press theClear Devicesbutton.
- Note
- Optionally you can adjust the
Timeoutwhich is the maximum time allowed for the Viewer to respond to theping(recommended 33 ms. or 30 fps.) that the scanning process will send. Depending on the speed of your network you might want to increase these settings to give more time to the NRGviewer(s) to respond. In addition, if you are not sure about the IP configuration of your network confirm with your new system administrator to learn which settings to enter.
 |
 |
You can stop the scanning process at any time by pressing Esc on your keyboard or if you are running the NRGeditor on a tablet tap the screen once with four fingers (equivalent to Esc on a touch screen). At the end of the scanning process all eligible devices that you can use with your current project will be listed.
- Note
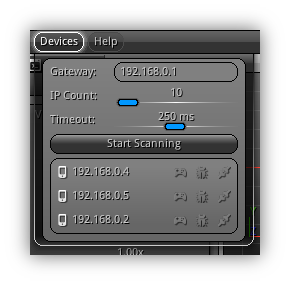
- Just to give you a glimpse of the possibilities and to show you how much flexible the NRG core system is; in the example above the NRGeditor is running on MacOS X, and the client is running on an iPad (192.168.0.4), an Android tablet (192.168.0.2) and Windows under Virtualbox (192.168.0.5). This is just an example but you can, of course, do any sorts of combinations between all the platforms supported by NRG and have multiple devices connected to the same project in real time.
Connect
Once a device is listed you have the choice to either connect to it and synchronize your project ( ![]() ) or use it as a joystick (
) or use it as a joystick ( ![]() ). In joystick mode once you push the
). In joystick mode once you push the Play button from the Workspace Controls all inputs received by the device will dispatch to the NRGeditor and translated into runtime events. Which means while developing on your desktop computer you could use your (ie) phone accelerometer and touch screen to control your app to simulate how the controls would react if your app. was running on a that specific mobile device.
Remote Debug
The last button that has to be covered from the device entry list is the debug button ( ![]() ). This button allows you to launch Ldb (the NRG built-in Lua debugger) on the connected device.
). This button allows you to launch Ldb (the NRG built-in Lua debugger) on the connected device.
Once activated and an exception or a breakpoint is hit you will automatically be able to visualize from within the NRGeditor the current call stack, examine variables values and more.
- Note
- You can only debug when the connected device is synchronized with your project; this option is not available when the device is used as input (joystick mode).
Help Menu
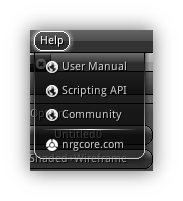
| Menu Item | Action |
|---|---|
| User Manual | Open this help in the default browser set for your platform. |
| Scripting API | Open the scripting and programming API reference website. |
| Community | Redirect your browser to the NRG community website to contact the NRG developers, ask questions and interact with other NRG users. |
| nrgcore.com | Load the NRG website to stay up to date with the latest news and goodies from NRG and its community. |
Workspace Controls
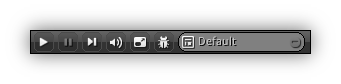
Located at the top right of the NRGeditor interface is workspace controls which just like the main menu are always visible. Once a project is loaded, most theses tool buttons allow you to control the state of your app. At the exception of the layout and workspace box, all other buttons of the workspace controls are listed below along with the behavior(s) they control.
| Control | Description |
|---|---|
| | Play/Stop the application (hold Shift to save before starting). Technically your application will run the same way as it would be when you are publishing it. When in full screen mode all local (or remote using the NRGclient) events will be translated to runtime events. If changes have been made during runtime you can apply them using the Apply Runtime Changes (or Ctrl+J) from the File Menu. |
| | Pause the running application. Before adjusting or tweaking parameters or properties (especially on a dynamic object or asset) it is generally recommended pausing first to freeze the runtime execution to be able to make some changes. |
| | Step the running application; this button allow you advance the application time of one frame. This is ideal while debugging physics, sequences, animations, particle networks etc... |
| | Turn On/Off all sound effects. What this does in the background is nothing more than overriding the listener volume setting and force it to be set to 0. |
| | Toggle On/Off full screen mode or alternatively
|
| | Start/Stop the built-in Lua debugger (aka Ldb) on your local machine. |
Unified Scrolling/Panning
At any time to pan a control area without selecting the underlying button or slider or cursor in a text area you can hold Alt+Left Button or simply the Right Button (aka three taps on mobile) and then drag to scroll the active content. To restore the scroll offset to its initial position double tap/click on the base control.
- Note
- If you are on a touch screen once
One Tapis always considered theLeft Button, three taps are the equivalent forRight Button.

When a control within an area are masked (meaning that there is still some widgets available but they are currently not in the visible scope) you will see a colored gradient just like the one highlighted (yellow box) in the screenshot above; either located at the top or bottom of the base control. To reveal the hidden content you can either use the pan shortcuts or directly click and drag on the control (when available) to reveal the hidden widgets.
Tooltips
By default, tooltips help are enabled and give you access to quick help when your mouse or finger hover a widget that contains help. At any time while the tooltip is open you can press Ctrl+Shift on your keyboard and left click/tap once to open your default web browser and jump directly to the associated help section.
For advanced users that do not need the tooltips; you can always turn this feature off by accessing the Preferences > Settings > Misc. > Tooltips and disable it.
|
|